DIY family photo album scrapbooking design ideas. The magical world of scrapbooking: six ideas for creating family photo albums. Making an album cover
Scrapbooking is the art of creating and designing original photo albums. The main goal of this direction of needlework is to turn a boring photo album into a unique story from our life. In this article, you will learn the history of scrapbooking, as well as how to make an album cover, binding and secrets.

In the 16th century, notepads were popular for writing down important dates, quotes, recipes, and more. At the end of the 17th century, a book appeared in which there were additional blank pages so that the owner himself could paste the illustrations he liked. After the advent of color printing, collectors actively began to collect cut-out images in their albums. This was the beginning of the development of scrapbooking.

In the 19th century, when photography began to actively develop in scrapbooking, a real revolution took place: they started special pockets for photos and colored pages on their own. Girls' albums with drawings, photographs, stickers and secrets became popular. Today there are many styles of scrapbooking and it has regained popularity all over the world.
Scrapbooking album, do it yourself
Scrapbooking photo album cover
Materials:
- canvas;
- cardboard or paper with millimeter markings;
- synthetic winterizer;
- PVA;
- cardboard;
- scissors;
- eyelets;
- rings.
- Decide on the dimensions of the album. In our master class, the album turned out to be 30 × 30.
- With the help of a cardboard or a sheet, measure on a regular cardboard 30 cm long and 30 cm wide.

- Cut a piece of synthetic winterizer of the same size.
- Glue the synthetic winterizer onto the cardboard with PVA glue.
- Cut off a square of canvas, while making a margin of 1 cm on each side, so that it is convenient to stick. Glue the canvas on the padding polyester.
- To close the pieces of material, a sheet of cardboard is glued on the inside. The back cover for the album is ready.


- Glue a synthetic winterizer on the front of the cover, and canvas on top, but without a window.
- Now carefully cut out the window and glue the edges to the cardboard.

- Make holes for the eyelets at a distance of 2 cm from the edge.

If you want the album to be not on rings, but like a bound book, then do not make holes for the eyelets. You can decorate the cover to your liking, not necessarily the same as in the first master class.

Sheets are needed to complete the album. It is best to use cardboard. Also cut additional strips, 2-2.5 cm wide, for gluing the main sheets together. Ready-made color pages, such as paper or thin cardboard with color prints, will also come in handy.

On each strip in the center, measure a strip 2-4 mm wide, for this you can use a pen that does not write or a sharp object. This is done so that the album can store voluminous decorations, for example, convex flowers made of paper. The edges of the strips must be cut at an angle of 45 degrees on both sides. Bend the strips so that the marked strip remains in the center, and start gluing to the pages. All pages must be glued evenly so that the album also comes out even, and not skewed.

You can determine the number of pages yourself. After the middle of the album is ready, we start binding. To do this, take a gauze or bandage, cut a strip along the height of the album and at the same time 1.5-2 cm more width. Now you need to take a piece of braid or tape and stick it on the top and bottom edges of the binding. The lace will make the edges look aesthetically pleasing, and the binding will also be more durable.

From thick paper, make a spine that completely closes the binding and protrudes 1-1.5 cm. Attach it to the album, and glue the cover on top of the folds of the spine.

Do not glue the spine itself to the binding, otherwise the pages of the album will not open freely. Open the cover and glue the protruding layer of bandage or gauze and the ends of the braid to it. The most convenient way to do this is not with PVA glue, but with a transparent “Moment”.


Everyone who wants to make a photo album plans to make it interesting, beautiful and original. Sometimes the volume of the album does not allow to place a large number of photos in it, so we suggest unique idea for its design.

Secrets is a way of arranging inscriptions, drawings or photos, which is known to every schoolgirl who had an “album for a girl”. There are several options for their design for a photo album.
- Secrets on the basis of a postcard. Make a postcard in the background color of the album page. Glue the main photo on the front side, and a secret inside. The flip page can be secured with tape, a clasp, or a cord.
- Secrets in pockets. Think in advance where such a pocket will be located and make it in the color of the page. Paste the main photos on top and decorate the page. Do not forget to put a secret photo in the pocket. In the photo, it is better to make a loop or make a hole for the grommet so that it is convenient to pull it out. You can decorate the pocket in such a way that additional pictures are pasted on it and visually hidden.

Thanks to the secrets on one page of the photo album, it is easy to stick a vertical and horizontal photo. Also, the photo itself can become a pocket for another one. You can stick a photo on a postcard and glue a few more photos inside. “Sandwiches” made of photo and paper look original, thanks to which you can hide a few surprises on the page.

Do you want to stick a large photo in the album, but feel sorry for the place? Glue the photo on a piece of paper in the background color so that it is convenient to stick the fold to the base of the album. Now the large photo can open, and paste other photos under it. Secure a large photo with thread or a lock. In the same way, it is easy to stick many more photos, if instead of a large photo you use a few small ones, and save the technology for secrets.

To make your album look creative, cut off the vertical or horizontal parts of individual pages and decorate them as if they were a continuation of the next page. Do not forget that it is permissible not only to stick a photo, but also to sew it on. This will add flair to ready product. Sew some photos with an accordion and fasten to a cord.

If it seems that some photos do not fit into the plot, hide them behind a decorative door. For children's albums, use drawings of flowers or animals, behind which secrets will also be hidden.

Also watch the video: Scrapbooking: DIY Wedding Photo Album
It all depends on the preferences of the owners of the future family heirloom and the style of execution. See more crafts in this.
Instruction
Buy at the store album for photos. Better if it will album neutral color with blank pages. This will allow you to design it in full accordance with your taste, nothing will limit your actions. Start your design with the cover. It can be decorated with magazine clippings, embroidery or simply painted. Another option is to cover the cover with fabric. For this, a diaper is very suitable, in which your baby was wrapped when discharged from the hospital.
The birth of a child is preceded by a wonderful time in the life of a young couple - and the anxious expectation of the birth of a new member of their family. Dedicate the first pages to this time album a. Paste photos of mom, first pictures baby on an ultrasound. Do not be too lazy to write down your impressions of this time, while the memories are still fresh. Describe how you felt, how you communicated with your child, how dad stroked his tummy and put his hand on it when the baby moved.
Paste in album your very first photo baby. Let it be a picture taken by a mobile in the hospital. But this is the first photo of a new person, and she has the right to take her place of honor. On this page, tell us about your emotions that you experienced when you saw the child for the first time. Indicate the date, time, weight and height. Then describe how the name was chosen, what it means.
Discharge from the hospital is one of the most important moments. Tag it in album e baby. Tell us about this day - how happy the relatives were, what flowers dad gave mom when they met. Take a big photo baby, paste it in album, and next to it - photos of parents. You can write your assumptions about what features the baby looks like mom, and what kind of dad.
There is a very popular technique with young mothers filling album his baby. Take a picture of a child next to a large toy. And take pictures like this regularly. As the child grows, it will be possible to observe how he will first catch up with the toy in size, and then outgrow it. Such a series of photos will look pretty funny.
The main thing in maintaining such album a - the regularity of its filling. Try not to throw it away, make notes constantly. Glue strands of hair into it, decorate album hand and footprints of your child. Dilute photos with memories, favorite poems and fairy tales that you read to your baby. In the future, you will open such album and scroll through it with pleasure, remembering all the pleasant moments of the first days of your child's life.
Well, hands came to prepare a master class on making a photo album from scratch)))
This is always a very inconvenient process, because. you need to have time to take a picture with one hand, and with the other, cut the paper and glue the details at the same time)))
Many operations are done so quickly and almost unconsciously that sometimes you don’t have time to fix such moments)))
Nevertheless, I made this MK! Of course, it is better to watch and repeat everything live, but many do not have the opportunity to attend a live Master class, they have to learn from photographs.
I am ready to answer your questions and help you as much as possible)
1. First, prepare the paper. For the manufacture of photo albums, special scrapbooking paper is used. It does not contain acids that can spoil your photos in the future and its quality is the so-called archival quality, that is, the paper should look perfect for at least 70 years. Many needlewomen manage to print the pattern they like on a color printer, but I recommend not experimenting. Scrapbooking is a fairly new trend in Russia, at most a dozen years old - during this time it is quite possible that the pages printed on the printer on acid-rich paper have survived. But do you hope that the album will be considered by your grandchildren, great-grandchildren and other subsequent generations? What will happen to your photographs in 40 or 70 years? It seems now - it's so long ... And time flies very quickly and you always need to remember about the future)
Also, the albums self made very expensive and it will be very disappointing if after 20 years the photos are hopelessly damaged, and the paper simply crumbles from antiquity (for ordinary paper of non-archival quality, the shelf life and shelf life is 25 years maximum).
Before starting to create an album, decide on a theme (decide at least for whom the album will be created - for a boy or a girl, a man or a woman, a colleague or a close friend), so as not to get a mixture of styles in the end.
Since this album was created for a newborn girl, the paper was chosen accordingly.
The number of sheets is selected individually, according to your idea.
To decide on the range, initially take a little more paper than you need, lay the sheets side by side and choose pairwise combinations that you like best and that look harmonious side by side.
Pair separation is necessary in order to make harmonious album spreads that will not drown out or spoil each other.

2. Preparation of tools and decor. In addition to paper, you will need scissors, double-sided scrapbooking tape (it is made on the basis of special glue), mock-up or stationery knife, hole punches, edges and corners, ribbons, lace, flowers, buttons and other decorative elements that you want to use in the album.

I usually collect everything that I would like to use, and in the process of work I sweep away the unnecessary, choosing only the most necessary details.

I store buttons and small items (brads, anchors, etc.) in containers, sorted by color. So it is more convenient to select according to the scale.

For tapes, for example, there is such a container in which coils of tapes are stored in compartments. If necessary, pull out as much as you need, cut off and the rest of the tape remains in the container. Very comfortably.

3. Compiling a composition. When I make an album, I lay out the sheets in pairs - the way they will be placed in the album. This is necessary to arrange all the elements harmoniously so that one page does not conflict with another.
We lay out the necessary elements on the pages, look, add something, remove something.
Gradually we begin to attach the decor.

4. Making corners. When I didn’t have a hole puncher for photo corners, I made do with homemade corners. I really like them and still use them often. They are reliable and plump, I like them much more than the corners from the hole punch)))
Draw squares on the back of a sheet of paper. I take as a basis the width of the metal ruler - the side of the square is 2.5 cm - this is enough.

Cut out, fold diagonally right side out and walk along the edge of the cut with a pad of paint. Again - use special scrapbooking materials in your work, they are developed specifically for archival paper and photographs. This pleasure, of course, is not cheap, but it is spent wisely, and for example, I don’t have crazy expenses for such consumables - everything is even.

Next, apply to the sheet. A little trick - I cut out templates from paper according to the size of photos (12x12, 10x15) and do not measure each time with a ruler - I just put the template where I need it, try on the corners and sew it on.

A few stitches on a typewriter - and your corner is ready!

After sewing, be sure to bring the threads to the wrong side, tie knots and fix with adhesive tape - this is necessary to secure so that everything holds tight.

5. Fixing frames. In this album, I used ready-made frames from the set. They are fastened to the base with small legs and these burr legs need to be cleaned with a regular nail file so as not to spoil the look.
The movements of the nail file must be done in one direction so as not to damage the paper fibers.
The edges of frames made by hand from binding cardboard are also processed.

Next, I had to not just glue the frame, but raise it to a level, add volume. This is solved with the help of voluminous double-sided tape. You can use both squares and a solid tape.
We fix the adhesive tape on 3 sides of the frame, the fourth remains so that you can insert a photo there.


I glued the other frame with wood glue. Many now very widely use hot glue guns and the popular Moment Crystal glue .... Oh... Don't do this when you're working with paper, and in particular with a photo album! You cannot guarantee yourself or your clients that after 5-10 years this glue will not crumble to dust or damage the photos! Remember - you can only work with paper with glue intended for it! Now there is a very large choice, the same thick PVA, or for example, there is a very inexpensive wood glue - it is generally ideal, dries quickly, grabs perfectly and does not spoil the paper!
6. Fixing the decor. Well, as I just wrote above - try to sew on all the decor))) HB threads will not harm the album, and the look will be unique, hand stitching will only add additional attractiveness - you must admit, it's better than hot melt drops, just like it came off the Chinese conveyor belt ?))))

First we sew a leaf, then a branch of sakura.

We fasten the seams on the reverse side.

We pin the brads. Brads is such a thing, like a beautiful bead that has legs. And these legs hold onto the paper from the back.
First, with a thick binding needle, I make a puncture in the right place.

Then I insert both legs of the brads into the puncture.

And on the back side of the legs I move apart in different directions. From above, it is also recommended to close up with tape.

This is roughly how it works.

I glue transparent glass droplets to complete the look. Terrible evening light distorts very much (((

7. Fixing the tape. I put this procedure in a separate paragraph, because you often have to work with ribbons in scrapbooking and the process must be debugged.
The tape must be ironed before use so that there are no creases. Then it will not disappear anywhere and every defect of the tape will be visible to the naked eye .. Alas.
Glue double-sided tape on the back of the tape, remove the protective layer, turn the tape over and attach it evenly to the page. When sticking the tape, make sure that the tape lies perfectly flat, otherwise the tape will fix any bend!


They put a ribbon, smoothed it, wrapped the ends on the wrong side of the page and smoothed it again. This method will help in the future to flash the pages without worrying that the tape will lie wrong. Of course, this method is not mandatory, you can only fix the edges of the tape on the wrong side, it all depends on your idea.

We stick a frame from the set on the tape with adhesive tape and a beautiful inscription on top. The inscriptions can be used ready-made, or you can do it yourself.

Glue drops.

We sew flowers, and this is what happened in the end:

8. Making a photo box. I think it's interesting to consider how to make a mini-box for several photos. It happens that you need to put a lot of pictures on the page - how to do it optimally?
For such purposes, mini-boxes are used, consisting of 3-4 mini-pages fastened together, where you can place photos. When folded, such a box takes up no more space than 1 photo - the savings are obvious!)))
So, we take two sheets of paper measuring 15x10 cm, and on one sheet along the long side we make a valve, about 1-1.5 cm wide. With a hole punch, we cut the corners for the photo on one leaf, which will be the base, and glue the cut corners to the other.

Glue the valve of the top sheet to the wrong side of the base.

To the page of the album, where we plan to attach the box, we attach a ribbon or, as in this case, two waxed cords of different colors. The length should be 3-4 times the width of the box (in our case, if the box is 10 cm wide, we choose the length of the tape 30-40 cm).

We attach our box on top in an open form, base to the album page and sew along the edge on a typewriter (or by hand seam). We bring the threads to the wrong side and fasten.

Close the box and tie with cords. All. On the top of the box, you can write something or place another photo. In this example, 3 photos fit, but you can also increase the number of inner pages of the box and just put a few photos inside - the cords are tied, nothing will be lost!

I'll dwell on the details a bit. Sometimes I want to emphasize some elements on the page, for this I use bulky tape and bring the elements to a higher level.

Try and use different materials - here, for example, an ordinary paper napkin was used under a glass - you glue it where necessary, cut off the excess.

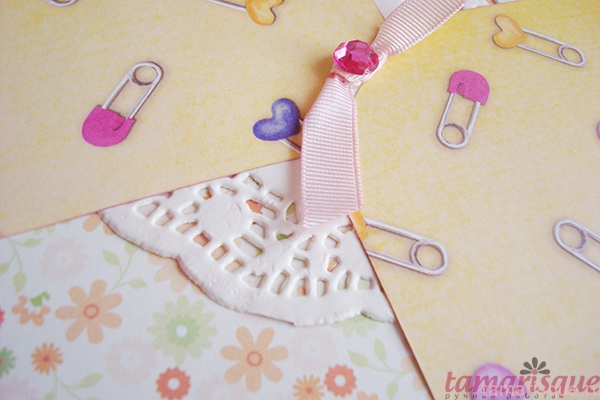
A very beautiful decor turned out using a regular picture and lace around the edges.

Tied a bow - sewn on. Very pretty and no frills. By the way, when using ribbons on a page, be sure to process the edges over a candle or a lighter so that the cuts do not crumble when used.

Tracing paper butterflies are very simple shapes, cut out the outline of the butterfly, glue a couple more wings on top and you're done!

9. Cover. Despite the fact that the cover is the very first page of your album, it is better to do it at the very end. It should reflect the general mood of the album and this is best done when you have tormented with the pages, felt them well and can easily create a unique cover!
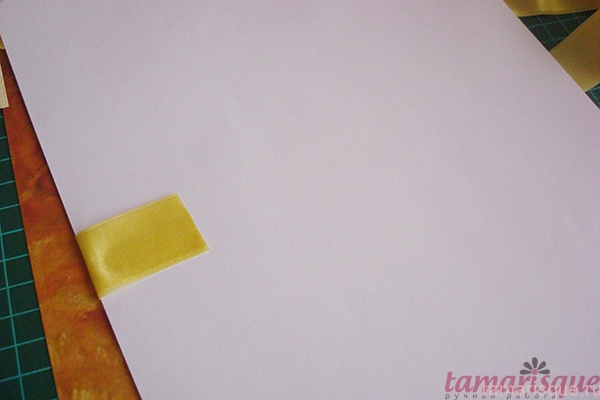
We select a suitable sheet of paper (do not forget that there will also be a back cover, so everything should be harmonious), attach the tape.
For the cover, it is better to choose stronger and wider ribbons, as they will be constantly pulled - open-close, etc. I fix the tape with adhesive tape, I also strengthen it from the inside.

In parallel, I work with the back cover - there is no special decor, but the ribbon should be at the same level as on the first cover.
I glue the lace paper to the ribbon and attach the decor details. At this stage, you can still twist-twist, remove-add, that is, compose a composition that completely satisfies you. Next, we begin to gradually sew and glue. Somewhere I use double-sided tape, somewhere I sew it, I fix it with brads - I listed all the methods above in detail, nothing has changed, the principle is the same.

10. Connection of pages. Phew. Finally got to the end. One more push, one more try, as they say))))
Here's a little background. I'll tell you first about what materials I use and why.
When we have created the pages of the album, they need to be connected. But not just like that, but put inside, between them, something solid that will keep its shape. Many use incomprehensible cardboard, even corrugated cardboard, as far as I know, from ordinary boxes, glue it all with a thick layer of the moment, rejoice and give it to the client ...
As I wrote above, these are pathetic attempts to reduce the cost of production. Buying (or picking up in the trash) a box is much easier and cheaper than spending money on high-quality bookbinding cardboard and the right paper glue. Is it really beneficial? Let's see. The cardboard used in the packaging is made from such waste that you cannot even imagine ... All this waste is ground into flour, filled with glue and sheets of low-quality paper are cast, from which then corrugated and other packaging cardboard is made. I think that even without delving into the details, we can confidently say that such cardboard is not suitable for us, it is clearly not of archival quality and in general there is no quality in it.
Binding cardboard is also not all good. There are very cheap types of such cardboard, which consist of resins and acids, which can directly damage our album, even if these cardboard seals are inside the pages (believe me, a chemical reaction will occur even in this case).
Clay Moment. This is a separate song. Not only will you spoil the album with this terrible substance, you will also inhale until the green devils in your eyes ... After all, the Moment stinks terribly. Do you need it?
I could write in detail here. chemical composition materials, but this is a lot and tedious, if you are interested, you can find information in tyrnetiks, read, think. Or just trust me as a print production technologist. No wonder I studied long years wisdom?))))
Well, I rejected all your consumables, and what should I do now? How to be? Where to run?
There is an exit. First, you can buy quality binding board that meets all the requirements of scrapbooking. If you are too lazy to bother, you can use the second option, which I use almost always when making albums.
We will use regular watercolor paper. here the whole trick is that paper acids and resins also greatly interfere with watercolor artists, so paper is made for them that is free from such impurities. That is, ordinary watercolor paper. In terms of density, it is certainly inferior to cardboard, but in practice, albums with such a base are very popular, easy to use, much lighter in weight and lower in cost.
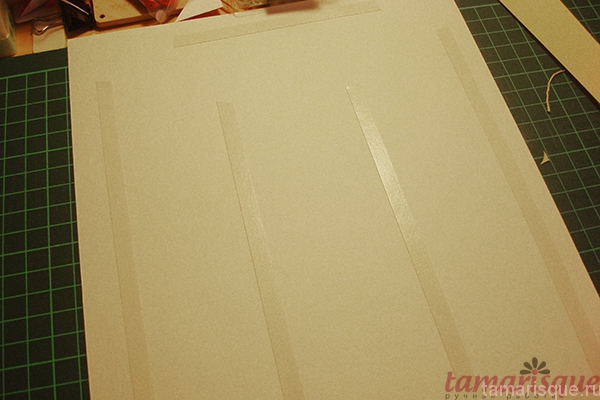
So, since our album sheets were cut into A4 format, we take watercolor paper of the same format. With double-sided tape we go a little along the edges of the sheet and in the middle. Remove the protective layer and carefully place the finished album page on top. It is very important that the edges match. small deviations are acceptable, this can be corrected later, but there should not be obvious shifts.
After we have fixed the page, we turn it over, and on the back of the watercolor sheet we do the same operation - adhesive tape, album page.
Be careful - the pages must match in serial number! Otherwise, you will be confused!
We also glue the pages that fall on the cover to the watercolor sheet, but it is better to two - to make it tighter.
After gluing the pages, you should get such a sandwich:
1. Page (face up)
2. Watercolor paper
3. Page (face down)
When all the pages are fastened in pairs and watercolor paper is laid between them, we begin to stitch.
We sew on a typewriter, you can use your hands, but for a long time. Do not forget that the pages already have ready-made elements that can be very voluminous, control the process, support somewhere with your hands, align somewhere - that is, carefully stitch all the edges.
Of course, you can not sew all the pages, but glue them with the same carpentry glue. But it seems to me that this method is not very convenient - firstly, glue is consumed in huge quantities, secondly, you need to dry each page for a long time and thoroughly (in conditions of our high humidity, this is difficult to do, the paper begins to warp if drying fails), and thirdly , if something is glued incorrectly, you will have to redo the entire page, and sometimes this is simply not possible.
On the typewriter, all edges are fixed, inside it is glued with adhesive tape - this is a “dry” method, you can be sure that the product does not deform from moisture (my clients have been using albums for quite some time, they say everything is fine), and if you made a little mistake when sewing, you can dissolve the seam and stitch again. Well, again - the line adds comfort))

After stitching, you can make holes for fastening. We punch from the side of the spine.
I do this with an ordinary clerical hole punch. For more complex holes (where you need to adjust the distance), of course, it is better to use a professional one.
Be careful - see which side you are punching with a hole punch! It's easy to get confused, but it's almost impossible to fix!

We open the ring, put the pages in order and close the ring.

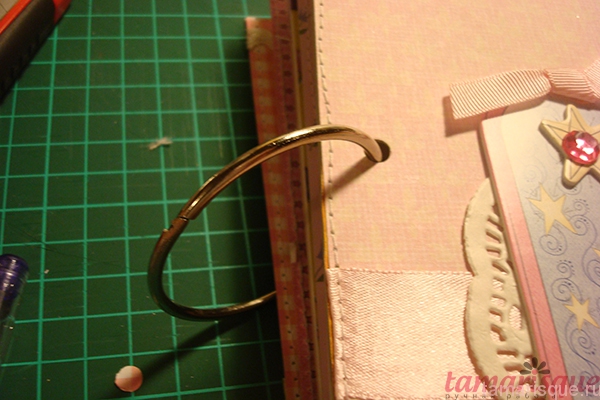
To complete the rings, you can tie ribbons, lace, put on beads, if the diameter allows - in general, decorate and complete the album with such strokes.
This is roughly how it would work:

I tried to talk about the key points in the creation. Of course, you can show and tell for a very long time, I will be glad to answer your questions)))
If you want to know some points in more detail, write in the comments, I will do separate small master classes specifically for each process.
People are increasingly using electronic photographs, sharing them in in social networks send to friends. But at the same time, the good old paper photos, carefully collected in an album, are by no means forgotten. Homemade album models are especially popular now. The only question is how to make a photo album with your own hands beautiful and original. For beginners, this article will tell you step by step and in an accessible way.
Necessary materials and tools
For beginners, before making a photo album with your own hands, you need to study step-by-step instructions, be patient, and use the necessary tools and materials. The easiest way is to buy a ready-made kit for creating a photo album in a store, but it is much more interesting and cheaper to create using improvised means. In addition, all family members can participate in this entertaining process.
Looking at the finished album, one gets the impression that it is simply unrealistic to recreate this on your own. But nothing is impossible!
So, to create such a masterpiece you will need:
It is important when decorating the use of decorative details. It can be lace, fur or leather details, chains, beads, locks, etc.
How to make an album cover
First you need to decide on the size of the future photo album and choose a design style. There are many interesting original ideas for design. The cover can be soft fabric, leather, paper, decorated with various elements. 
To make the back of an album cover measuring 25x25 cm, follow these steps:
- Measure and cut out a square from thick cardboard, with a side length of 25 cm.
- Cut a soft lining of padding polyester or foam rubber of the same size.
- Connect these parts with glue.
- Cut off a square of the selected fabric, measuring 26x26 cm. This extra centimeter is necessary for the convenience of folding and gluing the material with the lining.
- From above it is necessary to attach a sheet of white cardboard, which will hide the foam rubber and the edges of the fabric.
- The back cover of the photo album is ready.
The algorithm for making the front of the cover is slightly different due to the use of decorative elements. For example, you can make a window for a photo that will tell you in advance about the contents of the future photo album instead of the name.
This requires the following steps:
- Again measure and cut out a square of given dimensions from cardboard, but in the center you need to cut another square or rectangle.
- A soft lining and fabric for the cover are also cut out with a hole.
- Connect all parts together with glue.
- From the inside, insert and fix a photo into the window.
- From above, everything is closed with a sheet of white cardboard.
Then, in both blanks, neat holes are made with a hole punch at a distance of 1.5-2.5 cm from the edge. Rings or ribbon are inserted into them to connect the parts of the cover.
Pages and binding
You can not connect the photo album with a ribbon or rings, but arrange it in the form of a voluminous book with a binding. Accordingly, then the holes in the parts of the cover will not be needed. For album pages, it is better to take thick white paper. 
The sheets are interconnected as follows:
- It is necessary to cut strips of white cardboard 3 cm wide. With their help, the main pages will be connected.
- Then fold each strip in half lengthwise. To get a wider distance between the sheets, bend the connecting strip in the shape of the letter P.
- Carefully glue the folded strips to the pages. The uniformity of the entire photo album depends on this process.
The number of pages can be arbitrary and is determined only by the desire of the master and the availability of the necessary materials. After that, you can start making the binding.
This will require:
- Take a bandage or thick gauze, cut a rectangle 25 cm long and 3 cm wide more than the resulting album blank.
- Glue the fabric to the junction of the pages.
- Then you need to fix a piece of braid or ribbon along the top and bottom edges of the future binding. This will give the album a neater and more aesthetic look.
- From a thick cardboard of a suitable color, we make a spine that will hide the entire binding.
- Parts of the cover are glued to the bends of the spine.
Do not attach the spine to the pages of the product, otherwise they may not open well.
That's the whole secret of how to make a photo album with your own hands. Step by step for beginners it will not be difficult to create such a masterpiece. Now it remains only to fill the album with photos.
Scrapbooking technique in creating a photo album
Scrapbooking is an art form that creates and decorates original photo albums. Turning an ordinary boring album with photos into a unique story of our life. 
The origin of this technique goes back to the distant sixteenth century. At that time, notepads were at the peak of popularity. important dates, valuable tips, recipes, etc. By the end of the 17th century, books began to appear with additional blank pages for making notes and pasting illustrations. This was the beginning of the scrapbooking technique.
In the 19th century, with the beginning of the mass distribution of photographs, a real revolution took place - special pockets are made for photos, and the pages are painted with various colors and patterns. Albums for girls with pictures, photos and various inscriptions were especially popular.
Today, there are many ways to design photo albums, and scrapbooking is popular all over the planet.
Ready sketches for pages
A sketch is a small page template for a future album. In scrapbooking, a sketch is a prepared sketch to speed up and make the work process easier. Ready-made sketches are just a godsend for beginners wondering how to make an original photo album with their own hands. Step-by-step selecting shades and pictures, you can easily create inimitable pages of the future album. 
These ready-made sketches are simply an inexhaustible source of ideas and inspiration! Gradually, in the process of work, the templates will be used less and less, and soon they will completely fade into the background, freeing the way for the uncontrollable imagination of the master. Everything depends only on the desire to act and create. Such ready-made sketches are also useful for visualizing a future photo album.
After all, this is still a draft, on which there is always the opportunity to change and correct something, without causing damage in the process of making amendments. valuable materials for creativity. Sketches are used not only by beginners, but also by experienced masters. After all, sometimes one glance at the finished sketch is enough that it began to emerge in thoughts own idea photo album pages.
Thus, unique handmade masterpieces are easily and simply created.
The theme of self-made albums
 Before you make a photo album with your own hands step by step for beginners, you need to decide on its theme and choose the right album decorations.
 Make an original photo album with your own hands if available necessary tools and materials, as well as ideas for its design is not difficult at all.
It remains to choose a plot and some significant event in life, for example:
- the birth of a baby;
- the first year of a child's life;
- graduation at kindergarten or school;
- wedding;
- birthday;
- travels.
In general, the theme of a homemade photo album can be any bright event in life, the memories of which you want to keep in your memory for a long time. 
Another reason to do this kind of needlework can be to create a gift for relatives, colleagues or friends. It is enough just to make an original photo album and present it for any holiday of a loved one. Such a surprise will not leave anyone indifferent!
wedding album. Step-by-step instruction
The process of creating a wedding photo album is extremely interesting and exciting, because a piece of your own soul is invested in it. Beautiful happy newlyweds, their sincere smiles are the main characters of the emerging fairy tale, the beginning of a completely new life together.
An extraordinary feeling - after many years to pick up a shabby dusty photo album, flip through it and understand that love, true love, is not subject to years.
For beginners, before making a wedding photo album with your own hands, you should study the step-by-step instructions for its design:

In the process of creating an album, it is important not to overdo it with additional elements and decor, because photographs remain the main ones.
DIY album for a newborn
The birth of a baby is a new exciting stage of life together, filled with emotions and experiences. So I want to remember every moment, every smile of a child, his first clumsy steps. But over time, even the most vivid memories are erased from memory, dissolved in everyday fuss. Therefore, it is worth thinking in advance about the preservation of these emotions. 
For this purpose, a do-it-yourself photo album for a newborn is perfect. It will be interesting and exciting not only to view the pictures of the baby in the future, but also to participate directly in the process of its manufacture. Loving parents can show all their creative imagination and imagination, putting a piece of their love into the work.
Decor materials
When designing a newborn album, you want to use the softest materials and the most beautiful elegant elements. So that even through them tenderness and boundless love for the baby are transmitted. Pastel-colored velvet or velor is perfect for the cover.
Additionally, it can be decorated with such details:
- small plush toys;
- felt figures;
- lace;
- satin ribbon bows;
- beads and sequins;
- lace cap, booties, webbing with sliders, dummy;
- tags from the handle of a newborn;
- buttons and rivets.
In the process of decorating, it is important not to overdo it with the number of additional elements and harmoniously combine them with each other.
Making photo album pages step by step
For beginners, before making a photo album with your own hands, it is recommended to pay attention step by step instructions:

Homemade album is ready. It remains to put pictures of the baby in it, and it is important to fill the pages of the album regularly and with love.
Ideas for designing a children's photo album
There are many ways to design a children's photo album and make it unique and inimitable.
Here is some of them:
- It is better to save more little things, which in a few years will seem even more significant and interesting. For example, a tag from the first clothes of the child, a label from the first jar of puree or juice, the first diaper, a cut strand of hair.
- The child's name is welcome. What does it mean and why was the choice made on it.
- You can attach photos of your favorite toy and the first drawing of the baby.
- It is permissible to write down the words of a child's favorite lullaby.
- It is recommended to describe the process of introducing new products into the diet of a child, to consider his daily routine: rest, wakefulness, meals.
In general, you should listen to your heart and not be afraid of experiments! And then it will be easy to create a wonderful gift for a child.
Family photo album step by step for beginners
You can make an album with your own hands not only for some special event, but also for telling about family life generally.
You can use the following sections to create it:

It will take time and effort to create a family album, but the result will definitely justify itself.
Photo album in vintage style
An interesting idea for creating an album with your own hands would be a vintage-style photo album, i.e. "antique". 
This genre of creativity has a number of features:

It should be noted that black-and-white photographs with frayed edges will look more organic in such an album.
How to decorate pages and cover in an original way
Before starting work, it is imperative to think over the idea of \u200b\u200bthe future creation and sketch out sketches. On the draft, depict everything that is planned to be included in the album, to the smallest detail. This will allow you to visually consider the result of the work, taking into account all the nuances. The number of pages is calculated based on the number of photos.
Each sheet of the album must contain:
- the picture itself;
- name of the photo;
- description of each frame;
- decoration;
- additional decorative elements.
It is important to think in advance what kind of ink, color, font size and inclination of letters will be used to describe photographs. You can also use letters cut from a newspaper or magazine and assembled into whole words for this.
First of all, flat details are attached to the album, and at the very end - volumetric decorations.
For the original cover design, you can use a collage assembled from small pictures. It can be created in the form of a simple geometric figure or come up with a more complex decoration. For beginners, before making a photo album with your own hands, you should step by step figure out how and with what the finished copies are designed.
Otherwise, the process of creating the first album may cause some difficulties. It will be more convenient to design the pages before they are fastened into the finished product. It is important to remember that on one sheet, attention should be focused on one bright element in order to avoid information overload on the page.
Video how to make a photo album with your own hands step by step for beginners
How to make a scrapbooking photo album, see the video:
A simple do-it-yourself album:
Having tried such an activity once, it is impossible to stop, because the desire to create beauty is indomitable. In the scrapbooking technique, even a beginner can make an album for newborns. A talented craftsman will only need a basic set of knowledge, a boundless flight of fancy, materials and tools, as well as a sunny mood to work.
Decoration tradition
The name of the original technique was given by the English words scrap and book, which means “cutting” and “book”. From the title, even a beginner understands that the book should contain clippings from newspapers or magazines that emphasize the subject. The tradition of beautifully decorating an album with your own hands was born in the 15th century. In Europe it was considered fashionable to collect books with records of poems, quotations, drawings, sketches. The advent of printing made it possible to make scrapbook, supplementing albums with lithography, images, engravings. Admirers of an unusual hobby decorated products with personal gizmos, labels, travel tickets, invitations from attending social events. The more varied the scrap, the more luxurious and interesting the book looked. All of us in childhood loved to flip through old grandmother's albums full of secrets, personal memories, and our imagination painted pictures from the past for us.
Today, scrapbooking masters are actively looking for new creative forms for their masterpieces, decorating chocolate boxes, tea houses, miniature birdhouses in an unusual way. But an album in scrapbooking technique for newborns is a valuable gift for parents and a memory for a child, an unchanging classic of touching design.
Making a children's album

Album filling
With the advent of the baby, we become more sentimental, we look at the world in a new way, we appreciate every moment of life. Creating an album for a newborn with our own hands, we write history, because even after many years these events will not lose their value.
Description of errors in the work
What does the baby album contain?
- Photo before the birth of the crumbs. Touching pictures of mommy, who gently strokes her tummy, listening to jolts and stirring in anticipation of a miracle. Let such photos decorate the first pages.
- A photo of a young mother and baby immediately after birth, when there is happiness in the eyes, a glimpse of jubilation and something subtly new.
- Touching photos of a baby sleeping peacefully in his crib. You can capture the moment a newborn wakes up with a sleepy face and a cautious smile.
- Heading "We eat!". The funniest section: a dirty baby and mother, joyful laughter and happiness in the eyes.
- First walks. Young children are introduced to big world around. Bright moments in the photo will remind you of a happy time for many years.
- First baths. It is during bathing, according to psychologists, that there is complete agreement, the baby learns to trust his parents. Photos of a baby in a fluffy towel after bathing are some of the most touching and sweet.
baby album pages


Making out an album in scrapbooking technique for newborns, ideas for filling and decorating can be very different. A smile, first steps, games and acquaintance with the outside world - all this is so significant for parents during the development of a baby. Each photograph requires a special attitude, the decor must be thematic, and the meaning of journaling should be “on the bull's-eye”, complementing and revealing the deep meaning of the memorable image. Many years will pass, events will fade and be forgotten. But as soon as you pick up an album, unforgettable moments will again flash in your memory in a bright succession, which its pages so carefully store.
What do you need to work?
If you decide to create an album for a newborn with your own hands using the scrapbooking technique, then you should get acquainted with the basic design rules. Popular materials and tools:
- Rings and brads. The function of the rings is to securely fasten the pages of the album. Brads are shaped like a nail, but with two flat legs. If you decorate a hat with a bead or a flower, it will turn into an actual decor.
Mounting materials


- Stamping. Ready-made stamps with a printed pattern or inscription will give the product an aesthetic and noble look. Stamps can be acrylic or rubber.
Decor stamps


Stamps should be stored in special containers with tightly closed lids. To wash the stamp, a normal soapy solution is used, after which the stamp is wiped dry.
High-quality care for stamps will allow them to serve the scrapbooking business faithfully for a long time.
- Ink. They are applied to the stamp and are responsible for the bright colors in the composition. When choosing, you should know that they can be alcoholic, chalky, based on a water-soluble dye. It is important to make sure for what surfaces they are intended.
Various inks


- Figured hole punch. Such tools are needed for punching curly holes, creating carved borders and rounded corners. If you don’t have such equipment at hand, you can use thin nail scissors in the old fashioned way.
Hole punching tools


- Stationery set. If the master can do without specialized tools, then it is unlikely without a standard office. A few scissors, glue, a pencil and a ruler are indispensable tools, without which the work is almost impossible.
Useful tools for beginners part 1
Useful tools for beginners part 2
Useful tools for beginners part 3
Useful tools for beginners part 4
In addition to scrapbooking equipment, there are all kinds of decor. The industry offers to use metal pendants, cardboard cutouts, ready-made paper or fabric flowers, cardboard chipboards, plaster frames. Glitters, paints, structural pastes, patina, pastels will help in creating unusual effects on paper. Listing the decor for the album of a newborn, one cannot fail to mention lace and ribbons. An ideal addition to the photographs will be the first cut strand of hair, the imprint of a tiny hand and foot. It is the decor that will help create an exclusive product, and the theme of the album will tell you the heart!
We create with our own hands
There are many master classes on creating albums for newborns. Anyone who takes the first steps in a creative direction must learn to express themselves, develop their own individual style, which is easy to "read" in each product. Children's theme is the most fertile.
 Such an album can be filled with all the important moments of the first year of life.
When creating cute little things, fantasy does not need to be limited by choosing a touching decor or semantic content of the composition. A master class on creating an album is needed to understand basic principles work, and you just have to choose for yourself the most beautiful way of design.
A series of master classes on creating an album for a baby:
Making a children's album part 1
Making a children's album part 2
Making a children's album part 3
Making a children's album part 4
Making a children's album part 5
Album for a boy
As you know, the classic "boy" color is blue. In Soviet times, people around only by the color of the bows on the envelope could understand its gender. Since then, little has changed, so when decorating an album for a newborn boy, it is the pale blue color at the peak of popularity.
Album for a boy of the first year of life
Novice masters mistakenly believe that it is more difficult to design an album for a boy, because flowers, butterflies and other “cuteness” do not belong here. The scrapbooking industry is replete with a variety of decor, and right choice fantasy will tell you.
A few design rules:
- We cover the cardboard for the cover with a cloth, wrapping it inside and securely gluing the edges.
The cover is the "face" of the album, so the choice colors extremely important. A cage, stripes of blue and white, a bright cage - all this is relevant for a boyish theme.
- We fasten the classic inscription "Our baby" from cardboard or fabric letters. In a similar way, you can title the album by fixing the name of the crumbs on the cover.
- Choosing decor. A win-win decoration option is a picture or applique of a baby who looks out of the stroller of blue color. You can complement the cover with miniature knitted booties, bright satin ribbons and matching lace, a scattering of buttons in blue, light blue or turquoise. You can choose from ready-made chipboards, cuttings or metal pendants in a children's theme, which will decorate the composition in an original way.
- In order to decorate the pages of the album, first glue them with scrap paper. The edges of the pages can be processed with a figured hole punch, giving them a delicate delicacy.
- As a decor for the pages, you can use ready-made pictures or stickers depicting cars, a train, cartoon characters. To emphasize the baby theme, you can use stamps with the image of pacifiers, sliders, bottles and other baby accessories.
Interesting album for my son
The choice of decor for the cover and pages is a matter of taste and desire of the master. When creating your masterpiece, you should not think about strict principles and rules, it is important to be guided by tender feelings for your child.
Album for baby
When creating an album for a newborn girl, bright pink colors, delicate shades of lilac, creamy peach or purple come to mind. You can use mono-colors, but it is more interesting to organically combine all the shades with each other.
Scrapbook for baby in the form of a dress
To work on a scrapbooking album for newborns, you will need:
- prepared binding;
- white office paper;
- pastel and scrap paper;
- glue, tape, a few scissors;
- punchers.
For decoration, we use cutting flowers and butterflies from cardboard, satin ribbons and lace. Work algorithm:
- To begin with, we cut out substrates for pictures from white paper, we process the edges of each with a border hole punch.
- Cut out squares and rectangles from colored paper. The number must match the number of photos. We carefully tint the edges of the squares with an ink pad, and process the rectangles with a border hole punch.
- We cut out squares from scrap paper, we will process the corners with a figured hole punch.
- From beer cardboard or textured white wallpaper, cut out the pages of the album. To prevent the pages from curling, iron each sheet through a thin fabric.
- On a white background, randomly glue all the individual elements, stitch sewing machine. The substrate should be on top, we will place photos of the little princess on it.
- We decorate the pages with bows made of satin ribbons, cutouts of butterflies and flowers, or chipboards painted to match.
- For the cover, we will select a fabric of pale pink or lilac color, cut out two identical squares. Separately, we will cut out two squares of synthetic winterizer so that the cover is pleasantly soft. We put a synthetic winterizer on cardboard sheets, cover it with a cloth and glue it on the inside.
- To decorate an album for a girl, you can use a pre-embroidered picture with an image of an angel. A princess girl, Cinderella or Snow White will fabulously decorate the album. We stitch the picture with a machine.
- Separately, we sew satin or lace ribbons-strings. From lace ribbons we will make several roses with pearls inside, decorate the cover with rhinestones, a metal pendant in the form of a stroller, dummy or bottle.
- Separately, you can prepare an envelope using the scrapbooking technique for a disk on which an extract from the hospital and other memorable events from the child's life are recorded.
An interesting version of the album for a girl
The fountain of ideas for creating an album for a newborn is inexhaustible. It all depends on the imagination, the wishes of the parents and the master himself. A baby diary or an album with photos of a baby with an original design made using the scrapbooking technique will be the best gift for happy parents.
We also recommend
 Business card templates free download without registration in Word
 Abstract of entertainment in the form of a theatrical fairy tale "Teremok" (preparatory speech therapy group)
 Presentation "spiritual and moral education of preschoolers" presentation on the topic Spiritual morality
 Sigma 18 35mm f 1.8 art reviews. Dmitry Evtifeev's blog. Manufacturing and design
 Scenario of the theatrical performance "fairy tale, fairy tale, fairy tale" Performances based on fairy tales
 Creative presentation "I am a health teacher Creative presentation of the participant of the competition