Photography hack: Capturing beautiful landscapes. landscape photography landscape photography lessons
The famous American photographer Ansel Adams, who became famous all over the world for his black and white landscape shots, once said: “Landscape photography is the main test for the photographer and often his main disappointment.” And this, perhaps, is the truth. How often we, noticing a beautiful view, believe that it is enough just to start on the shutter button, capture what we see - and you will get a masterpiece. However, a masterpiece most often does not work out, because in a landscape photographer it is not enough to be just a mirror for nature, he must learn to express himself through the landscape.
Photographer Declan O'Neil shared his 10 secrets to creating expressive landscape photos.

1. What can you say about the landscape through photography?
It takes time to read and understand the landscape. You just have to stand and watch how the light changes contours and shapes. As the sun moves, forests and rivers are illuminated every minute in a completely new way and sometimes completely transformed. Light creates its own mood and emotion in the landscape. The landscape can be compared to a huge canvas on which light paints its complex and amazing picture.
In this case, photography is about capturing how light transforms a landscape. Therefore, the decision about what to photograph and what composition to build should be dictated by the question: “Does this photograph say something about light and landscape?” This simple question helps to reject a lot of losing and empty compositions and choose the one that is perfect.

2. Learn to get up early!
If I have a choice between sunrise and sunset, I always choose sunrise. I have nothing against sunset photos, but I find it difficult to add something new and original to the thousands of sunset shots that I have already seen. Dawn light, on the contrary, always brings surprises! It is very difficult to predict what exactly you will receive while you stand and wait in the predawn darkness.
It's kind of like taking pictures of wild animals - because you can get the shot you've always dreamed of, or get none at all. Dawn light can be completely different - from smoky pink to warm yellow.
Keep an eye on the weather forecasts - because if you happen to live in areas with cold nights and clear skies, you can sometimes catch amazing cloud and haze effects that are sure to clear by the time the rest of the world wakes up.

3. Imperfection is good.
One of the main challenges of landscape photography is that you have to deal with a huge dynamic range. This makes it very difficult to control the balance of light in the frame. ND filters sometimes help, but are often inconvenient or inappropriate for a particular place and time. Sometimes you have to completely abandon shooting due to too large a dynamic range.
You can, of course, use HDR technologies, but they most often give themselves away and can violate the integrity and honesty of the image. Many images can be light balanced when processed on a computer. However, sometimes photography only benefits from not being able to capture the full dynamic range. Most likely, such a photo will not be accepted for participation in various competitions, and for sure there will be sections in it from which it will be impossible to isolate at least some details. Perhaps, technically, the photo will turn out to be very poor, but a black silhouette on a light background very often unimaginably attracts attention to itself and seems to call for a closer look. Sometimes you have to give up the opportunity to capture a perfectly lit shot in order to draw attention to the potential of the subject itself.

4. Look back!
It's so easy to see the winning shot and forget to look around. Watching a sunset or sunrise, people usually point their lenses towards the sun and again take thousands of pictures, millions of which they have already seen from their friends or on the Internet. However, often it is enough just to look back to see something completely new and missed by everyone! After all, instead of photographing the rising or setting sun, you can capture what it illuminates at that moment.
The obvious shot is not always the best. Learn to look carefully.

5. Use planning software.
There are many programs that can help you when shooting outdoors. Perhaps one of the more useful ones is The Photographers Ephemeris. In short, it allows you to select any location on the planet - and shows you where the sun will be on any given day and at any particular time. In this way, you can choose the best day and time to shoot in a certain location and choose a specific shooting point with the most advantageous lighting. If you're serious about landscape photography, this is the tool you need.

Another tool that can help you a lot is a terrain map. A good map will help you predict what the landscape will look like and give you some idea of what will be in your field of vision. The ability to understand these detailed topographic maps will help you save a lot of time and not travel around the area in search of that very - perfect shooting point!

6. Equipment is not that important.
The best equipment doesn't guarantee you the best pictures, just as the best pen won't automatically let you write that great novel you've always dreamed of. The equipment is just a device that allows you to convey to others what is in your head. If you have your own opinion and if you have something to say (see point 1) - then you can use anything from a smartphone to Nikon D800.
Remember that it is you who is composing your future shot, and the camera is just capturing it. More megapixels or a faster lens will never help you make a composition more expressive and full.

7. Don't try to "paint" the landscape with your camera.
On the Internet, photos that have undergone the strongest post-processing or created using ND filters that make water look like smooth silk have become more and more fashionable lately. Why not let nature express itself naturally? Believe me, she knows how to do it perfectly and without the use of all sorts of filters. The same goes for post-processing. If used sparingly, it helps to emphasize the natural beauty of nature, if overused - we are already starting to change the landscape and paint it completely different from what it really was.
Real photographs always leave their mark on our consciousness and subconsciousness. This is why heavily photoshopped, idealized images of landscapes often leave us cold. They tell a fictional, not a real story. We immediately notice the false orange sky and the oversaturated color of the grass. Photos can be metaphors, but they should be metaphors that appear in the mind of the viewer, not in the imagination of the photographer.
If you still want to convey your vision of how the landscape looked - perhaps you should try your hand at drawing?

8. Bad weather is good weather.
Clouds and rain are not the most inspiring weather conditions, but they bring with them opportunities much more interesting than any cloudless day. It takes patience and optimism to walk with a camera in the rain all day, but more often than not, you will be rewarded. If you look around carefully, you will certainly find amazing shots created by clouds and rain!
Greetings, dear readers! In touch with you, Timur Mustaev. Some amateur photographers consider landscape to be one of the most elemental genres of photography. To some extent, I share their point of view: go where you like, but shoot everything that comes into your head.
Plus, unlike studio shooting, which requires considerable financial costs, nature will not disappear and will not require anything in return, except for caring for it, and the situation changes depending on the time of year, giving scope for imagination.
But is the landscape really that simple? Let's figure it out together.
And let's start the debriefing, perhaps, with the definition of this genre and its place in human reality.
landscape in photography
Landscape- This is a genre in which the center of the image is nature.
This direction originated in the era of the absence of cameras, when well-known and not so famous artists went to the open air and conveyed what they had taken away with the help of brushes and paints.
That is why understanding the meaning of this genre should be learned from realist artists.
Pictures, like nothing else, allow you to feel the beauty of nature, they are inextricably linked with the inner world of a person, with his feelings, mood and love of life in general.
And in photography, a landscape is not a thoroughly accurate redrawing of this or that corner of nature, but its own worldview.
Modern landscape photography is quite versatile. Exhibitions of such materials instill in the viewer an artistic taste and develop the imagination by drawing associative parallels between real life and photographs.
The relationship between photography and life has given rise to a new direction - the urban landscape, in which the dominant is not nature, but the brainchild of society - the city with its numerous streets, architectural objects, squares, as well as an endless stream of cars and pedestrians.
The urban and classic landscape captivates even the most stingy photographers! And there is an explanation for this: shooting in this genre, you can get excellent shots without using expensive equipment.

All you need is desire, patience, a tripod, a SLR camera, and some skill in using it.
Shooting in this genre, as, in fact, in any other, is, first of all, a creative process, accompanied by your own vision of what is happening, but, oddly enough, there are many rules, the observance of which will save you from failures.
Landscape photography
Close your eyes for a moment and imagine: vast expanses of unprecedented beauty lie in front of you and it seems that as soon as you press the shutter button, the most beautiful image that the world has never seen will appear on the camera display ...
Capture this episode in your memory and open your eyes, your fantasy will remain a fantasy, and you will never know how to photograph a landscape if you neglect the rules listed below.
- Maximum Sharpness. Many photographers practice shooting landscapes wide open, but "many" is not a good indicator of good work.
A classic technique during landscape photography is focusing on the entire image (shooting with a covered aperture).

Usually it is enough to make simple camera settings to get a sharp and moderately exposed photo: a slider in the f / 11-16 region, or you can trust the machine if you shoot in . However, to avoid shaking, it is best to shoot landscapes with or .
- Presence of meaning. For any photo, it is important to have a semantic center of the composition, so that, as they say, the eye has something to catch on. Anything can serve as the center of attention: an interestingly shaped building, a tree, a mountain, a ship in the middle of the sea, etc.
- Rule of thirds in the overall composition of the frame. The location of the semantic center in relation to all the elements and details of the image is as important as the presence of sharpness.
The reference says: the photo looks most advantageous when the objects being photographed are conventionally separated by lines that divide the image into three parts, both along and across.
- Thoughtful foreground. Place the semantic centers on the front of the photo, leaving the “air space” in front, so you can create an effect of lightness and convey depth.
- dominant element. The secret of successful nature photography is revealed - either the sky or the foreground should dominate in the picture.

If your photos do not fit this description, they will most likely be considered boring and mundane.
If it so happens that the sky during the photo shoot is uninteresting and monotonous - shift the horizon line to the upper third, so you will not let it prevail over the rest.
But if it seems that the airspace is about to explode or collapse to the ground with lava flows - give it 2/3 of the frame and you will see how much the plot of what is happening can change.
- lines. There are endless ways to reflect the beauty of nature in full. One of them is the technique of including active lines in the composition. With the help of lines, you can redirect the viewer's gaze from one semantic point of the photo to another, while creating a kind of closed space.
Lines not only create patterns in the photo, but also add volume. This also applies to the horizon line, beyond which you constantly need an eye and an eye.

- Traffic. Many consider landscape shots to be calm and passive. But this is not necessarily the case! You can add life to a photo with the help of water or wind, for example, capture with a SLR camera a riot of the ocean or a flowing waterfall, a breath of wind or falling leaves from a tree, birds taking off or people walking.
The influence of weather and time on the quality of landscape photography
The golden rule of the landscape: "The scene and the plot can change dramatically overnight, depending on weather conditions and seasons"
It is a mistake to think that the best time for nature shots is a sunny day.
In cloudy weather, in terms of lighting effects, shooting is a pleasure: hail, rain with snow and thunderstorms can fill any landscape with an ominous, mysterious mood.
However, there is a side effect - the likelihood of getting your feet wet, getting sick and saying goodbye to the DSLR forever, since moisture can have a devastating effect on all electronics.
To avoid this, plan your day in advance, take your packing seriously: think about what to wear and what to wrap your camera in. For these purposes, it is best to purchase a waterproof case, or at least one that protects the lens from drops on the lens.

Shooting in the rain is not necessary - it's just one way to achieve artistic images.
This creates a very soft diffused light, giving the pictures a lightness and a special sleepy look.
A forest covered in fog will look much more mysterious and attractive than on a sunny day.
Although if the shooting takes place in the summer or autumn, the light penetrating through the foliage can create an interesting, wide aperture.
At sunset, using , you can take pictures of no less interesting landscapes, especially if the foreground is slightly backlit.
To avoid bunnies, use a hood or. This filter in landscape photography is simply irreplaceable.
Night shooting is technically the most difficult. Shooting nature in its full nature is pointless due to the lack of light. Therefore, you need to go where there are artificial light sources - the city.

In this case, you should not use the flash without interruption, raise the value to 800-1600 and go towards the city landscape!
A brief educational program on landscape photography has reached its point of no return! I hope this article was at least somewhat instructive and useful. I think that I have conveyed to you the meaning of how to photograph a landscape correctly in order to achieve the desired results.
If you are an aspiring photographer who wants to achieve positive success in photography, then everything is in your hands. To begin with, it is best to start with the concept of your SLR camera. And one of the video courses below can become an assistant. Most beginner photographers, after studying this course, have a different attitude towards the SLR camera. The course will help to reveal all the important functions and settings of the DSLR, which is very important at the initial stage.
My first MIRROR- for owners of a CANON DSLR.

Digital SLR for beginners 2.0- for owners of a NIKON DSLR.

Subscribe to blog updates, and share links to articles with friends.
All the best to you, Timur Mustaev.
Much has been written about landscape photography. I do not want to repeat myself, therefore, I will describe the main points here and focus on the problems that I directly encounter when shooting.
A very short guide to landscape photography:
- Watch the aperture, often, you need to close it strongly to F / 5.6-F / 16.0
- Follow the horizon, the horizon should harmoniously “cut” the frame. Carefully and thoughtfully compose lines and proportions in the frame
- Follow the light sources (sun)
- Enjoy the result

As you can see, there is nothing difficult in shooting a landscape. But the problem is that to get a high-quality picture, you need to work hard:
- The landscape implies that it will be necessary to find it. Finding a pretty landscape is not always easy. Very often, when you find a good landscape, you don't have a camera with you.
- It is best to shoot in the morning and evening, when there is no “hard” (strong) sun. Shooting in strong and hot sunlight is very difficult.
- Since it is best to shoot in the morning and in the evening, and even on closed apertures, you need a tripod. A tripod is an extra cost and extra weight during transportation.
- To catch good shots, you need an inner sense of harmony, which can either be innate or acquired over a long time of photographing.

Masters of landscape photography have a very large stock of skills and developments in their arsenal, it is useless to describe them, since every little trick will be useful only in one case out of a hundred, and the person himself must choose exactly how he needs to shoot in this or that situation.

Setting the camera for landscape photography
- Almost always the landscape is shot on a closed aperture: F5.6-F36.0. The easiest way to do this is in aperture priority mode.
- The ISO value must be set to the minimum: ISO 50, 100, 200,
- Color Saturation Adjustment - Maximum
- Focusing is best - manual, it is desirable to focus on infinity (on the farthest object)

Theory is great, but with practical shooting, all the simplicity disappears. First, when shooting landscapes, a very serious problem is the effect of overexposure or underexposure of areas in the photo. The most common example is a photo of black earth and white sky. In this case: either the sky will be with details, and the ground will be completely black (dark, without details), or the ground will be normally exposed, but the sky will be strongly highlighted (overexposed). It has to do with the dynamic range of the camera. A gradient filter helps to solve this problem, which compensates for the difference in the “glow” of the earth and sky. Very often, it is enough to make an adjustment in order to “save” the frame a little. For the landscape it can be very useful.

Secondly: landscapes are shot on closed (covered) apertures. On digital SLR cameras with closed apertures, every speck of dust on the matrix will be visible. This is very unnerving, frustrating and ruins the photo a lot. For example, already on F11 “blots” appear on the matrix (they can also be seen in the examples for this article). At F14, fine dust is already quite visible. You can fight such an ailment with the help of, or by lowering the aperture value. It's funny, but ordinary digital cameras (soap dishes) and film cameras are less susceptible to this ailment. But, soap dishes suffer greatly from diffraction on closed apertures.

Thirdly: often, by eye very difficult to compose a frame, so that the lines fit perfectly into the frame. The horizon line tends to tilt. When I shoot handheld, thoughtfully and attentively, and then look at the footage on the computer, the horizon often “falls” by a couple of degrees. For some plots, even 5 degrees is already an unacceptable error. To overcome the littered horizon, I turn on the “grid” in the viewfinder. The grid displays lines by dividing the frame into 9 or 12 segments, which allows you to immediately see the symmetry in the frame, as well as, evenly position the horizon. Almost all Nikon CZKs support the grid. Some cameras have a virtual horizon (for example, ) that allows you to control the lines. Well, if there are problems with the lines at all, then you can crop the image with the rotation of the area in Adobe Photoshop or other editors.

Fourthly: for landscapes, most often, need a very wide viewing angle, for this use wide-angle and . All “over-widths” have distortion (geometry distortion). Distortion can spoil the picture very much, or it can make it unusual (like, for example, the fisheye effect). Still, the less distortion, the better. Unfortunately, all ultra wide-angle lenses have this drawback. Distortion can be overcome with the help of graphic editors, some cameras have built-in distortion correction for a number of lenses (for example,). Or, you can shoot with a longer focal length lens without distortion. The photo of the sky was taken at fifty dollars, this lens does not have distortion.

Personal experience:
If I'm shooting without a tripod, I use S mode (priority). Usually I set it to a value from 1/80 to 1/200, while I know that the aperture when shooting will be (in good light) very closed, which is what is needed for the landscape. In poor lighting, I still get a fairly sharp shot without blur, shooting handheld. When I use a tripod, I work in A or M mode (aperture priority or manual mode). With a tripod, long ones on closed apertures are not terrible. I rarely shoot landscapes, so this is where my experience ends.

I am often asked, what is the best aperture for landscape? There is no single answer. Sometimes F2.8, ISO 800 is enough to shoot in the evening, F2.8, ISO 800 is enough. And sometimes, to “freeze” the waterfall, you need F / 36.0 ISO 100. By the way, on closed apertures, almost all lenses (including whale lenses) give a very sharp image, so that there is no point in chasing a specialized landscape lens for home purposes.

Shooting a landscape is much more complicated if you need to shoot a person against the backdrop of nature. In this case, focusing on infinity will not always help. When shooting people in nature, I also recommend that you follow the placement of objects in the frame, and in some cases it is better to place a person not in the central area of \u200b\u200bthe picture.

Conclusions:
Shooting a landscape is not difficult, it is difficult to find a good place. In a landscape, the most important thing is the harmony of combinations of lines, shapes, light and shadow. To competently compose (select) a picture, you just need to go and experiment. In practice, experience comes very quickly.
Don't forget to press the buttons ↓ ↓↓ social networks ↓ ↓↓ – for site. Thank you for your attention. Arkady Shapoval.
Landscape It is an expanded picture of nature. It would seem that it could be easier than taking a picture of the view you like. However, a few useful rules for landscape construction will help you to create high-end photographs.

Rice. 2
The basis for constructing a spectacular landscape are the unbreakable rules of composition. This is where the law of thirds comes in handy. Mentally divide the frame with imaginary horizontal lines. Always position the horizon line so that it intersects the landscape at a height of one third of the total height of the frame. (Fig. 1.2)
There may be exceptions if, for example, you want to emphasize the symmetry of the composition as in Fig. 3 (sea and sky).

Fig.3
In the landscape, the "protagonist" is of great importance. It can be a tree, an interesting building or group of buildings, an unusually shaped cloud, a yacht, or something else. The main character should be placed at the intersection of 3 vertical and 3 horizontal lines according to the rule of thirds.

Rice. four
Versatility is one of the main characteristics of a good photograph. It is difficult to achieve the effect of spatial depth in the frame, but this is aerobatics. This is where the knowledge of the principle of perspective comes in handy (Fig. 5).

Rice. 5
Use a wide-angle lens, it will help you create the effect of the third dimension. But at the same time, remember to fill the foreground. In landscape photography, the center of the composition is almost always the horizon line. Unfilled areas of the foreground turn into compositional "holes". A flower, a tree branch, a gate, and similar seemingly insignificant elements of the composition can compensate for the emptiness of the foreground.

Rice. 6

Rice. 7
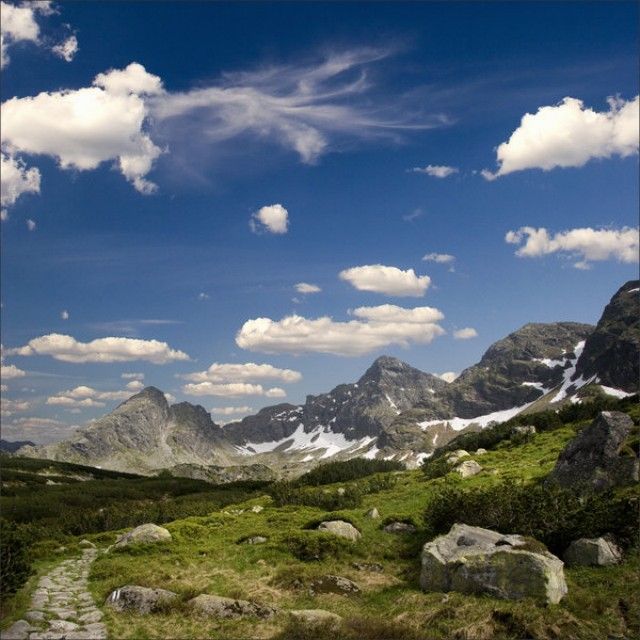
Practice: the low point is often the best when shooting landscapes. A dull grassy lawn in the foreground can be brightened up with an unexpected flower. A pile of picturesque boulders will be a suitable impetus for the viewer’s gaze to move along a winding path deep into the frame to a picturesque hill (“the main character”), as in Fig. 6.7.
Remember that the person is not looking at your image with a fixed gaze. The gaze moves along obvious or invisible lines that connect the individual elements of the composition. If these lines are diagonals, your landscape will gain dynamism and become much more interesting. The natural appearance of diagonals in the frame can be achieved by a good choice of shooting point. In this case, the left diagonal is always more expressive than the right one. A single diagonal has the most effect if it is at a 45-degree angle to the horizon line (or the bottom edge of the frame).

Rice. eight
Converging diagonal lines, as you know, are the basis of the principle of perspective (Fig. 9).

Rice. 9
Practice: When two objects of equal size appear in the frame, choose a shooting point from which one of them will appear smaller than the other. This will create the illusion of versatility in the image.

Rice. ten
An unusual angle for a landscape is just as possible as for any other genre of photography. Top view will save you from being caught in the frame of the sky or the horizon line. But you probably will not have problems choosing the right shutter speed for too bright sun (Fig. 11).

Fig.11
The advantage of a low vantage point is that the size of the subject in the foreground optically increases in the frame. This is especially important when you want to make a still life with a landscape in the background. Use a wide-angle lens, which will create a deep perspective in the frame, but even distant objects will remain in focus.
Photography is light. When shooting panoramic landscapes, the photographer always has to wait for a natural spotlight to appear in the gaps between the clouds, which will brightly illuminate the desired area in the frame. The most important thing here is to be patient, although the ability to catch the slightest changes in the weather also does not hurt. It is hardly worth shooting a landscape in rainy or cloudy weather. But as soon as it begins to clear up, the sun shines through the clearings between the clouds. Try to catch a ray of sunlight sufficient to illuminate the landscape.

Rice. 12
It is under such conditions that the contrast between the bright sun and gloomy clouds can be especially expressive. An important factor in successful outdoor shooting can be even the past rain, which cleared the air of dusty suspension, dispersed atmospheric haze and significantly improved visibility.

Rice. 13
Understanding the nature of light and its ability to turn even the most boring view into a stunning canvas is a fundamental skill for a serious photographer. The most spectacular landscapes are obtained at dawn and at sunset.

Rice. fourteen
The sun gives side light, high contrast and deep shadows make the space more expressive.
If you're shooting on a clear sunny day, beautiful white clouds can bring nature to life, as shown in fig. 15-16

Rice. fifteen
Rice. 16
If you decide to become a landscape photographer, get ready to travel. Your true friend will be a tripod. And the heavier it is, the more successful the pictures will be.
Landscapes are different: mountainous and flat, rural and urban, sea or forest. Landscapes can be shot at any time of the year, at any time of the day and in almost any weather.
The most beautiful are landscapes in which there is water. Whether it's a fast mountain stream, a waterfall or the vast expanse of the ocean - such landscapes always attract the viewer's attention with their beauty (Fig. 17-18).


Practice: Use a tripod and shoot at a slow shutter speed to capture the movement of the water (Fig. 19).
Although at first glance landscape photography may seem very simple, in fact it is much more than “point the camera - click the shutter”. The goal of landscape photography is to convey an inner state, to express something more, and not just to show the landscape in front of you.
We see reality every day. That is why, in my opinion, landscape photography should not simply reproduce it. Objects should not be in front of the viewer or occupy the entire photo: the composition should lead the eye to the final point of the picture - the point of interest, your subject.
Like any other art form, landscape photography has its own rules. It takes a lot of time to master the lighting, composition, subject selection, post-processing, and the final results will vary from person to person.
There are plenty of videos out there with tips and ideas on this topic, but the bottom line is that it doesn't matter unless you go out and start taking as many photos as possible every day to understand what works and what doesn't.
These are 25 tips and ideas for landscape photography. I hope you find them useful (details about each of them are in the video):
1. Shoot the same subject at sunrise and sunset. Different light, different angles, completely different results.

2. A low-angle shot changes the perspective dramatically, creating a more interesting shot... a picture you don't see every day.
3. If it is foggy at dawn, shoot against the light so that the fog is illuminated by the rays of the sun.

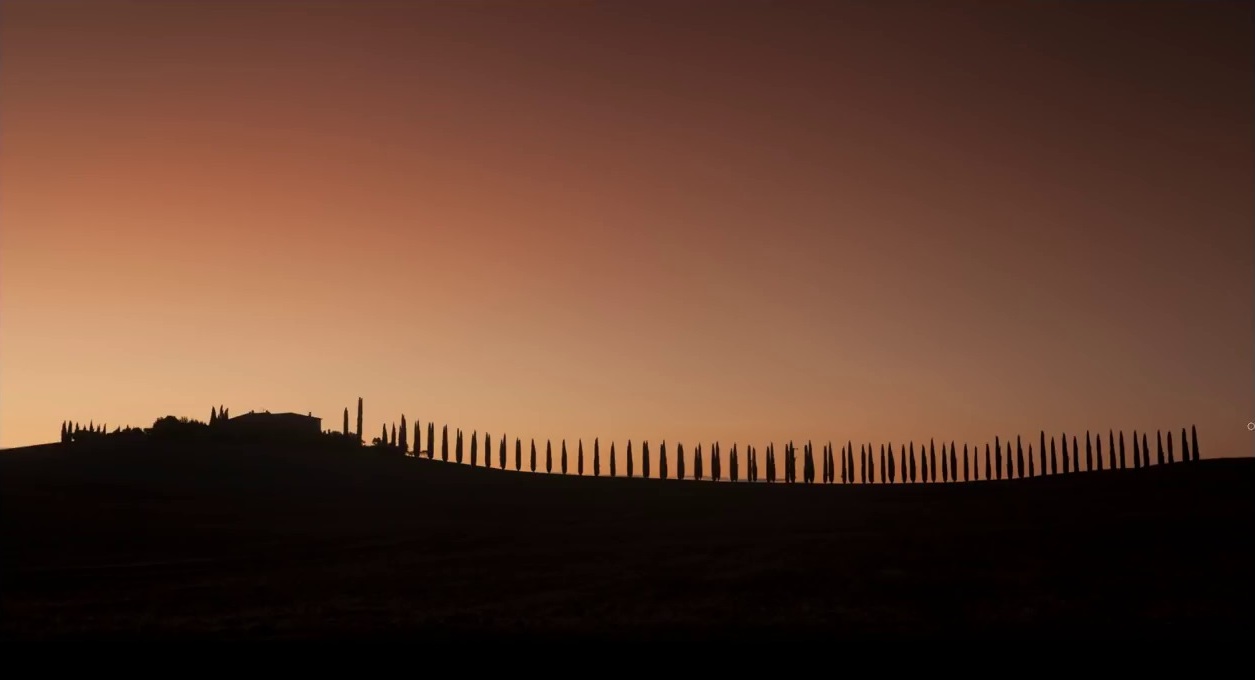
4. Silhouettes are best obtained before dawn, with a cloudless sky.
This is a simple idea, how to create something interesting in an uninteresting moment. All you need is an interesting shape.
5. Dark areas direct the eye towards light areas.

6. Long exposures will help to tell more about the weather: wind, temperature, movement of clouds.

7. If there are dark clouds in the sky, this does not mean that you need to stay at home.
Light in the gaps between the clouds, through the clouds - a beautiful moment worth capturing.

8. A bright spot of color in a sad gray landscape can make a strong impression on the viewer.

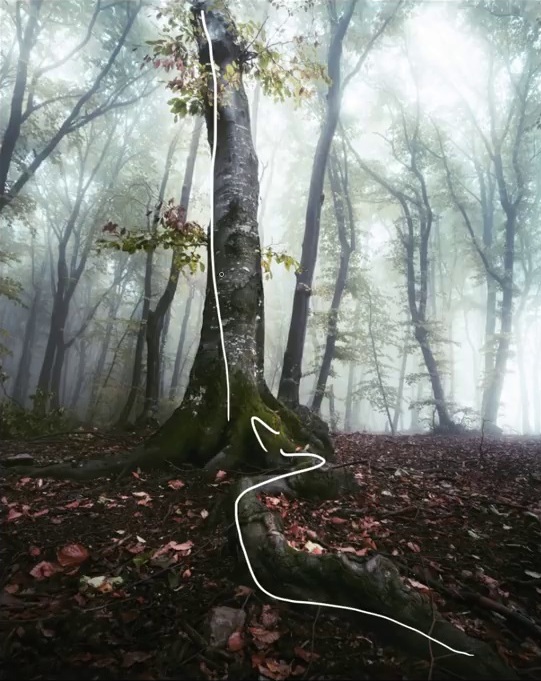
9. Pay attention to the background when you want to highlight the subject, especially when shooting in the forest.

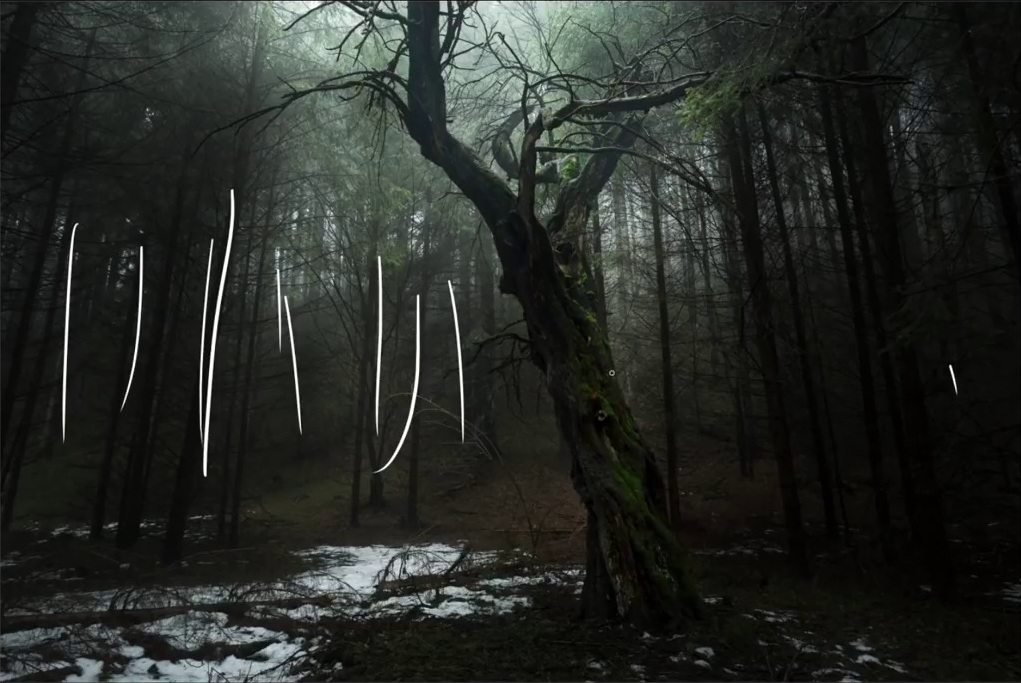
10. Foggy days in winter can be boring.
But find a lone tree and place it in the center to emphasize the subject. Negative space will convey a sense of great emptiness and how small O tree on its background.

11. Reflections are always beautiful.
Earth is not always, and reflections can help get rid of unwanted elements.

12. Move the camera while pressing the shutter.
This works best when the subject is clearly separated from the background.

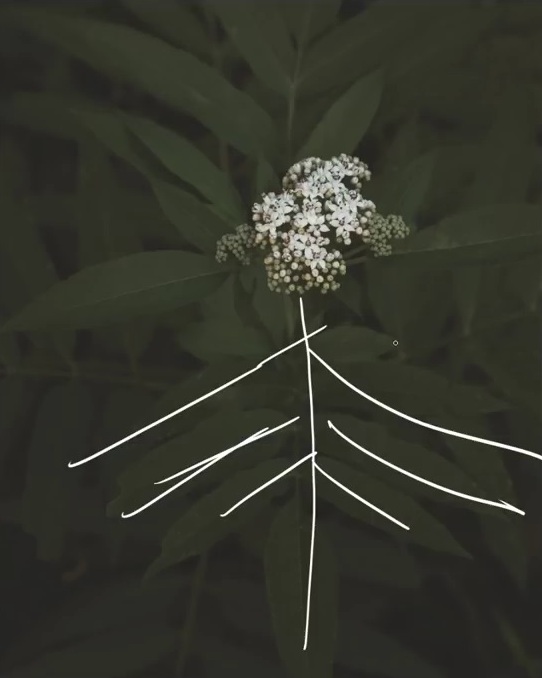
13. Contrast can be very helpful in separating the subject from the background.
A small white flower on green leaves, slightly highlighted with light, can create a simple yet beautiful photo.
14. Panoramas are a great way to convey the scale of a landscape in a forest.

15. Cloudy skies at sunset may offer nothing...
... or to give an almost miracle, when the sun's rays break through the clouds for just a second.

16. Sometimes the sky can become a mirror of the landscape - when the clouds follow the lines of objects on the ground.

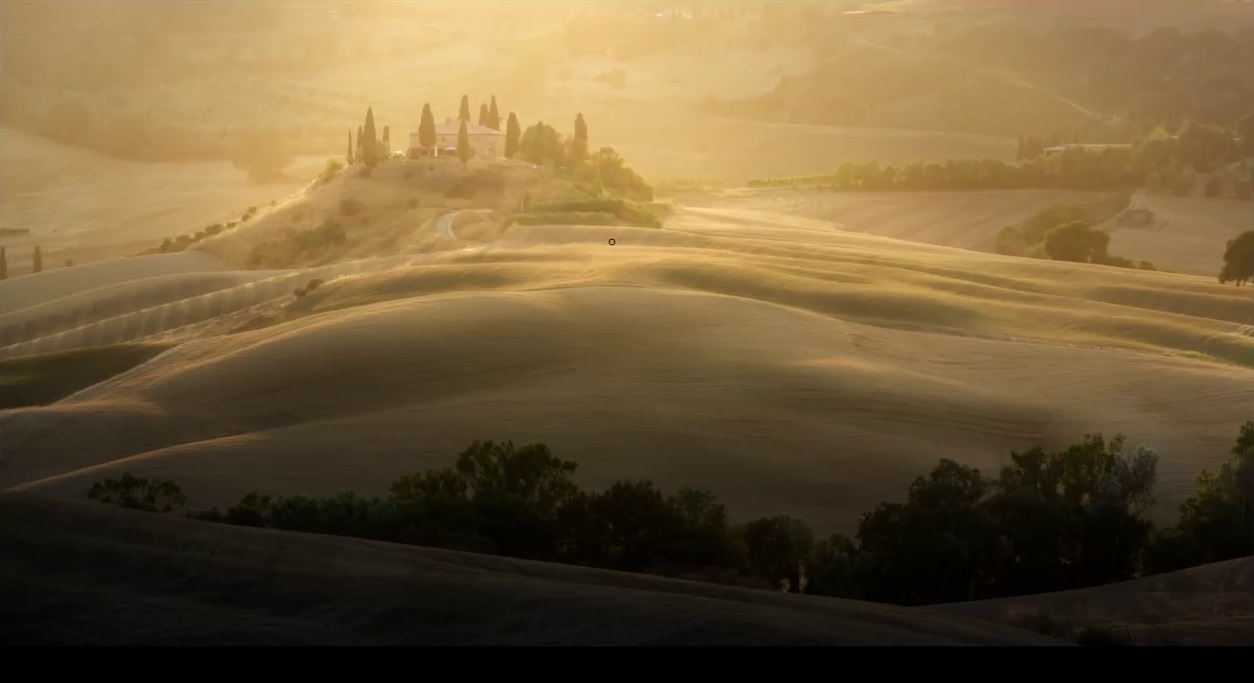
17. A foggy morning is a wonderful time, especially if at some point the sun breaks through the fog.
Choose your shooting position so that your subject is in the mist, between you and the sun.

18. A light at the end of a forest path, when everything else is dark, can make for a great shot.

19. The best time to shoot waterfalls is early spring when snow melts in the mountains.

20. Photograph trees that look unusual... especially old trees.
21. The mountains in the background, behind the houses, can convey the magnitude of the landscape - use a telephoto lens for shooting.

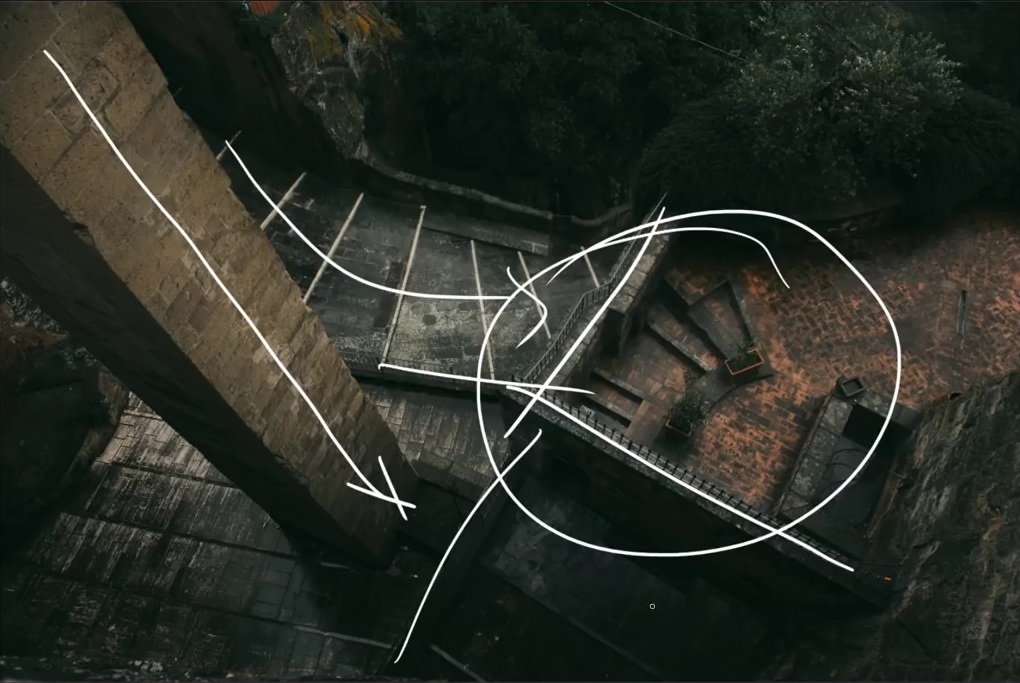
22. When shooting in urban areas, look for complex dynamic lines. In addition, several vertical plans will add volume to the image.
23. Separate the illuminated area from the surroundings with a telephoto lens - and get a great photo.

24. When shooting, think about other perspectives - this can give a unique look to a simple subject.

25. Don't forget to see the details.
Sometimes a large landscape can take your attention away from smaller elements. Textures are a great thing, they can almost look like abstract art.

A detailed analysis of all examples is in this video:
I hope you liked the tips and found them useful. Keep shooting - it's the only way to get better as a photographer!
About the Author: Toma Bonciu is a Romanian-based photographer specializing in landscape and travel photography. His other works are on his website and pages in
We also recommend
 Business card templates free download without registration in Word
 Abstract of entertainment in the form of a theatrical fairy tale "Teremok" (preparatory speech therapy group)
 Presentation "spiritual and moral education of preschoolers" presentation on the topic Spiritual morality
 Sigma 18 35mm f 1.8 art reviews. Dmitry Evtifeev's blog. Manufacturing and design
 Scenario of the theatrical performance "fairy tale, fairy tale, fairy tale" Performances based on fairy tales
 Creative presentation "I am a health teacher Creative presentation of the participant of the competition