Polymer jewelry. DIY polymer clay jewelry - tips for beginners. How to sculpt from polymer clay
Buy polymer clay in different colors. You can use different colors for a particular job. Polymer clay mixes very well, so don't forget that you can always easily mix different colors of clay for your work.
- There are several different brands available polymer clay. You can buy several to see which one you like best. Some brands of clay may be softer. However, it's worth remembering that different brands of clay may have different firing guidelines, so they may not need to be mixed.
- You can also make your own polymer clay at home.
Select auxiliary accessories for making jewelry. You need to decide what type of pendant you want to make. To make a pendant necklace or multiple dangly earrings, you will need heat-resistant fastening material. This could be a piece of wire that you can insert into the piece before firing to secure it. This wire will have a loop protruding from the pendant, which can be used to attach the pendant to the thread of a necklace, chain, or earrings.
- All the necessary accessories for making jewelry can be found at any craft store.
Mix colors. Choose your favorite colors of clay and mix for a shimmery look.
- If you mix clays of different colors over a longer period of time, you can get a completely new, long-lasting color. It can be fun, with only red, yellow and blue clay, to make a different color of clay yourself by simply mixing the colors you have.
Modeling. Using only your fingers you can sculpt pendants, beads, and various figures. Start with simple shapes, adding small pieces of clay on top to create a design.
- Come up with your own unique shapes. There are endless options for what can be made from polymer clay - you only need your imagination. You can sculpt some abstract multi-colored figurine or sculpt a tiny figurine of your favorite animal. As you can see, the scope for creativity here is limitless.
- Try covering square or round pieces of clay with small specks/peas of clay of a different color. After coating, gently smooth the surface or leave it rough.
- If you have exhausted your ideas, you can find some fresh ideas for creativity on thematic Internet sites - there are a lot of them.
Insert metal parts into sculpted objects before firing. Some metal parts must be fixed into the product by firing. Make sure that all parts of the product are heat resistant.
You don’t have to buy beautiful, bright, juicy jewelry. You can make them yourself if you master the technique of working with polymer clay.

- Polymer clay is a material whose consistency resembles plasticine. But because heat treatment it hardens and turns into plastic
- Polymer clay comes in many colors, shades and textures. Colors can be mixed, glitter and paint can be added to them
- This material is non-toxic and even a child can work with it
- You can make almost any kind of jewelry from polymer clay: earrings, pendants, bracelets, watch bracelets and much more.
- Fantasy is the main condition when working with this material. Flowers, fruits, animals, abstract elements - this is not a complete list of what can be realized using polymer clay
- First, let's choose a polymer clay manufacturer. It can be expensive or cheap, with a wide color scheme, can be sold as a set or individual bars
- Manufacturers such as Fimo, Kato, Pardo are quite expensive. There are also domestic, cheaper analogues
- Do not immediately buy packaging of different colors. Buy 1 block and try it at home: how is its texture, mixability with other plastics and paints, bake the resulting material. Good clay should not crack or change color excessively.
- For sculpting, you will need standard colors, which can later be mixed. You also need tools and a small electric oven
- Usually on the packaging of polymer clay it is written how long it needs to be baked until ready and at what temperature
- Please note that you need to work with polymer clay carefully. To maintain color purity, work with medical gloves and on a clean surface.
- If you decide to make jewelry from plastic, then in addition to clay you will need accessories: earring earrings, fastening elements, decorative details and much more.

Flowers made of polymer clay: master class
- The most common and any flower is roses. At first glance it seems very difficult to do, but it’s not.
- Pay attention to the structure of this flower - there are many petals held together, which are larger at the outer base and smaller at the inner one
- Let's prepare the materials: we need plastic in the color of the future rose (red, pink, yellow or white), a modeling stack with a ball at the end
- Let's make preparations for future petals: pinch off a piece of clay, knead it and roll it into a ball. Large balls are for outer petals, smaller ones are for inner petals.
- Now we're missing a bud made from a thin layer of plastic
- We make each petal from a ball, using a stack we give it a curved shape (this can be done with your hands)
- We attach the petals to the bud one by one, adjusting the splendor of our flower
- The finished rose can be used for decoration. To do this, you need to cut the base and make a hole for fastening.
- Carefully place the flowers in the oven and bake until done. Then they can be opened with varnish if desired.

Now let's learn how to turn our roses into earrings. There are two ways. One of which is simpler, the second is more difficult, but the result is simply gorgeous
Simple earrings made of polymer clay (rose blanks)
- Remove the rose blanks from the oven. They already have a hole for mounting
- To turn them into earrings we will need: a pin with a double-sided eye, rings for fastening, earrings
- We string the rose onto a pin and fasten it so that there is an eyelet at the top and bottom for attaching it to the part.
- Attach a hook to the top using a ring
- On the lower part - a bead in the color of a rose (or as your imagination dictates). The bead will make the earrings a little heavier and they will hang down without twisting.

Earrings in the form of a bouquet of roses
- We need rose blanks again. But now they are raw and very small in size. They can come in a variety of contrasting colors, such as red and white
- We make a ball base. We attach roses to it using a toothpick. Make sure that they are in good contact with the base ball and do not fall off after baking
- Gaps can be filled with small green plastic leaves
- Carefully make a hole in the ball where the pin will be attached
- We bake our flower bouquet. The baking time will be slightly longer due to the higher density of the clay.
- After cooling, we attach our ball to the wire. Spectacular earrings are ready!

Polymer clay bracelet
- First, let's figure out what elements the bracelet consists of: the base (chain, rope, wire or fishing line), clasp and decorative elements
- We purchase the base and clasp from a hardware store, but we make the decorative elements ourselves
- Let's make a bright berry bracelet from raspberries and blackberries. It will complement any summer look and looks very original.
- To make raspberries, we need pink clay and green clay for the leaves. Making berries is very simple. The base is a dense plastic ball. Small balls of a similar color are attached to it. The balls are smaller at the bottom and larger at the top. We attach leaves to the base of the berry and attach a wire. Bake the berries according to the instructions for working with clay
- We make blackberries in the same way, but from black or dark purple plastic
- To make our bracelet brighter, in addition to the berries, we will attach beads to the base
- For the base of such a bracelet, it is better to use a chain with a decorative clasp

Polymer clay ring
- A polymer clay ring can be made in two ways: solid plastic or based on
- A solid ring is made using a mold. A mold is a heat-resistant silicone mold that is filled with plastic and baked with it. The hard plastic is then simply removed from the mold, sanded and varnished
- For the second version of the ring you need a base. There are many such bases in hardware stores, where there is a niche for attaching plastic
- You can imagine endless ways to decorate a ring. There are a lot of options, but the simplest and most versatile option is flowers.
- A ring paired with earrings or a necklace looks especially original.


Polymer clay beads
- To learn how to make beads from polymer clay, first learn how to make smooth, neat beads
- Even ordinary beads are not so easy to make so that they are the same size and correct shape. Practice making even balls of the same size and making holes in them for fastenings
- Once the basics are mastered, you can begin making decorative beads
Polymer clay beads with metal effect
- Such beads are difficult to distinguish from metal ones. But thanks to your imagination they will be unique
- We will need gray or metallic plastic, an embossing element (for example, a button) and tools
- First, roll out a smooth ball of plastic
- Now we roll out the plastic into a dense layer and use a button to emboss it. To prevent the button from sticking to the polymer clay, moisten it with water.
- Then carefully cut out the embossed elements with a blade and attach them to the ball
- We decorate the joint with a decorative plastic cord
- Make a hole in the bead for fastening
- These beads can be used for beads, bracelets, earrings and much more.

- Making a massive summer necklace from polymer clay is more difficult and requires some skill.
- For it we need: plastic, decorative beads, chain and fastening
- First, draw a sketch and decide where which elements will be placed
- Then we will prepare individual flowers, leaves and beads
- For the base, we need a piece of thinly rolled plastic of the desired shape. Choose only high-quality plastic for such work, otherwise a poor base simply will not withstand the abundance of elements and will break
- After the workpiece, we attach all the elements to the base according to the sketch. Don't forget to make holes for attaching to the chain

Hair decorations made of polymer clay
- Polymer clay can be used to decorate hair clips, headbands and garters.
- You can attach the elements to the base using special glue or invisible fishing line
- For any products consisting of several elements, you need to make a sketch, because imagination does not always correspond to the result
Delicate flowers for decorating hairpins and headbands
- We will need: polymer clay and stacks (you can use a toothpick)
- Knead a piece of clay of the desired color and roll it into an oval
- We make cuts, the same number as the number of petals planned
- Now we make each petal, bending it using a stack
- We give the flower the desired shape, trim off the excess plastic
- The middle can be decorated with yellow plastic stamens or simply filled with paint
- These flowers can be used for all types of decorations. They are very reminiscent of apple or apricot flowers

Clay headbands
- For clay rims, it is better to choose a thin base, plastic or metal.
- When securing the elements, make sure that they do not cling to the hair.
- Here are examples of headbands for inspiration:


Hairpins made of polymer clay
- The basis of the hairpin can be an old plastic hairpin, a regular automatic hairpin or bobby pins
- To ensure that the hairpin lasts a long time, do not choose elements that are too massive for small bases.
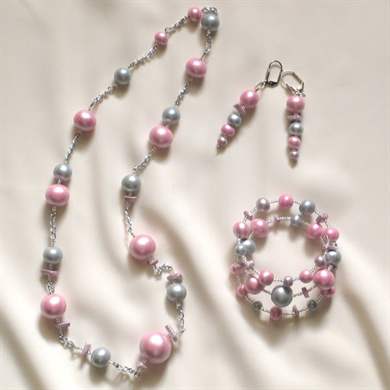
Hello! Today is a very interesting master class on making beautiful summer jewelry with your own hands, using already outdated beads that are a pity to throw away and are no longer fashionable to wear. Agate beads and metal beads are available for alteration. We sculpt the remaining details of the decoration ourselves from FIMO polymer clay. Let's watch and learn this fascinating needlework using an excellent master class from Ninel.

We always have a lot of fantasies and ideas for making jewelry. But when you start to create something, it doesn’t always turn out as planned. Often changes occur in the process, new ideas appear, and the end result is completely different from what was originally intended. But it was these beads that prompted the author to come up with a floral theme, since it was summer outside and I wanted to make the decoration delicate!
To make the decoration we will need: gloves, baked polymer clay FIMO, stacks, a brush, a flower cutter, mother of pearl and suitable accessories. We will create a four-piece jewelry set. Complexity of manufacturing at the initial level.

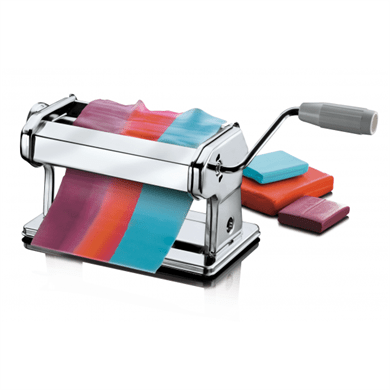
Let's prepare polymer clay of 4-5 shades from dark blue to white and roll out each color on a paste machine, apply mother-of-pearl with a brush to the surface of the already rolled out layer (you can use old eye shadow) so that the tool does not stick to the surface of the clay. And let's start squeezing out flowers using a cutter: white - 12 pieces, pale blue - 17 pieces, light blue - 25 pieces, blue - 20 pieces and dark blue - 25 pieces.


Each flower will have to be decorated with a stack with a ball, as shown in the photographs.


We place the decorated clay flowers on a sheet of foil and make a puncture in the center with a stack. Then we send our creations to the oven for baking at 130 degrees for 15 minutes.


At this time, you can distract yourself and prepare the next stage of work.

Take a blue chain and measure 55 cm, cut it off with wire cutters, fold it in half, find the middle, mark it and attach the already cooled flowers to the chain with a pin with a ball and a metal bead.


I suggest immediately dividing the flowers by color, each color separately, this will be more convenient for further work with them.

We first assemble one side, and then duplicate the second, plant clay flowers on the chain through one link, I also found green acrylic leaves that can be made from UV resin, I will attach them too.


It's time for the ring. You need to take the base for the ring with holes or special rings and decorate it in a circle with flowers and leaves like this!


For the earrings, I took clips and attached a chain to the hole of the clips, the length depends on your desire, mine is 6 cm. Next, we collect the flowers on the chain in the same way: from dark to light colors. This is what we got.


Finally, the time has come for the bracelet; the work is, of course, painstaking, but interesting. Measure your wrist, divide it into three parts, and do the same with the chain. Every three parts of the chain need to be connected to a connector with a pin to create a bracelet frame like this.


Connect the end of the bracelet with a ring.

And now we can safely start decorating the middle with flowers.


We will secure it with a pin on the back side of the chain so that the middle does not fold and the flowers do not turn over.
Designer jewelry is always highly valued in the fashion world. Polymer clay allows you to make any decoration with your own hands, putting your warmth, energy and imagination into it. Costume jewelry made from polymer clay is very popular among the fair sex.
Polymer clay

Polymer clay is a plastic material that resembles plasticine, beloved from childhood. When heated to certain temperatures, it hardens and becomes like plastic. You can make any jewelry from it: earrings, rings, necklaces, pendants, hairpins and much more.
Huge color palette allows you to choose any shade. Colors can be mixed to create new ones.

The material is considered non-toxic and therefore safe for health.
Imagination, accuracy and creativity will ensure excellent results and will delight the author with new products.

Polymer clay is produced by many manufacturers, of different qualities and different price categories.
To begin with, you can choose soft types of clay, from which it will be easier for a beginner to sculpt.
You shouldn’t buy a whole package; first, it’s better to buy a separate color and try to make simple elements out of it and bake it. If the product has not cracked or changed color, then you can purchase a set from this manufacturer.
Before sculpting, you need to hold the clay in your hands - it will warm up from the heat, and it will be easier to sculpt.
It is better to roll out the clay in thin layers so that the resulting product is neat and elegant.

You should carefully read the instructions on the package, which indicate the baking time and temperature conditions. It must be strictly observed and in no case increased, otherwise the product will deteriorate.
In addition to clay and an oven, you will need various accessories and tools.
Tools

- a machine for rolling out clay;
- extruder;

- texture sheets;

- glue;
- stationery knife;
- brushes of different sizes;
- stacks of wood;
- surface for modeling;
- toothpicks.
Graceful roses

This master class will tell you how to sculpt flowers from polymer clay.
Roses look very beautiful and natural. They can be used to decorate earrings, bracelets, and hairpins.
Materials:
- polymer clay of any shade - red, pink, white, yellow for a flower;
- stack with a ball;
- device for rolling clay.
- First you need to create blanks for the flower petals.
To do this, you need to make as many small balls as the flower has petals. The sizes of the balls can be different, because a real flower has smaller petals on the inside than on the outside.
- Roll out the balls and cut into halves.
- Create the center of the flower: to do this, make a droplet from one ball with your fingers.
- Then gradually form a bud, alternately attaching the petals to the center.
The splendor and size of the rose will depend on their number.
- Bake according to the time and temperature indicated on the package.
The video below discusses in detail all the stages of this master class:
Earrings

Using the technique of making roses as a basis, it is not difficult to make earrings.
Materials:
- roses made of polymer clay;
- rings for fastening;
- ear wires.
Before sending the flowers to bake, you need to pierce a hole in the petal, into which you can subsequently insert a ring and attach it to the earring, and enjoy beautiful new earrings, such as in the photo:

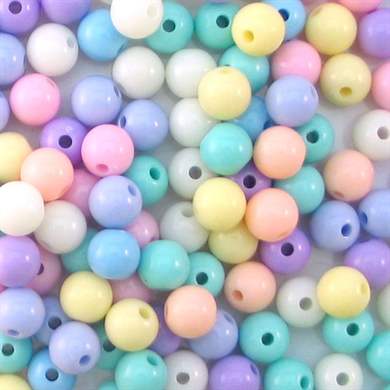
Beads
Handmade beads look incredible. They look very feminine and add originality to any look.

Materials:
- polymer clay of various pastel shades: beige, pearl, caramel, pink-brown, white.
- glitter;
- toothpicks;
- varnish for plastic (matte and glossy);
- cord or chain.
- knead the clay;
- divide into pieces based on the size of the beads;
- form beads of different sizes;
- use a toothpick to make holes in them;
- add glitter to several beads; to do this, dip your finger in the glitter and press it to the surface of the bead;
- bake;
- let the beads cool completely;
- cover part of the beads with glossy varnish, and the other part with matte varnish;
- collect beads.
You can make any decoration that will complement your favorite dress, suit or blouse. It will harmonize with the outfit or, on the contrary, will become a bright accent in the image. Handmade jewelry made from polymer clay is a pleasure to give as a gift. For original work you need very little free time, creativity and imagination.

Video selection:
Evgenia Smirnova
To send light into the depths of the human heart - this is the purpose of the artist
Content
Modeling is an easy and very exciting hobby. It allows you to make a lot of different things yourself - jewelry, toys, decorative crafts and sculptures of various shapes. Finished goods They are perfect for unusual interior design and can be wonderful gifts for almost any holiday. Where to get material for modeling, how to work with it correctly, and what can you make from clay with your own hands?
Modeling from polymer clay for beginners
Polymer clay is synthetic material, which is similar in properties to plasticine, but is capable of hardening. It is called differently - plastic, thermoplasticine, thermoplastic, cernit. Beginning craftsmen need to know that polymer clay comes in two main types - one hardens only when baked, and the other without firing. Before choosing what can be made from clay, it is worth deciding what type of material will be used (purchased clay or homemade modeling clay).
How to make polymer clay at home
Those who do not want to incur the cost of purchasing ready-made material for modeling can prepare it themselves. It would be incorrect to call homemade polymer clay, since it is made using completely different components. However, the resulting material can be processed using standard techniques for working with polymer clay. To make it, you need:

- 1 cup white PVA glue;
- 1 cup cornstarch;
- 2 tablespoons lemon juice;
- 1 tablespoon Vaseline;
- 1 tablespoon of any low-fat cream;
- glass mixing bowl;
- spoon for stirring;
- substrate for kneading clay;
- polyethylene film.
The given amount of ingredients is enough to make approximately 350 g of plastic mass for modeling. The technique for making clay is simple: using a spoon, carefully mix PVA glue, starch and Vaseline in a bowl. Then add lemon juice to the mixture and mix everything well again. Next, place the bowl in the microwave at maximum power for 30 seconds.

The surface on which the clay will be kneaded should be lubricated with hand cream. The mixture, kept in the microwave and mixed again, must be placed on this surface and kneaded vigorously for 5 minutes, like regular dough. The result of all the work should be an elastic and plastic material. It needs to be rolled into a “sausage” shape and wrapped in cloth to remove excess moisture. The clay will be ready for use immediately after cooling.
What you need for sculpting
During the sculpting process, any available means are used that can make working with clay easier and help give the material the desired shape. It is better for novice craftsmen not to stock up on a large number of professional tools at once, since many may not be useful. The minimum set of devices and materials for working with polymer clay is presented in the following list:

- hard working surface;
- cutting tools - stationery knife, razor blade for small work;
- rolling pins for rolling out different sizes - any convenient cylindrical objects will do;
- toothpicks or needles - use them to make holes, roll out small elements thinly, and secure parts;
- cutters - this is the name of special molds for cutting out figures, but for the first time, any other devices, for example, caps from bottles of different sizes, will do;
- wet wipes and gloves.
Modeling techniques
When choosing what you can quickly make from clay, you need to study a variety of modeling techniques, which offer the novice master many ideas for creativity. They are used both for making clay products without firing, and when working with baked clay. Depending on the planned shape, color and design elements, polymer clay crafts can be made using the following popular techniques:

- Cane technique - rolled pieces of clay in different color combinations are laid out in layers and rolled into rolls, the cut of which produces original multi-colored patterns.
- Technique smooth transition colors - polymer clay is mixed in different proportions, achieving the effect of transition from one color to another.
- Filigree technique - the workpiece is covered with very small pieces of clay, forming a beautiful openwork pattern.
- Kaleidoscope technique - layers of modeling material of different colors are rolled into rolls, and then given various geometric shapes by pressing them onto a flat surface.
- “Salt” technique - beads or other elements are rolled in coarse salt, baked, and after cooling, the salt is washed out with water, achieving a relief texture on the surface of the products.
How to sculpt from polymer clay
Self-hardening clay, after hardening, feels like wood or plaster to the touch, making the products amenable to processing with appropriate tools. The baked polymer material after exposure to high temperature is harder and resembles plastic. You need to buy such clay in art and craft stores.

The first products made from polymer clay should be made in the form of easily processed elements, using available tools and gradually mastering various simple modeling techniques. It is best to start working with flowers (roses or lilies), bouquets, and jewelry. When choosing what to paint polymer clay with, preference should be given to acrylic paints. If gouache is chosen for painting, a layer of waterproof varnish is applied over it, and before painting with nitro enamel, it is recommended to prime the surface with epoxy glue.
Flowers

To make a rose, you first need to make a small ball and give it a teardrop shape - this will be the core of the flower. Then roll a few balls and flatten them with your fingers, turning them into thin petals. They should be wrapped one after another around the core, forming a bud. It is better to leave the first petals straight, and bend those at the edges outward.
Articulated doll

To work on making a jointed doll, you need foil. With its help, blanks of parts are formed on which a layer of polymer clay will be applied - the torso, head, legs and arms, as well as the hinges themselves for the hips, knees, forearms, elbows and hands. After drying, the parts are cut and the foil is removed. Then they are sharpened to better fit each other in size, glued at the cut points and connected using elastic laces.
Costume jewelry

Decorations of simple shapes are something that can be easily made from clay, even without good modeling skills. Any novice craftsman will be able to make a ring, earrings, bracelet or pendant using simple techniques. It is best to choose a light version of the product for the first work, for example, make simple beads or earrings. To do this, the clay is rolled out and equal squares are cut into it, which are rolled into balls - so each bead will have the same size. Then you need to make holes in the beads with a needle.
Master class on polymer clay crafts for children
Modeling classes help a child learn the world and develop fine motor skills. The possibilities for creativity here are endless, but when choosing what a child can make from clay, it is better to start working with things of the simplest shapes that he can make on his own or with minimal help from an adult. For example, you can sculpt food for dolls with your child or teach him how to sculpt different animals.
Food

It will be easiest for a child to fashion food for dolls such as vegetables and fruits. Show him how to use a needle to make a “real” peel for an orange, beautifully design a leaf on an apple by drawing veins on it, or give the correct shape to a pear. You need to gradually master different methods and techniques of sculpting with your child, and it is also important to take into account that children always want to see the result of their work faster. To prevent your child from losing interest in modeling, it is better to explain to him in advance that the products will not be ready right away.
Animals

For sculpting animals, it is best to use simple pictures where the animals are depicted schematically. Looking at them, it’s easier to choose what to sculpt, and it’s easier to figure out how to give the details the desired shape. For very small animals, it is allowed to use solid pieces of material, and larger figures are recommended to be made using the hollow parts technique, using improvised molds for modeling. Beads are used to decorate the eyes and noses.
Clay products for modeling and firing
How to prepare clay for modeling? Immediately before starting work, you need to knead it well with your hands - this way it becomes more flexible. When using baked white or red clay, it is important to maintain the correct temperature when heating the products. It should be within 110–130 degrees, since with more high temperature the clay may lose shape, darken, or even catch fire.
Is it possible to make baked clay yourself? Theoretically, this is possible, but, firstly, to create such a material you need to find high-quality natural clay, and secondly, it will be difficult to properly fire it at home without special equipment. It will be possible to independently produce such material for modeling only experimentally, that is, by trial and error.
Vase

For the manufacture of thin and tall figures and sculptures, it is recommended to use a frame. When creating a vase, a beautifully shaped plastic bottle will best serve as such a frame. It needs to be cut into two parts, and then each one should be covered with rolled out layers of self-hardening polymer clay. After hardening, both parts are carefully glued together and a finished vase is obtained.
Figurines

When sculpting figures and sculptures, you cannot do without a base for sculpting. To create it, various available materials can be used, for example, flexible wire. If a novice master is interested in how to mold a person from clay, then in this case it is better to resort to video tutorials that show the process of performing such a complex work step by step.
Video tutorials on clay modeling
The video tutorials on modeling provide a lot of necessary information for beginning craftsmen: how to fire clay at home, how best to use certain techniques. Master classes in video format help you better learn the intricacies of working with polymer materials and quickly master the independent production of elements of varying degrees of complexity.
New Year's crafts
On New Year It’s so nice to give homemade crafts to relatives and friends. Ideas for them can be easily found in video tutorials on creating New Year's souvenirs using available materials. With the help of a step-by-step master class, anyone will be able to make beautiful and original crafts - Christmas tree decorations, gift figurines or even New Year's masks, which are sure to please loved ones and make the holiday better.
We also recommend
 Presentation on the topic "time"
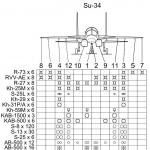 Russian aviation What materials are the Su 34 aircraft engine made of?
 The land near the Dirigible shopping center has changed its status from “business” to “park” What is being built next to the dirigible
 Printable forms 8.3. Adding an external printing form to the database. Where are printed forms stored?
 How to work as a sales manager - features of the profession Profession sales manager description for children
 Estimation of gross profit 1c retail 2