Printable forms 8.3. Adding an external printing form to the database. Where are printed forms stored?
This article will tell you in detail how a beginner with little knowledge of 1C 8 can create a printed form. For example, let's take one of the most common 1C 8 configurations - Accounting 2.0. Creating a printed form 1C stages of writing:
- Creating an external printing form file;
- Creation of a printed form layout;
- Writing program code to display printed form data on the screen;
- Creating parameters for auto-registration of a printed form;
- Connecting an external printing form to the base 1C Enterprises.
Creation of a printed form 1C. Formulation of the problem
We are required in the configuration Accounting 2.0 create a printed form for a document Receipt of goods and services. In the header of the printed form, display the following data:
- Organization;
- Counterparty;
- Counterparty agreement;
- Date of receipt.
Display the data in the tabular section as a table Goods document. The table should include the following columns:
- Nomenclature;
- Quantity;
- Price;
- Sum;
- And also the price of the item for the current date (by type of price from the document).
External processing file
Let's move on to solving the problem. First, let's open 1C 8 in mode Configurator. It is in this mode that all developments are carried out on the 1C 8 platform. Now we need to create an external processing file. To do this, click on the menu File -> New… or by the icon of a new file.
In the window that opens, select the item External processing.

Next in the field Name You must enter the name of the external processing. In our case, we’ll simply call it “PrintForm”; the synonym field will be filled in automatically. Please note that in the field Name, external processing, the name should be written without spaces or punctuation marks.
Let's add external processing attributes LinkToObject and select type for him DocumentLink. Receipt of Goods and Services. To do this, in the 1C external processing metadata tree, select the item Requisites and press the button Add(button with green plus). The attribute properties window will open on the right side of the screen, in the field Name let's write - ReferenceToObject. IN field Type press the button with three dots.

Let's expand the branch in the type tree DocumentLink, and find the element Receipt of Goods and Services there, check the box next to it and click OK.
Let's save the external processing file to the hard drive; to do this, use the menu File -> Save, pictogram Save(blue floppy disk), or a keyboard shortcut Ctrl+S. Let's name the saved file “PrintForm”.
Creating a printed form layout
Let's start creating a layout of the 1C printing form. The layout serves as a template for the output of the printed form, so if you want your printed form to look good, you should pay attention to it.
Let’s add a new layout in the external processing metadata tree; we won’t change anything in the layout designer window and click the button Ready.

In the new layout that opens, we will create several areas necessary for displaying the printed form. All the layout areas we need will be horizontal, so to create a new area, select the required number of layout lines and go to the menu Table -> Names -> Assign name or use keyboard shortcut Ctrl + Shift + N, then enter the name of the region in the box. When creating a layout area, don’t be afraid to make a mistake with the number of lines; you can always add or remove them. To delete a 1C layout line, select the desired line and select the item in the context menu Delete. To add a new line to the layout, select any line of the layout and select the item in the context menu Expand.
Adding a Layout Header
First of all, let's create an area A cap, it will display the data for the header of the printed form. For this area we will need seven layout lines. Let's select them and, as I wrote above, press the key combination Ctrl + Shift + N, in field Name write “Hat” and press the button OK.

Let's fill the layout area with the data we need. Usually, no printed form is complete without a title, so let’s create one in our layout header as well. Since in the title, in addition to the name of the printed form, we will also display the number of the document from which it was printed, we will set the text of the title in the layout as a parameter. A layout parameter is a specially designated layout cell into which various data can be output using the built-in 1C 8 language. The title should be displayed across the entire width of the printed form, so let’s decide how many layout cells will be enough for us to print on a standard landscape orientation of the sheet.
Usually thirteen or fourteen layout cells are enough, select them in the first row of the area A cap and combine into one cell ( Context menu -> Merge). After this, double-click on the resulting large cell and write the name of the parameter, in our case “TitleText”. In order for the entered text to become a full-fledged parameter, right-click on the cell and select the item in the context menu Properties. On the bookmark Layout let's find the field Filling and select the value Parameter. Parameters in the 1C layout are indicated by brackets “<>».
The heading of the printed form should stand out among the other text, so select the cell again and use the icons on the layout formatting panel to set the text alignment Centered and font size 14.
After the title text we will display it in the area A cap information about the organization, counterparty, counterparty agreement and date of receipt of goods. Since all this data is also taken from the document, we will also formalize it with parameters. In addition, before each parameter you should write explanatory text so that the user can easily understand where the organization is, where the counterparty is, etc. All these actions are similar to creating a title, so I won’t dwell on them in detail, I’ll just give a picture of what should happen in the end.
The figure shows how the layout parameters differ from regular text.
Adding a Layout Table Header
The last thing we need to create in this layout area is the table header, into which the data of the tabular part will be displayed Goods. The columns required for the table were described in the “Problem Statement” section. We will also create a table header using a combination of cells and writing text (column names). Select the borders of the table header using the tool Frame, which is located in the layout formatting panel.

Adding a table to a layout
Let's create another area in the layout - Data. The data table of the tabular part will be displayed in it Goods. For this area, we only need one line of layout. To display all the rows of the tabular part in a printed form, we will fill and display this area the required number of times. Columns in the area Data should coincide with the columns of the table header, so filling it out will not be difficult. The only difference is in the area Data we need parameters, not just text. Also note that by default, numeric parameters are formatted to the right and text parameters are formatted to the left. To select columns, you also need to use the tool Frame.
Adding a Footer to a Layout
The last layout area we need is Basement. It will display totals by quantity and amount. Creation is similar to creating an area Data, but additionally the results should be highlighted in bold.
The end result should be a layout that looks like this:

Creation of a printed form 1C. Programming
Let's start programming - this is the most important stage in creating a printed form. First of all, let's go to the external printing form object module, this is where we will program. To do this, in the main external processing window, click Actions -> Open object module.

You need to create an export function in the external printing form object module Seal().
Function Print() Export EndFunction
Please note that this feature is required for external printing forms in configurations using the regular application. All subsequent program code necessary to display the printed form will be written inside this function.
Initializing Basic Variables
Let's create a variable TabDoc, which will contain a spreadsheet document - this is exactly the printed form into which we will display the filled areas of the layout.
TabDoc = new TabularDocument;
To a variable Layout We will get the printed form layout we created. To do this we use the built-in function GetLayout(<ИмяМакета>).
Layout = GetLayout("Layout");
We will convert all areas of the layout into variables. To do this we use the layout method GetArea(<ИмяОбласти>) .
HeaderArea = Layout.GetArea("Header"); AreaData = Layout.GetArea("Data"); AreaFooter = Layout.GetArea("Footer");
Outputting the header of a printed form into a spreadsheet document
All necessary variables are initialized. Let's start filling and displaying the layout areas in a spreadsheet document. First of all, let's fill in the title of the printable form; for this we need to pass in the parameter Title Text, which we created in the layout, the text we need. To fill in the parameter values for the layout area, there is a special collection called - Options. From which through “.” you can get any parameter. In the header text we will transfer the text: “Printed form”, as well as the document number.
Header Area.Parameters.TitleText = "Print form"+LinkToObject.Number;
We will fill in the remaining parameters of the header in a similar way; we will obtain all the necessary values for them from the details Object Reference, which contains a link to the document being printed.
HeaderArea.Parameters.Organization = LinkToObject.Organization; HeaderArea.Parameters.Account = LinkToObject.Account; HeaderArea.Parameters.ReceiptDate = LinkToObject.Date; Header Area.Parameters.Counterparty Agreement = LinkToObject.Counterparty Agreement;
All parameters of the header are filled in, we will display it in the spreadsheet document we created, for this we use the method Output(<Область>) .
TabDoc.Output(HeaderArea);
Writing a request for a printed handicap
Let's start filling and drawing out the area Data. Creating a 1C printed form also involves writing a query; we need it to obtain tabular data Goods and prices Nomenclatures for the current date we will use Request. The 1C 8 query language is similar to SQL, or rather practically copies the capabilities of its SELECT operator, but the entire query is written in Russian. Therefore, if you are at least vaguely familiar with SQL, then you will easily understand the 1C 8 query language.
In this printed form, the request will be quite simple and many will say that it would be possible to do without it, but knowledge of the query language and the ability to use it competently is one of the main skills of a 1C programmer. Queries allow you to obtain complex data samples using fewer resources, and the query text is much easier to understand than program code written without using a query (or with minimal use of it). In addition, 1C 8 has a very good query designer that allows you to interactively assemble a query from the necessary tables.
Let's create a variable that will contain the request.
Request = New Request;
We will compose the request text using the request constructor. To begin with, let's write:
Request.Text = "";
Place the mouse cursor between the quotes and press the right mouse button. In the context menu that opens, select the item Request constructor, it will help us a lot in creating a 1C printing form. After this, the query designer window will open; it contains many tabs, but for our query we will only need four: “Tables and Fields”, “Relations”, “Conditions”, “Joins / Aliases”.

For our query we will need two tables: table part Goods document Receipt of goods and services and a snapshot of the latest information on the current date of the register Item prices.
On the left side of the designer window we find the column Database. It contains a tree of all metadata objects, let's find the ones we need. To do this, let's open the thread Documentation and find the document Receipt of Goods and Services, let's open it and find the tabular part Goods, drag it into the column of the query designer Tables. You can drag in three ways: by dragging, by double-clicking on the table, or by selecting it and clicking the “>” button. Let's open the thread Information Registers and find a table there PricesNomenclature.ShortcutLatest, also drag it into the column Tables. These two tables are enough for our query.
Let's select the fields we need from the resulting tables. To do this, in the column Tables let's open the table and find the fields: Nomenclature, Amount, Price, Quantity and drag them to the third column of the constructor - Fields. Let's expand the table , let's find the field Price and also drag it to Fields.

The structure of the tables and fields of our request is ready, now let’s move on to the conditions. We need the tabular data Goods were not taken from all receipts, but only from the one we print. To do this, we will impose a condition on the table Receipt of GoodsServicesGoods. Let's go to the “Conditions” tab of the query designer. In a collumn Fields the tables we selected earlier are located, for the condition we will need a field Link from the table Receipt of Goods and Services Goods, Let's drag it into the Conditions window.
In 1C queries you can use parameters; they are needed to transfer data to the request. For example, if we want to limit the selection of documents to a specific document, then we can use a parameter to pass a link to this document to the request and use this parameter in the condition. This is exactly what we will do in our request.
After the window Conditions we added a field Link, the query designer itself will create a parameter with the same name and place it after the “=” sign. This parameter can be renamed if desired. In the request text, the parameters are marked with the “&” sign, but in this case this is not necessary, since it is assumed that the second part of the condition contains a parameter, you just need to remember this. How to pass a value to a 1C request parameter will be discussed below.

Since in the request we are using not a full table of product prices, but a virtual one (a slice of the latter in this case), we need to set the conditions for the formation of this virtual table, in our case this is the cut-off date and the condition for the type of prices (prices that have a strictly defined price type is the one specified in the receipt document that we print).
To fill in the parameters of the virtual table, go to the tab Tables and fields query constructor, in the column Tables select the table PricesNomenclatureCuttingLatest and press the button Virtual Table Options, located at the top. In the window that opens, in the field Period you should set a parameter to which the date on which the price cut will be made will be passed. In our case, this will be the current date (that is, today), so we will call the parameter “&CurrentDate”. In the conditions field we will write the conditions for the price type, we will also pass it in the parameter, which we will call “&TypePrice”. The resulting condition will look like this (where TypePrice- register measurement Item prices):
PriceType = &PriceType
The virtual table parameters are filled in, click the button OK.

Now that we have limited the selection to only the document we need, let's create connections between the query tables. If this is not done, then the prices from the PricesNomenclatureSliceLast table will not be associated with the item from the receipt. Let's go to the tab Connections query designer. Let's create a connection across the field Nomenclature between our two tables. To do this, press the button Add, in field Table 1 select a table Receipt of GoodsServicesGoods, and in the field Table 2 - PricesNomenclatureSliceLast. In the communication conditions, select the fields Nomenclature from both tables.
It should also be noted that in the query selection we need to get all the rows from the tab part Goods and prices only if they are available on the current date for the document price type. Thus, the tabular data Goods are mandatory, but price breakdown data is not available. Therefore, in the relationships between these tables, it is necessary to use the so-called LEFT JOIN, and the left (or required) table will be Receipt of GoodsServicesGoods, and the right (or optional) PriceNomenclatureSliceLast. In order for the left join of query tables to work as I described above, you need to check the box All after the field Table 1.

The request is almost ready, all that remains is to work a little on the field aliases. Let's go to the bookmark Unions/Aliases and set an alias for the field PricesNomenclature Slice Latest.Price. The nickname name will be - PriceAsToday, it is needed so that the names of the query selection fields and the names of the parameters in the printed form layout match.

The work in the query designer is now complete, click OK. After the designer window closes, you will see that the line with the request text is filled in and looks like this:
Request.Text = "SELECT | Receipt of GoodsServicesProducts.Nomenclature, | Receipt of GoodsServicesProducts.Amount, | Receipt of GoodsServicesProducts.Price, | Receipt of GoodsServicesProducts.Quantity, | PricesNomenclature Slice of Latest.Price AS PriceToday | FROM | Document. Receipt of GoodsServices.Goods AS Receipt ProductsServicesProducts | LEFT CONNECTION RegisterInformation.PricesNomenclature.SliceLast (| &CurrentDate, PriceType = &PriceType) AS PricesNomenclatureSliceLast | ON Receipt of GoodsServicesProducts.Nomenclature |
Executing the request
Let's pass the necessary parameters to the request; for this we will use the request method SetParameter(<ИмяПараметра>,<Значение>).
To get the current date, use the built-in function The current date(), it returns the computer's date and time.
Let's run a query to get a sample with the data we need. To do this, first use the request method Run(), and then the method Choose().
Select = Query.Run().Select();
Filling out the printed form table
As a result, in the variable Sample will contain a selection of query results, you can navigate through it using the method Next(), and to go through the whole thing you need a loop Bye. The design will be as follows:
While Select.Next() Loop EndLoop;
It is in this loop that we will fill and display the layout area Data. But first, let's initialize two variables of numeric type. In them we will collect the totals by quantity and amount that we need to display in the area Basement.
TotalSum = 0; TotalQuantity = 0;
Inside the loop we will fill the area Data data from the current selection element into variables TotalAmount And TotalQuantity add sum and quantity values, and finally, display the area in a spreadsheet document using the method already familiar to us Output(). Since the names of the fields of our request completely coincide with the names of the area parameters Data, then to fill we will use the built-in procedure FillPropertyValues(<Приемник>, <Источник>), which copies property values<Источника>to properties<Приемника>.
While Selection.Next() Loop FillPropertyValues(AreaData.Parameters,Selection);
TotalSum = TotalSum + Sample.Sum;
TotalQuantity = TotalQuantity + Sample.Quantity; Basement TabDoc.Output(AreaData); EndCycle;
Outputting the footer of a printed form into a spreadsheet document
It remains to fill and display the last area of the layout - . We have already prepared the data for filling, filling and withdrawal are carried out according to the same scheme. AreaFooter.Parameters.TotalQuantity = TotalQuantity; AreaFooter.Parameters.TotalSum = TotalSum; TabDoc.Output(AreaFooter);
The spreadsheet document is completely filled out; all that remains is to display it on the screen so that the user can view the printed form and print it if necessary. But in typical 1C 8 configurations, the procedures of special modules are responsible for the output of external printed forms. Therefore, it is enough to return from the function
Seal() . We have already prepared the data for filling, filling and withdrawal are carried out according to the same scheme. completed spreadsheet document.
Return TabDoc;
When connecting an external printing form to the database, the system does not automatically determine which document or reference book the printing form is intended for; you have to select it manually. And if another person wrote the printed form, and you are only tasked with connecting it, then the choice may become ambiguous. In order to avoid such problems, in all external printed forms it is necessary to create a layout with auto-registration parameters. If it is created and correctly formatted, the system automatically determines which document or reference book the printed form is intended for.
It is done as follows:
- In external processing we create a new layout. We call it “Settings_Auto-Registration” (it’s important not to make a mistake!).
- In the first cell of the layout we write Documentation.(or Directories.) and the name of the document to which you need to connect the printed form.

Connecting an external printing form to the base
- Start 1C 8 in mode Company;
- Go to menu Service -> Additional reports and processing -> Additional external printed forms;
- Click the button Add;
- In the window that opens, click the icon Replace external processing file;
- If you have created auto-registration parameters, then we agree to use them;
- If you have not created auto-registration parameters, then in the tabular part Printing plate accessory add the required document or reference book;
- Press the button OK.

After this, the external printing form will be available in the menu Seal document Receipt of goods and services. The creation of the 1C printed form can now be considered complete.
2016-12-01T12:56:42+00:00A wonderful opportunity has appeared in 1C: Accounting 8.3 (edition 3.0). Now a user in 1C:Enterprise mode can easily edit printed form layouts.
When might this be useful? Well, for example, there is some printed form, say, “Demand-invoice”, in which you make some changes every time you print it. Change the font, reprint the fields, remove unnecessary things.
So why do this every time?! If we can make these changes to the layout of the printed form once, the program will always output the printed form as we need.
Below, step by step, I will show you how to change the layout of the “Demand-invoice” printed form. We will add a new field there: “Responsible”.
1. Create a printable form (click the “Print” button) and click the “More” -> “Change Layout” button in the form that opens (on the right):
2. The printable layout will open. Make the necessary changes to it, but be careful that it doesn't work out like this. I’ll say right away that fonts and field sizes can be changed absolutely, but deleting existing fields (especially those in<угловых скобках>) not worth it. If you want to hide a field in<угловых скобках>, just make it invisible (color or size), but it should remain on the form, since it is required by the 1C program code.

3. We will add the "Responsible" field and click the "Record and Close" button.

4. The printing form was reshaped in a new form as we wanted.

If, after changing the printing form, it stops working, then you.
Sincerely, Vladimir Milkin(teacher and developer).
This article describes how to connect an external printed form to a 1C database using the example of the “Trade Management 10.3” configuration
The “Trade Management 10.3” configuration is a configuration on so-called “REGULAR” forms, and not on “MANAGED” forms like “Trade Management 11.2”; for “MANAGED” forms we recommend reading.
Our instructions “show” how to connect an external printed form in 1C with configuration on “REGULAR” forms, namely:
- "Accounting 2.0"
- "Trade Management 10.3"
- "Salary and personnel management 2.5"
- "Comprehensive automation 1.1"
- "Manufacturing Enterprise Management 1.3"
- "Retail 1.0"
- and other similar configurations.
In order to connect an external printing form in 1C we will need to go through 11 steps.
1 - Menu "Service". 2 — Select “External printing forms and processing”. 3 — Next — “External printed forms” (see figure below ↓)
In order to convince you that this instruction is also suitable for other configurations on “REGULAR” forms, let’s present the same initial 1-2-3 step, but not in “Trade Management 10.3”, but in “Accounting 2.0” everything is the same there with the exception of slightly changed words in the subparagraphs, namely...
1
- “Service” menu (the same as in “UT 10.3”, and in others).
2
- Here “Additional reports and processing”, and not “External printed forms and processing” as in “UT 10.3”,
but still the meaning is the same and is located there in the “Service” menu.
3
- And then - “Additional external printing forms”, i.e. extra word “Additional” when compared with “UT 10.3” (see figure below ↓)

Next, we will continue using the example of “Trade Management 10.3” without unnecessary comparisons.
4
— Click on the “+” button i.e. "Add". 5
— A button where the folder is drawn (when hovered, a hint will appear: “Replace external processing file”).
In new versions of 1C (starting from August 2016), the program has a built-in warning mechanism about the danger of using unknown external processing that may contain “viruses”; in earlier versions of the program the warning will not appear! If it occurs, then to connect external processing it will be necessary - 6 - click the “Continue” button. (see figure below ↓)

7 — Select the directory in which the external printing form file we need is located. 8 - Select our file. 9 — Click “Open” (see figure below ↓)

10 — An external printed form may have auto-registration parameters, as in our case, here it makes sense to click “Yes” - thereby using these parameters during registration, i.e. automatically select those objects (documents or maybe, for example, directories) in which it will be possible to use a connected external printed form (see figure below ↓)

That’s all, we have filled out the table “Affiliation of the printed form”, thanks to the auto-registration parameters, we see the name of the connected external printed form, perhaps you will have the “Comment” field filled in, etc. You can add your objects to the “Print Form Ownership” table, for example, for our “Universal Printable Contract Form” processing, which supports printing of many documents and reference books, but auto-registration parameters are set only for the main ones: 10* — Click on the green “Add” button and select which objects to also place for processing. Now all that remains is - 11 - click on the “OK” button and (see figure below ↓)

Now it’s worth checking - did we do everything right?
To do this, we select an object to check, for example, the document “Sales of goods and services”, which is indicated in the table “Affiliation of the printed form”, this means that the connected printed form can be used in this document! Let's check... (see figure below ↓)

To check whether printing is possible, open any document of the form: “Sales of goods and services.” 13
— Click the “Print” button.
We see that a window for selecting printed forms has appeared, among them there is - 14
— external printing form connected by us (see figure below ↓)

As is known - without a piece of paper you... no serious business can do without. And when we say that 1C has some kind of electronic documents, the question immediately arises of how to print them in paper form.
The process of printing an electronic document 1C is called printing form 1C.
Each document can have several 1C printed forms. For example, the document Sales of goods and services (i.e. sale) is printed in 1C printed forms: TORG-12, Invoice, Consignment note, Certificate of services rendered, and so on.
The essence of the 1C printed form is a template (such as an Excel document) in which variables are specified. During the printing process, text from the electronic document is substituted for variables. The template is usually stored in the configuration.
The problem with changing a standard 1C printed form is that it is usually not advisable to change the standard configuration, otherwise it will be more difficult to update. Therefore, various methods for using external 1C printing forms appeared and began to reinvent the wheel.
An external 1C printing form is a printing template that is stored somehow separately from the configuration itself.
However, this is all theory. How to create your own printed form? Or better yet, how to make changes to an existing one?
How a 1C document is printed
To print any 1C document (which can be printed), you need to click the Print button in the document. 1C will offer to select a 1C printed form for this document from the list.

To the left of the Print button there is usually a quick access button to the last selected 1C printing form.
The print result looks like this. To print it to a printer, you need to place the cursor in the 1C printing form, press Ctrl+P or the printer button on the button panel or in the File/Print menu.
Print settings (margins, sheet orientation, etc.) are located in the File/Page Setup menu. You can also configure the user settings to print directly to the printer.
Where does this printing form come from?
Where is the 1C printed form?
Let's go to the configurator. Find the required document in the configuration window. Let's expand its Layouts branch. It is they who turn into the 1C printing form when printed.

However, it will not be enough - we were offered to choose many more options when printing. The fact is that many 1C printed forms layouts are hidden in another place.
Let's go back to the top of the 1C configuration window. Let's open the General branch, and then the General Layouts branch. This is where most of the layouts are located. This is especially true for state-regulated printed forms 1C - TORG 12, Invoice, etc.
By the way, it’s not difficult to notice that you will see several layouts of TORG12 or Invoice. Why? It's easy to explain. Laws and requirements change periodically. But we can't just change the same layout - and if we have to print the document from a date that is earlier than the change date. Therefore, several layouts are made and, depending on the date of the document, the correct one is used.

But that's not all! There are also external layouts. Where are they stored?
Let's return to 1C Enterprise mode. Through the user menu with administrative rights Operations/Directories, select the External processing directory.

The lines of this directory, which have the form Printing form, add printing options for the document specified in the table Ownership of the printing form (in the picture this is Sales of goods and services).
In order for this to work, you must make an external processing that has a Print() procedure in its object module labeled Export, which organizes the printing process.
But we are getting ahead of ourselves. Let's first look at how the layout of the 1C printing form is organized.
Layout of printed form 1C
The layout of the 1C printing form looks like this.

As you can see, it is divided into blocks. Blocks can be horizontal (name on the left) or vertical (name at the top).
The layout itself, as it is, is not printed. Individual blocks are printed. The programmer in the print processing procedure specifies the order of blocks and the number of repetitions of each block. As a result, the printed form is formed.
In order to assign an area, select several rows (or several columns) and select Table/Names/Assign a name from the menu. To remove, there is also the Remove name command.

The name is needed so that the area can be accessed from program code. The name can be assigned not only to rows or columns, but also simply to several cells. To do this, select the cells and select the same menu.
However, by default, custom cell names are not displayed. To see them, select the menu item Table/Names/Display named cells.
So, today we learned that a 1C printed form is formed using a layout. The layout consists of blocks – cleverly called areas.
Typical (commonly used) blocks for printing plates:
- Header – the title of the document is displayed
- Row – one row of the table is displayed, this block is repeated as many times as the rows need to be printed
- Footer – the end of the document is displayed.
Now we need to deal with the
Good afternoon.
Today I want to tell you how to create external printed forms for the “Salary and Personnel Management 3.0” configuration. As you know, ZUP 3.0 uses a library of standard subsystems, which means the processing structure looks completely different. When I first had to make a printed form for the BSP in managed forms (then it was UT 11), the first thing I did was go to the ITS disk in order to find detailed documentation there about what export procedures, what parameters should be processed and how it all works. Here ITS disappointed me a little, because... everything is told there about how the procedures should look in the document module, and in the external printed form the parameters of the “print” procedure are rearranged, so I had to look for information in other sources and tinker with the subsystem from the inside.
Well, let's begin. What we get at the end can be used as a template.
Step one- obvious. Let's create a new processing. Let's assign it an arbitrary name: "Print Sample".
Step two. Let's create a layout. Since we have a test example, I will create the simplest layout, without a single parameter.
Step three- The most interesting. Open the object module and start programming. According to the BSP, when registering an external processing, it (the processing) must indicate what it can do, what objects it is attached to, and what it is called. When asked what processing it can do, it should return a list of commands - this is a table of values. In our case, the processing can output one printed form, so there will be only one command. To generate a table of values, we will define a couple of procedures that will always be the same in all external printed forms:
//procedure that prepares the command table structure
Function GetTableCommand()
// Create an empty command table and columns in it
Commands = New ValueTable;
// What the description of the printed form will look like for the user
Commands.Columns.Add("View", NewTypeDescription("Row"));
// The name of our layout, so that we can distinguish the called command in print processing
Commands.Columns.Add("Identifier", New TypeDescription("String"));
// This sets how the processing command should be called
// Possible options:
// - OpeningForm - in this case, the identifier column should indicate the name of the form that the system will open
// - CallClientMethod - call the client export procedure from the processing form module
// - Call ServerMethod - call a server export procedure from the processing object module
Commands.Columns.Add("Usage", New TypeDescription("Row"));
// The next parameter specifies whether a notification should be shown when a processing job starts and ends. Doesn't make sense when opening the form
Commands.Columns.Add("ShowAlert", NewTypeDescription("Boolean"));
// For a printed form, it must contain the string PrintMXL
Commands.Columns.Add("Modifier", New TypeDescription("Row"));
Return Team;
EndFunction
//Creates a new row in the command table
Function AddCommand(CommandTable, View, Identifier, Usage, ShowAlert = False, Modifier = "")
NewCommand = CommandTable.Add();
New Team. View = View;
New Team. Identifier= Identifier;
New Team. Usage = Usage;
New Team. ShowAlert= ShowAlert;
New Team. Modifier= Modifier;
EndFunction
Function InformationOnExternalProcessing() Export
Registration Parameters = New Structure;
ArrayDestinations = New Array;
Array of Assignments.Add("Document.Hiring");
Registration Parameters.Insert("View", "PrintForm"); //maybe - Filling an Object, Additional Report, Creating Related Objects...
Registration Parameters.Insert("Destination", Array of Destination);
Registration Parameters.Insert("Name", "Hello World"); //name under which the processing will be registered in the directory of external processing
Registration Parameters.Insert("Version", "1.0");
Registration Parameters.Insert("SafeMode", TRUE);
Registration Parameters.Insert("Information", "SAMPLE");//this is how the description of the printable form will look for the user
CommandTable = GetCommandTable();
AddCommand(CommandTable, "Hello World", "Layout", "CallServerMethod", True, "MXL Print");
Registration Parameters.Insert("Commands", CommandTable);
ReturnRegistrationParameters;
EndFunction
Actually, you will have to tinker with it every time you create a new external printing form. From the piece of code it is clear that we will link it to the “Hiring” document, accordingly you write your own. Our printed form will be called “Hello World”, again we’ll change it to our own. Here it would be convenient to write an obvious billboard in the template so that it catches the eye, so as not to forget to correct it later; in my opinion, “Hello world” comes in handy. The version is for yourself, write what you want, it will be displayed in the form of an element in the directory of external processing. The word "SAMPLE" is also visible only in the form of a directory of printed forms. Next, we add a command, here the name of the button is passed to the second parameter, this is what the user will see in the document in the “print” menu item.
This set of three procedures is enough for the processing to be added to the directory of external processing; all this confusing code is service and has nothing to do with the printing algorithm. In fact, the authors of the BSP forced us to program in such a difficult way that if previously you immediately started writing the “Print” function, now when you write processing from scratch, and not according to a sample, you will waste time on the service. Previously, registration parameters were optional and were indicated in the processing layout, now everything looks much more serious. The first impression when I saw this was cool, so many possibilities, everything is unified... but in practice I always create just one command in one processing, and link it to one document. Those. in fact, I need two lines for registration: object name, button name. And here everything is so... well, oh well, it’s not for me to judge.
Step four- no less interesting.
PRINT function?
But no, now it’s not a function, but a procedure.
How can I get the layout back?
Send it to the global print subsystem module function.
Okay 
Here is the text of this procedure:
Procedure Print(Array of Objects, Collection of PrintForms, PrintObjects, Output Parameters) Export
If PrintManagement.NeedPrintLayout(CollectionPrintForms, "Layout") Then
Print Management.Output TabularDocumentIntoCollection(CollectionofPrintForms,
"Layout", "Layout",
GenerateTabDocumentSample(Array of Objects, Print Objects));
endIf;
End of Procedure
Now for clarification. The first line of the procedure contains a slightly unclear condition. The fact is that when we call the print procedure, the system passes us a table of values, which indicates what we need to print. In essence, the function ManagePrint.NeedPrintLayout(...) checks for the presence in the table of values of a row in which in the "Name" column there is a row with the name of the layout. In practice, in most cases the thing is useless, because... our processing will be able to generate only one printed form. Those. This condition can be omitted and it will not affect performance.
Next, Print Management. Output TabularDocumentIntoCollection(...) - this is what adds the tabular layout where it is needed, so that it can then be displayed on the screen. If you need to show your spreadsheet document in your own window (not in a standard one), then do not call this procedure, but simply write your code here.
I would also like to add that the Print procedure is performed on the client and, if necessary, you can open a free form here in order to ask the user for additional information necessary for printing.
Next, GenerateTabDocumentSample(...) is a function that we have to write in the processing module and which returns a tabular document. In 100 out of 100 cases it will be server-based, because... we need to get the value of the details from the objects listed in the "Object Array" parameter.
Step five- creating a layout.
Hurray, we'll finally get down to the layout algorithm, data retrieval, etc.
But in our sample we will act prosaically and I won’t even comment here)))
Function GenerateTabDocumentSample(Array of Objects, Print Objects)
tabDoc = New TabularDocument;
layout = GetLayout("Layout");
AreaHeader = Layout.GetArea("Header");
tabDoc.Output(areaHeader);
Return TabDoc;
EndFunction
That's all, thanks for your attention
We also recommend
 Presentation on the topic "time"
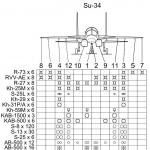 Russian aviation What materials are the Su 34 aircraft engine made of?
 The land near the Dirigible shopping center has changed its status from “business” to “park” What is being built next to the dirigible
 Printable forms 8.3. Adding an external printing form to the database. Where are printed forms stored?
 How to work as a sales manager - features of the profession Profession sales manager description for children
 Estimation of gross profit 1c retail 2