Forced update. Nikon D610 DSLR camera review. DSLR camera Nikon D610 Body DSLR camera nikon d610 body
A bad soldier is one who does not dream of becoming a general. This truth was written down many years ago and does not lose its relevance today. But among photographers there is a slightly different expression: “It’s impossible not to want a full frame.” But at the same time, the cost of a full frame did not allow every second person to buy such a carcass. In the camps of both Canonists and Nikonists, such cameras were intended for more professional use or for advanced enthusiasts, while it should be borne in mind that professional tools simply cannot be cheap.
It’s scary to imagine how much time in total is spent in the world dreaming about a 36x24 frame.
There were terrible legends about the full frame. It was rumored that anyone who picks up such a camera simply won’t be able to shoot with anything else, that there is a “Masterpiece” button, and every third photo taken with a full frame will be bought and printed by magazines such as National Geographics, Playboy and Esquire. Many even simply went to stores and held such carcasses in their hands in order to be imbued with the holy spirit of real creativity.
But now camera manufacturers are breaking all boundaries and are starting to produce cameras that you will not only want, but can afford. And one of these is Nikon D610.
Nikon D610 video review:
Design and ergonomics
Externally, the device most closely resembles the Nikon D600. Same controls, same ports. Go and check out his review.
I was too lazy to describe all this, but angry Chief Editor said: “Work!” So you have to work.
The base of the case is magnesium alloy, which protects the camera from external negative influences. A small amount of The plastic is still present and can be seen on the front side of the device. But at the same time, the solidity was not affected in any way - the carcass feels strong. It has dust and moisture protection, although its level is, of course, inferior to that of the D4 master, but you can shoot in light rain or snow without worrying. Even in ten-degree frost, all functions worked adequately for me, however, for this you need to prepare the camera in such a way.

The case fits into your hand like a glove, does not slip and does not tend to fall out. On the front side there is a battery handle with a functional wheel for more comfortable grip and control, a canonical red stripe, and two functional buttons. One has a function for changing the frame format - switching between FX and DX. This is very convenient when you need to bring your subject closer, but the zoom is not enough. Or for a more convenient compositional frame. On the second one, I personally installed an aperture repeater in order to quickly and conveniently assess the depth of field.
In the center there is a metal mount, and on the other side there is a lens release button, a lever for switching between automatic and manual focusing and a button for changing autofocus modes. Above, on the protruding prism block, there are keys for bracketing and opening the built-in flash. This is undoubtedly a plus, because all models of this class usually do not have a flash. Manufacturers believe that people using such a camera will use external lighting sources. This is partly true, but sometimes the built-in puff saves the day.

On the left side, under rubber plugs, there are connectors for connecting external accessories - Mini USB, HDMI, a port for a GPS module, and a remote control. There are also connectors for an external microphone and headphones, so it’s now much easier to control the quality of sound recording.

The right side still houses two SD card slots under a plastic cover. This solution will allow you to use twice as much memory and forget about worries about lack of space.
The bottom edge is occupied by the battery compartment and tripod socket.

At the top end everything is familiar. On the left are two wheels for switching modes, which are locked with buttons to protect against accidental rotations, while the lower one is responsible for selecting the shooting speed, mirror pre-raise, quiet mode, and the upper one is for selecting PASM, user saved modes and auto.

On the right is a monochrome display for displaying information, a shutter button with a three-position on/off/backlight lever, video recording, exposure compensation and focus area selection keys. It is worth noting that to control the functions you need not only to press them, but also to hold them while turning the wheel.
In the center above the bayonet mount is a hot shoe and a hidden built-in flash.

The rear edge is given over to a non-rotating 3.2-inch VGA display. Viewing angles and color rendition evoke genuine delight and a desire to view pictures right at the shooting location.
To the left of the display are five buttons: menu, color correction, setup information, zoom in and out. Almost all buttons have two functions. Thus, setting information can change the white balance, and zooming can change the image quality and ISO.

To the right of the screen is an info button, Live View mode framed by a video or photo selection lever, a four-way joystick, an OK button, and a focus point lock lever. Above the screen there is a viewfinder with a proximity sensor and diopter adjustment, to the left of it is gallery viewing and deletion. On the right is AE-L/AF-L and the second mode dial.

What's under the hood
Behind the mirror is a 24 MP sensor measuring 36 x 24 mm. Classic narrow film format in digital form. The Expeed 3 processor is responsible for correct operation. This is absolutely enough to ensure the highest speed of operation and forget about any slowdowns or speed problems.

The photosensitivity range is from 100 to 6400 units, and in extended mode the range from 50 to 25600 ISO becomes available. At the same time, the matrix makes little noise - values up to 6400 can be considered working. If you shoot in RAW with subsequent competent development, then 12800 is quite usable not only for the web, but also for printing in small sizes. Falling parts and colored noise cease to be noticeable even from a distance of one meter.
For printing from a device in A4 format, oddly enough, almost all values are suitable. Up to 6400 ISO, you can get high-quality prints even from Jpeg, but after that you still have to switch to RAW. 12800, after proper development, still shows some colored noise, but at arm's length, and even more so on the wall, it is difficult to see. But 25600 is not worth printing even from RAW larger than A5. Here you can already see the loss of detail on small textures and noise creeping in.

The rate of fire of the device is high – 6 fps in full resolution in RAW. The buffer is enough for a series of 15 frames, then the camera will shoot endlessly with a frame rate of almost 1 fps. With JPEG you practically don’t have to worry about the buffer – more than 30 frames will be enough in 99% of cases. Measurements were made with a fast memory card (review). With slower cards, the results may differ for the worse.

There is also quiet shooting at 3 fps. True, the volume here is an exclusively comparative parameter, but you will clearly attract much less attention.
The dynamic range deserves special praise - lights and shadows are processed correctly and correctly, but if the need arises, you can safely enable the D-Lighting or HDR extension. High Dynamic Range does not work with RAW or even in RAW+JPEG mode. To activate it, you will always have to switch to JPEG.
Autofocus
The autofocus system is inherited from the D7000. And I must say that she is cool. These are 39 points, of which 9 are cross points. But there is also a minus - the main array is concentrated in the central part of the frame. This means that aiming at the extreme point will be somewhat problematic, as well as aiming at the shallow one in the center of the frame. Personally, this was no problem for me - I focused, locked, moved the camera a little and got a good result. In general, the automatic focusing system works very correctly - quickly, tenaciously, accurately.

These definitely include the Time Lapse Motion shooting function, or time-lapse video, as you please. If earlier, to obtain such an effect it was necessary to spend a lot of time and effort, now we simply select the required item, interval and shooting time from the menu. Click “OK” – and we get the finished video in *.mov format. Everything else is not something supernatural - expanding the dynamic range, bracketing. That's all, we saw this in previous models.
Video capabilities
They are at their best here. FullHD up to 30 fps, high bitrate, flexible sound settings, microphone and headphone connections. But here, as almost everywhere else with Nikon, a minor and annoying bug appears. Well, why the hell am I, buying a carcass for two grand bucks, but I can’t change the aperture value when shooting video in Live View mode? At the same time, there are no problems with this in the older D800. I'm simply shocked that the company that was the first in the world to implement video recording in DSLRs behaves like this.
Nikon D610 vs. Nikon D600
- 6 fps versus 5.5 fps;
- the new model now features quiet continuous shooting;
- Fixed some bugs with color correction and white balance;
- From now on, in new models there are no problems with the shutter/mirror unit and no oil stains on the matrix. And in the predecessor this sometimes happened.
Fine
- excellent low noise sensor;
- Wide dynamic range in standard mode;
- bright and rich display;
- good level of video quality;
- variety of ports;
- dust and moisture protection;
- adequate work in low temperature conditions;
- fast and tenacious focusing;
- viewfinder with 100% field coverage;
- availability of time-lapse photography;
- many functions for correcting lens defects;
- slot for two SD memory cards.
Badly
- minimum shutter speed 1/4000;
- crowding of dots in the central part of the frame;
- IT IS IMPOSSIBLE TO CHANGE THE APERTURE IN Live View MODE;
- not the fastest autofocus in live sighting mode;
- absence of a histogram on the display when viewing via the display.

Which glass to take

It is worth saying that to unlock the full potential of the matrix installed inside the carcass, it is worth planning to purchase good and bright optics. At the same time, in conditions of limited finances, you can easily get by with primes - for example, Nikkor AF-S 50mm F1.8G.

In full frame conditions, this will be exactly the right fifty-kopeck, universal lens. It’s not for nothing that all film cameras were equipped with just such fixes - they can shoot almost all subjects: from architecture and genre, to portraits and landscapes. And the high aperture allows you to shoot even in poor lighting conditions. At the same time, the photographer will always have the opportunity to switch to DX mode and get 75 mm for shooting large portraits.
If there are no funds at all, then fifty dollars will be enough for the first time. His review.

If you have extra funds, you can take it. Its cost is approximately $400, but the aperture is two-thirds higher.

Nikkor AF-S 85mm F1.8G will be good choice for those who like to take portraits. It's compact enough to carry your camera around every day, does a great job of blurring backgrounds, and provides a soft and beautiful drawing. But its cost is about 500 conventional units. There is also a version with F1.4 aperture, but whether it’s worth overpaying, decide for yourself, based on the tasks at hand.

Nikkor AF-S 28mm F1.8G is the same glass that is suitable for shooting architecture or landscapes. Wide angle, beautiful pattern, low level of distortion for $700 is a good choice.

You can also look at the expensive one - one of the best wide-angles ever created. . Let it be darker, but it will give a better picture. But considering the $2,000 price tag, it's worth thinking twice about whether you need it.

- This is a standard fast lens for every day. Sharp, fast, beautiful, heavy, it will allow you to shoot all kinds of scenes, getting good results. It costs a lot - 1600 bucks. .

Nikkor AF-S 70-200mm F2.8G VR II is a light telezoom for reporters. The built-in stub minimizes smears, there are practically no defects observed, and the price of 2100 conventional units makes you lick your lips. But keep in mind that it’s worth buying such a huge thing for professional work– when I came to the club with him, they asked me to confirm my journalist’s accreditation.

Alternative
In fact, the only alternative and competitor. The price category is about the same, and even a little cheaper. Its cost now in the vastness of Ukraine starts at $1,500. The carcass is lighter and smaller, the sensor loses slightly in detail nominally. In real conditions, you are unlikely to feel the difference. A matrix from a competitor will make a little less noise in the dark and have the same excellent DD and color rendition. The rate of fire is slightly lower - 4.5 fps versus 6. On board there are only 11 AF points with one cross-shaped one. But the dots are located more evenly across the frame. The viewfinder loses - only 97% coverage.

Also, the Canon 6D has one memory card slot and no built-in flash. But there are Wi-Fi and GPS modules.
You can, of course, take the Nikon D600 - it will cost a little cheaper - about 1600 US dollars. But at the same time, you doom yourself to torment over oil on the matrix and damage to the mirror/shutter. And considering the $100 difference with the next generation, I don't think it's worth it.

Summary
I am sure that the Nikon D610, despite a number of small disadvantages, will easily win the love of many photographers. This is the most compact and most affordable full-frame DSLR from manufacturers, which brings to life the best practices: excellent detail, low noise, wide dynamic range.
And, if you belong to the cohort of Nikonists and can afford such a device, take it. You are unlikely to be disappointed. The camera will allow you to complete the entire range of assigned tasks quickly and efficiently. And considering that the price tag for it now starts at $1,700 on the Ukrainian Internet, this is an excellent upgrade of equipment. Although, if you have a Nikon D600, then it’s definitely not worth upgrading.
And yes, I hope that the elastic bands will not come off after six months of active use. Otherwise, this is another minus in the manufacturer’s karma.
Gallery of pictures
(move your mouse cursor to the upper right corner to view in full screen mode)
In addition, the Nikon D610 body is perfectly protected from moisture and dust. The location of all rubber gaskets is the same as in the D600. You shouldn’t test the camera’s water resistance in a swimming pool, but you can safely shoot in rain and snow. Just don’t forget that the lens must also have the appropriate degree of protection - not all “glasses” in the Nikon collection can boast of this.
Display, viewfinder, interface
The additional display pleases not only with a pleasant green backlight, but also with information content. In this parameter, it surpasses the similar screen in Canon cameras.
The software interface will probably not be new to anyone who has ever held any Nikon DSLR in their hands. The menu moved unchanged from the Nikon D600, and there was simply no reason for changes. Here we have six main sections - the viewing mode menu, photo and video shooting mode settings, a set of user settings, a general settings menu, an image processing menu and a custom user menu. The menu items are also provided with fairly detailed tips, and the Russification is one of the most literate and understandable.
I recently purchased a D610. Here's a quick comparison with the D90. (If not explicitly stated, I’m writing about the D610)
Body: The D610 is slightly larger and heavier. The materials are of higher quality and pleasant to the touch. D90 – feels cheaper.
Grip: The D90 fits like a glove in your hand, but the size is a little small when trying to reach the shutter button. The D610 feels less secure in the hand, but is more comfortable to use. (Surprisingly…)
Controls: D610 – softer, more pleasant to operate, but less informative when pressed. Especially the shutter button. You just put your finger on it and half-press works. And when you press all the way, you don’t feel the limit. The D90 has clear clicks. Maybe, of course, this is how it should be, but it’s very unusual. The wheels of the D610 spin more softly, but are still informative. The PASM mode switch is controversial. I have not yet found a convenient option for switching it. But the ring of broaching options is made very conveniently - you press the latch with your thumb and twist it with your index finger. For some reason they changed the location of the ISO(-) and QUAL(+) buttons - really unusual! And if you can put up with the new location of the photo playback button, then with the change of these - well, no way! The biggest drawback in terms of management is them.
Shooting: The D610 has a pleasant shutter sound. And, it seems, there is less vibration when shooting.
Autofocus: The D610 is better, but not perfect yet. I focus on the center one. So it will do.
Light meter - The D610 is quite accurate, but requires a minus correction. Like everything, in general...
White Balance - Accurate, but I like other colors.
Picture: More detailed, “voluminous”, pleasant, more “expensive” than the D90. Plus, the full frame reveals the lenses (their design). You still need to get used to the development.
Sensitivity: The D90 had a top limit of 640, the D610 had a top limit of 3200, for reporting, 6400 would do. But the colors and detail float. The most important requirement is high quality at ISO 100 at the maximum open aperture - that’s what the device was bought for.
Video: high-quality, but requires production, an external microphone, a good tripod and a script. As, indeed, in all DSLRs...
Cons (no comparison with D90): It crashed a few times. Need fast memory cards. Very fast. Stupid when high magnification LiveView. The viewfinder is dark. Not convenient for manual focusing. You can only use the green dot or LiveView. Maybe with 100% vision there will be no such deficiency. Auto-ISO, although it works decently, eats up 4 frames out of 14 in the buffer. A little confusing menu and working with LiveView/video.
Comparison with other cameras: D750 is not so much better to give it preference. D810 - a little expensive, different slots for flash drives, an even bigger problem with retouching and a lower working ISO. I would buy the D810 if not for the price...
Verdict: Quite satisfied! A good replacement for the old D90 with improvements in all technical characteristics.
PS: The device was released (seemingly) in November 2016. I hope there will be no problems with oil/dust.
Today we are testing a very interesting camera - Nikon D610. On the one hand, this is an advanced full-frame SLR camera for serious work, on the other hand, it is the most affordable model from Nikon’s full-frame line, and it will be of interest primarily to those amateur photographers who have decided to switch to full frame from simpler models. The camera also has many automatic modes that will be useful for beginners; there are also purely professional functions that will help you create excellent quality photos and videos. Who will be interested in the Nikon D610? We will try to answer this question with our test.
It's a dull winter, gradually turning into spring. Gray low sky, slush underfoot, incessant nasty runny nose, wet feet. I don’t really want to shoot anything in this weather. I want to crawl under a warm blanket and sit in front of the fireplace on long dark evenings with an interesting book, without going outside at all. What kind of photography is there, what complete and incomplete frames... However, as soon as the bright sun looks out, and even on a day off, all the people rush out of the city, to parks, museums, ski resorts and just into the forest, away from the dusty metropolis, and almost Everyone has a large black DSLR with a huge lens on their neck, or a smaller mirrorless camera, and many simply take pictures with a smartphone and enjoy a good mood.
Video - our program “Photo Fire!”
In our video we briefly looked at ergonomics Nikon cameras D610, principles of setting up the main modes, gave examples of shooting photos and videos, as well as two examples of Time Lapse time-lapse shooting. The film was made by the authors and is an appendix to this article.
Testing methodology
All photos were taken on a Nikon D610 camera (firmware 1.00) complete with an AF-S NIKKOR 24-85 mm f/3.5-4.5G ED VR lens, all frames were shot in RAW format (14 bit, lossless compression), SDHC UHS-I Transcend SDHC 32GB 300x Class 10 memory card, developed in Adobe Lightroom 5.7, all photos are shown without artistic treatment, as they were filmed, the necessary retouching was carried out for the portraits.
Comparison of the main characteristics of Nikon D610 and Canon EOS 6D
Ergonomics Nikon D610
What I liked
- Secure grip, convenient body, controls as in the latest models of DSLRs - D7100, D750, everything is familiar and everything is in its place. There is no point in listing the basic principles of settings - everyone who has shot on Nikon cameras will instantly figure it out; for beginners, it is enough to remember the main point: press the control button of one or another parameter (for example ISO) and use the wheel to change the value of this parameter. We monitor on the top or main screen. Everything is simple and logical.
- Control wheels with parameter locking- the established mode will never accidentally go wrong. We hold the camera with our right hand, press the button with the index finger of our left hand, and turn the top wheel with our thumb; in the case of the lower wheel, it is more convenient to press the button with your thumb and turn it with your index finger.
- Large additional screen on the top edge- it’s convenient to read the values, and you can also save battery power if you constantly use the top screen without using the main screen for setup purposes.
- Protective cover for screen- the point is controversial. It is rather useful, as it protects the screen from damage and does not interfere at all when shooting. If someone thinks that it spoils the appearance, the cover can be removed.
- Two SD memory cards are very convenient! Frankly, we are accustomed to the fact that modern Nikon DSLRs have two memory cards, and using other cameras with one card is no longer comfortable.

What I didn't like
1. Shooting options and Live View. One of the most significant disadvantages is that when using Live View in photography mode, when changing the aperture and shutter speed, the digital values on the screen change, but these changes do not visually affect the picture on the screen, which misleads the user. There is no live histogram in Live View mode, which is not so critical compared to the non-displayed result of changing parameters.
2. Aperture in video shooting mode. In Live View mode, when shooting video, you cannot change the aperture; you can change shutter speed, ISO, white balance and some other parameters, but changing the aperture is not available. Directly when shooting a video, if there was a need to change the aperture, it would be smooth, without jumps, as on more professional models (for example, the Nikon D750 can smoothly change the aperture). Changing the aperture discretely will inevitably lead to jumps in brightness, although in some cases it is better to have a jump in brightness than to continue shooting with the wrong settings.
3. OK button when viewing. Pressing the OK button when viewing a photo does not enlarge it on the screen, as in older models. To enlarge a fragment of the frame, you need to click on the magnifying glass with the plus sign several times.
4. Built-in mono microphone. The camera records video well, but the built-in microphone is monaural. The connector for an external stereo microphone saves the day; this is the only way to record stereo sound.
Taking a portrait
The aperture at the long end is 4.5... this, of course, is not 1.4 or 2.8, as on fast primes, but it is quite possible to blur the background with this lens.

 |
 |
| 50mm f/4.5 | 85 mm f/8 |
|---|

 |
 |
| 85mm f/4.5 | 50mm f/4.2 |
|---|

 |
 |
| 70 mm, f/5.6 | 80 mm, f/5 |
|---|
Landscape photography
Thanks to its versatile lens and excellent sensor, the camera allows you to shoot excellent landscapes, especially when traveling. You can safely take this camera on a trip - it is simply created for travel reporting. The focal length of the kit lens - 24 mm - will allow you to shoot wide sea or mountain landscapes, and if you wish, you can set it to 85 mm and bring the subject closer or shoot a series of excellent portraits. In the evening, you don’t have to take a tripod with you - you can safely raise the ISO to 6400 and shoot city scenes handheld, and for evening portraits there is a built-in flash.

 |
 |
 |
 |
 |
 |
 |
Panorama of 5 horizontal, focal length 24 mm, 1/60 at f/5.6, ISO 100:

 |
 |
 |
 |
 |
Indoors, with mixed light, auto white balance does an excellent job:
 |
 |
 |

Autofocus
AF-A- automatic tracking focusing: the camera itself selects single-servo AF if the subject is stationary, and continuous tracking AF if the subject is moving.
AF-S- single-frame tracking focusing: for shooting stationary objects. Focus locks when the shutter button is pressed halfway. At default settings, a shot can only be taken when the focus indicator is displayed
AF-C- continuous tracking focus: for shooting moving objects. The camera focuses continuously while the shutter button is pressed halfway; if the subject moves, the camera will engage predictive focus tracking to predict the final distance to the subject and adjust focus. With default settings, the shot can be taken regardless of whether the subject is in focus or not.
Focus points can be selected:
Single point autofocus: used for stationary objects.
Dynamic autofocus: In AF-A and AF-C modes, the camera will focus based on information received from surrounding focus points if the subject moves away from the selected point for a while. The number of focus points depends on the selected mode:
- Dynamic, 9 points
- Dynamic, 21 points
- Dynamic, 39 points
3D tracking: In AF-A and AF-C modes, the camera will track subjects that have left the selected focus point and select new focus points if necessary.
Automatic AF area selection: The camera automatically detects the subject and selects the focus point. When using a G, E, or D lens, the camera can distinguish human faces from the background to improve subject identification.
In Live View mode, the camera can focus:
AF-S- single-servo focus: for shooting stationary subjects - focus is locked when the shutter button is pressed halfway.
AF-F- constant tracking focus: for objects that move - the camera focuses constantly while the shutter button is pressed; Focus is locked when pressed halfway.
In Live view, you can select the following AF area modes:
- Face priority autofocus- for shooting portraits.
- Wide autofocus area- for shooting landscapes and other objects handheld.
- Normal AF area- for precise focusing at a selected point in the frame.
- Autofocus subject tracking- the focus point will follow the selected object as it moves in the frame.
Lens included
The camera came to us for testing with the AF-S NIKKOR 24-85 mm f/3.5-4.5G ED VR kit lens - this lens is well known to everyone who shoots on Nikon cameras - an affordable kit lens that comes with full-frame cameras. In the case of this optics, whale - does not mean "simple" - the lens provides excellent optical characteristics and covers the most popular focal lengths - from a wide angle of 24 mm with a minimum aperture of 3.5 for landscapes and urban scenes to classic portraits of 85 mm with an aperture of 4.5.

The lens has a built-in ultrasonic autofocus motor, thanks to which it focuses instantly and almost silently, and is equipped with 2nd generation image stabilization (VR II). The lens provides good sharpness in the center of the frame, but the resolution at the edges and corners is much worse.
Test: focal length 24mm, ISO 100, F11
 |
 |

 |
 |
Test: focal length 50mm, ISO 100, F11
 |
 |

 |
 |
Test: focal length 85mm, ISO 100, F11
 |
 |

 |
 |
The disadvantages of the lens are noticeable barrel, vignetting and chromatic aberration, these parameters can be compensated either by the camera itself (for shooting in JPEG), this is included in the menu, or using software when processing, for example in Lightroom 5.7 in the case of RAW. The average price of this lens according to Yandex Market as of February 2015 was 21,800 rubles.
As an alternative, you can consider the even more versatile Nikon 24-120mm f/4G ED VR AF-S Nikkor lens - constant f/4 aperture at all focal lengths and 120 mm at telephoto will be clear advantages, but such a lens costs about 10,000 more rubles
Using DX Lenses
The D610 can be equipped with any DX lens that is designed specifically for Nikon crop factor cameras. Of course, such lenses are equipped with exactly the same mount, so they will install without problems, the only problem is strong vignetting at the edges at wide angles.
To reduce the vignetting effect when installing DX lenses, you need to specify the frame size in the menu not FX, but DX (see screenshot below), the camera uses only part of the matrix and there will be no vignetting effect. In our opinion, if the camera already has a full-frame sensor, it is better to use its full potential, and do such a trick only when necessary. The only plus is that the coverage area of the autofocus points will be very close to the edges of the frame, and we will be able to focus almost anywhere in the frame.

Nikon D610 with DX NIKKOR 18-55mm 1:3.5-5.6 G VR lens
 |
 |
| At a focal length of 18 mm, the strongest vignetting is noticeable | Now you need to enable DX in the menu |
|---|---|
 |
 |
| The viewfinder will display the full frame, but the crop frame will be drawn in the center, this is how the frame will be taken | In Live View mode, the camera immediately crops the frame to DX size |
ISO sensitivity test
At this point in the review I would like to make a small digression. , this is the first time we have encountered full-frame DSLRs from the Nikon line; before that, we only tested models with a crop factor. And the amazing quality that the matrix produced in the Nikon DF camera at almost all ISOs, up to 51200, seemed to us to be in the order of things. We were happy and decided that this was the norm for all Nikon full-frame DSLRs.
Friends, this is not true. See how much Nikon DF costs. This is despite the fact that the camera does not shoot video, there is no battery grip for it, it has an outdated processor, the screen does not rotate, the battery is rather weak, the hinges of the battery compartment lid are weak... The Nikon DF camera has one undeniable advantage that easily and naturally puts on both blades any DSLR on the market, excluding only the top-end Nikon D4S (it has the exact same matrix) and Canon 1D (of course, we do not take into account medium format devices and the just announced Canon 5DSR). This advantage is its chic matrix.
We invite you to watch the ISO test we shot on the Nikon D610. Shooting parameters: aperture priority F/8, NEF format, all processing such as noise reduction at long shutter speeds and high ISOs are turned off. Click on photo - magnification 1:1. The quality of the Nikon D610 is quite suitable for work, so don’t look at the Nikon DF test and don’t compare, don’t be upset.
 |
 |
 |
| 50 | 64 | 80 |
|---|---|---|
 |
 |
 |
| 100 | 125 | 160 |
 |
 |
 |
| 200 | 250 | 320 |
 |
 |
 |
| 400 | 500 | 640 |
 |
 |
 |
| 800 | 1000 | 1250 |
 |
 |
 |
| 1600 | 2000 | 2500 |
 |
 |
 |
| 3200 | 4000 | 5000 |
 |
 |
 |
| 6400 | 8000 | 10000 |
 |
 |
|
| 12800 | 25600 |
High dynamic range
Classic HDR with Exposure Bracketing
We pay great attention to HDR shooting in every report, and there are many reasons for this. Firstly, even the coolest modern matrices are unable to convey the range of brightness that we see with our own eyes at the shooting location, and secondly, this style allows you to turn on your imagination and creatively process the frame, making it more dramatic.
In the Nikon D610 camera, AE bracketing can be selected:
- 2 frames: one of which will be shot with normal exposure, the second with either plus or minus to choose from.
- classic 3 frames with 0.3, 0.7, 1, 2 or 3 steps fork.
The Nikon D610 camera allows you to take only three exposures in a series, so all that remains is to select a bracket on the spot. We most often make two series - with plug 2 or 3, since it is sometimes difficult to decide which brightness range is suitable for a particular plot. A narrower fork than 2EV, in our opinion, makes no sense - such a result is easier to achieve by processing one RAW than fiddling with a series and subsequent gluing.
Example with fork 2

 |
 |
 |
| -2EV | 0EV | +2EV |
|---|
Example with fork 3

 |
 |
 |
| -3EV | 0EV | +3EV |
|---|
Some more HDR shots with different processing:
 |
 |
 |
 |
Setting parameters in the menu
In-camera HDR
The camera also has an automatic HDR stitching mode, it is included in the menu and only works when shooting in JPEG - the camera itself will take a series of two frames and stitch the finished file. In order for the camera to remember the fact that this mode is turned on, you need to set it to “series”, otherwise before each next HDR-style shot, this function will have to be re-activated in the menu.
You can adjust the bracketing (in the menu it’s called “Exposure Differential”) and the processing hardness (for some reason it’s called “Softening”). As practice shows, you shouldn’t expect any special miracles from shooting in this mode. For the example below, we took a landscape in all modes and compared the result with classic HDR, which was shot at the same time from the same point. Comments, as they say in such cases, are unnecessary.
 |
 |
 |
| HDR Off | HDR Auto, Normal | HDR 1EV, Normal |
|---|---|---|
 |
 |
 |
| HDR 2EV, Normal | HDR 3EV, Normal | HDR 1EV, High |
Classic HDR with three exposures, shot in RAW from this point and assembled in a graphics editor:

 |
 |
 |
| -2EV | 0EV | +2EV |
|---|
Active D-Lighting
This is a feature of all Nikon DSLRs; we test this mode every time we work on camera reviews. And every time the operation of this function causes bewilderment - why? You can’t see much of a difference in the photo, but when processing RAW in a graphics editor, you can easily achieve more interesting results. And another strange point: this function has no effect on the raw file, only on JPEG. Or rather, not quite like that: when you open NEF in the Nikon program, Capture NX-D, information about Active D-Lighting will be read and the file will be displayed according to the specified settings for this parameter. If you work with this NEF in any other editor, there is no point in using this function; rather, it makes sense to disable it so as not to waste energy.
Example of Active D-Lighting
 |
 |
 |
| ADL AUTO | ADL moderate | ADL normal |
|---|---|---|
 |
 |
 |
| ADL reinforced | ADL super reinforced | ADL Off |
In this example, the photo with ADL turned off looks much cleaner and interesting, while the super-boosted mode adds a gray veil to the photo.
Setting parameters in the menu
 |
 |
 |
| We shoot in JPEG | Settings Active D-Lighting | Setting up HDR |
|---|
Shooting video
The main video parameters are configured in the menu before shooting: quality and frame rate (we shot 1920x1080 24p), memory card number. Many parameters can be adjusted when switching to video mode before recording has started. And some parameters can be changed directly while recording a video.
If you set the creative mode to M and switch to video shooting mode, but do not start recording yet, you can configure many recording parameters. A picture will appear on the screen, already cropped to 16:9 format, which is good, and then:
What can be configured:
- Exposure
- White balance
- Brightness
- Microphone level
- Picture Control
- Autofocus mode and move autofocus area
What cannot be configured:
- Aperture - turning the wheel does not change the aperture number and does not affect the picture in any way
- Exposure compensation - changing the exposure compensation is visually displayed on the screen, but does not affect the picture in any way
If you start recording video, then right while shooting the video you can change:
- Exposure
- White balance
- Brightness
- Autofocus mode and move the autofocus area
The built-in microphone is monaural, the sound in the video will be flat, which does not make watching the video any better. But the most difficult thing is to adjust the diaphragm, because no matter how you turn the front steering wheel, there is no point. And in the field, when you urgently need to shoot, you start hastily turning different wheels and pressing all the buttons in a row, eventually setting the parameters at random. It's good if you guessed right.

Examples of shooting video on Nikon D610 are given in our video
Interval photography - Time Lapse
The camera can shoot the classic version time-lapse photography- frames over a period of time specified by the photographer. In this case, the output is a series of files that will need to be assembled into a video clip on a computer in an editing program, for example Adobe Premiere or Adobe After Effects.
Time-lapse video shooting- everything is the same, only the camera will independently stitch together the final video, and the resolution and frame rate will be copied from the video recording settings.
Important points when shooting Time Lapse
- When shooting Time Lapse Be sure to disable autofocus! If this is not done, the camera will focus anew each time it takes a new frame, which will inevitably lead to focus jumps in the video. If when shooting a photo or even a video this is not noticeable to the eye, then in the case of Time Lapse this fact will completely ruin the video. And besides, the battery power will be wasted. An example of unsuccessful shooting is given in our video - while filming the Moscow City International Business Center in the evening, we forgot to turn off autofocus. The second example in the video turned out to be more successful, where we turned off all automation altogether.
- The mistake would be choosing shutter priority mode or software P - the camera, when shooting each next frame, will re-evaluate the exposure and select some kind of aperture, which will inevitably lead to a change in brightness from frame to frame, which in turn will lead to flickering in the frame. The aperture must be clearly set.
- It is better to refuse automatic ISO selection, you must select and set the desired value.
- Set the desired white balance, just not automatic. On a cloudy day it can be a cloud, on a clear day it can be sunny. Otherwise, the white balance may also “walk” from frame to frame, which will inevitably lead to jumps in the color tone in the video.
- Floating shutter speed. If you choose aperture priority, say, f/8, then the camera will re-select the shutter speed for each subsequent frame, lengthening it as it gets dark in the evening, and shortening it at dawn. When shooting on a bright day, this can again harm the video if the sun hides behind a cloud, then comes out again, and so on - brightness jumps are inevitable. Or a passer-by will accidentally appear in the frame - this will only add dynamics to the picture, but we are guaranteed a jump in brightness.
Multiple exposure
Like most modern Nikon DSLRs, the D610 can shoot multiple exposure style shots. Overlay of 2 or 3 frames is available, and you can shoot in RAW. The default maximum time between exposures is 30 seconds, which can be extended using Custom Setting c2 (Standby timer). Just like for HDR, you can set it to On in the menu. (series) or On (single shot) - in the first case, the camera will take one multiple exposure, and you can start shooting the next one, while in the second case, after shooting one multiple exposure, the camera itself will switch this setting to Off mode.
There is also such a parameter as “Auto Gain”. This setting needs to be adjusted to your taste; the instructions do not give any specific recommendations in this regard, except that it suggests turning off auto gain if the background is dark.
Shooting multiple exposures is a challenging creative endeavor. If in the case of HDR you can at least roughly imagine what the future frame will look like (for example, mentally darken the sky and lighten the shadows on the ground), when shooting Time Lapse you can again mentally accelerate the movement of clouds in the sky or the course of any events, then In the case of multiple exposure, it is incredibly difficult to imagine the future frame.
Anyone interested in multiple exposures can be recommended to study the works of the masters, and you can start with the works
and kit lens
Nikon 24-85mm f/3.5-4.5G ED-IF AF-S Zoom-Nikkor
Recently this post appeared on the forum: “With regards to the D7000, this camera has a crappy autofocus module installed (the same one was installed in the D600-610), it has crooked operating algorithms and therefore often misses where the D300-D700 works perfectly. The D7100-7200 has a module from the D300-700 installed, but I don’t know what operating algorithm it has because I haven’t checked it personally".
To be honest, this statement bothered me. D610 was in our laboratory, we carried out the test, it seems, in April last year. But the article never appeared (you can always find a hundred reasons to postpone unfinished work). So we didn’t process the autofocus test, we didn’t look at the footage for the “gallery” (it gives a good indication of how accurately the AF works), but from my experience with the camera I didn’t have any aftertaste from the “crooked” autofocus.
And even before that, several letters appeared in the “personal” with the following subject: “Why wasn’t there a review of the Nikon D610 if you had the camera in your hands?” Indeed, the D610 was featured in the article “”. In short, the stars aligned and ordered us to take test materials and finish the pending work. Still full frame DSLRs entry level- not such a frequent occurrence that they should be neglected. So, let's get acquainted: Nikon D610, the heroine of our test:
| Main characteristics | |
| Housing, protection | Moisture- and dust-proof case (weather-sealed), magnesium alloy. Working temperature: 0 - 40 °C. Operating humidity - up to 85%. |
| Lens | Interchangeable optics, Nikon F mount. |
| Matrix | CMOS matrix 24.3 MP, Full Frame (35.9 × 24.0 mm; focal length conversion factor - 1.0). |
| Photosensitivity | ISO 100 - 6400, in extended mode - ISO 50 - 25,600. |
| Focus control | Phase TTL module Nikon Multi-CAM 4800. 39 focusing points (including 9 cross-type). Range is −1 to +19 EV. |
| Exposure Control | TTL metering with 2016-pixel RGB sensor. |
| Screen | 3.2 inches RGB, 921,600 pixels (640×480×3), fixed, viewing angle 170°, frame coverage ≈100%. |
| Viewfinder | Optical (pentaprism), FX frame coverage: ≈100% (horizontal and vertical), magnification ≈0.7. |
| Image stabilization | in the cell - no |
| Shooting modes |
|
| Continuous shooting | Up to 6 frames per second. Drive modes: single frame, continuous low speed, continuous high speed, quiet shutter, quiet continuous shutter, self-timer, remote control, mirror up. |
| Gate | Mechanical with electronic control and vertical travel of the curtains: 30 - 1/4000 s, X-sync - 1/200 s. |
| File Format | JPEG (Exif 2.30), RAW (NEF, 12 and 14 bits), RAW + JPEG |
| Video | Maximum resolution Full HD 1920x1080 30p in MPEG-4 AVC/H.264 (MOV) format. |
| Memory | 2 slots: SDHC, SDXC memory cards, compatible with SD (Secure Digital) and UHS-I. |
| Power supply | Rechargeable Li-ion battery EN-EL15 (approx. 900 shots according to CIPA standard). |
| Dimensions, weight | 111 × 113 × 82 mm; 850 g (including weight of battery and memory card) |
| additional characteristics | |
| "Hot shoe" | Eat, ISO standard 518 with synchronizing contact. |
| Built-in flash | Yes, guide number ≈12 (ISO 100) |
| Autofocus illuminator | There is |
| Bracketing | By exposure, by flash, by white balance, by the “Active D-Lighting” function (reduces the loss of detail in highlights and shadows). |
| Connectors | USB 2.0, Mini-HDMI (type D), audio input and audio output (stereo, 3.5 mm minijack). |
| Wi-Fi/USB/GPS | option / USB 2.0 / option |
| Self-timer | 2 s, 5 s, 10 s, 20 s; from 1 to 9 exposures at intervals of 0.5, 1, 2 or 3 s. |
| Shooting formats | Shooting formats Main - 3:2 (6016×4016). DX format photos taken in Live View for movies - 16:9 (3936x2224). |
| Peculiarities |
|
Of course, the Nikon D610 is an entry-level full-frame DSLR, and in many respects it corresponds to the entry-level. There are shutter capabilities, a relatively weak processor, and relatively modest video capabilities. And, of course, a relatively weak AF module - Nikon Multi-CAM 4800FX (almost the same, Nikon Multi-CAM 4800DX, is installed in Nikon 5000 series crop DSLRs). But calling it a “crappy module with crooked algorithms” is an impolite overkill. Let me remind you, according to our tests, the autofocus rating is:
- Nikon D7200 - 8.7 points.
- Nikon D7100 - 7.1 points.
- Nikon D5500 - 6.3 points.
Of course, the Multi-CAM 4800DX does not perform as efficiently as the Advanced Multi-Cam 3500 and Advanced Multi-Cam 3500 II. But still, it’s not “bad”, let’s be at least a little objective. By the way, let's see what rating the Nikon D610 gets in the autofocus test. I don’t think that everything is determined by the AF module and only by it. We'll see a little later, but for now let's take a look at the camera's exterior.
Construction, design, management
Externally, the Nikon D610 is a “Nikon classic” with two control disks. Of course, it can be compared with its “big sister” D810 and despite the general similarity, noticeable differences can be found. The “non-professional” dial for selecting shooting modes is like that of “crop models”. Lack of connectors for synchronizing the flash system. But we must not forget that the D610 represents the entry-level of full-frame DSLRs; it should not be judged by professional standards (the highly advanced D810 costs exactly twice as much as the heroine of our test).
 | Externally, the Nikon D610 is a “Nikon classic” with two control disks. On the front panel to the left of the lens we see:
|
 | Here you can clearly see: the profile of the handle, the auxiliary control dial and the surroundings of the shutter button with three positions: camera off, camera on, backlight of the top LCD panel. |
 | It’s undignified for a full-frame DSLR to have less than two slots for memory cards. Moreover, the price of this option is low. But in general, the camera is not oversaturated with controls: on a large body they seem small. In this case, you can notice that some controls are assembled into blocks. |
 | We see the first such block to the right of the screen - a 4-position joystick (multi-selector), surrounded by an AF area locking ring. Just below: the Live View button, surrounded by a “Photo - Video” switch ring. Below them is the Info button, which controls the display of information on the screen. |
 | To the left of the screen we see the Menu button and below it there are four dual and triple function buttons:
|
 | A complex system of covers is organized for the connectors. On top it covers the audio input and audio output (both stereo, 3.5 mm mini-jack). In the middle section - mini-USB and mini-HDMI (type D). In the lower section there is a connector for (GPS GP-1, Nikon MC-DC2 Remote Cord cable and others). |
 | And finally, to the right of the lens we see:
|
 | In general, a classic is just that: a classic. The top panel doesn’t show us anything surprising, but the few buttons are clear and provide the necessary set: exposure compensation, exposure metering mode and turning on video. And also a built-in flash, which is not so common in full-format DSLRs. But here Nikon has met the “middle class” of photographers who sometimes want to highlight something, but are not ready to always carry a large flash with them. |
 | The mode dials in the D610 are also quite traditional. The top dial allows you to select Auto, Auto without flash, SCENE (scene programs), PASM and two custom modes. Hidden under the upper dial is the lower one - selecting the “drive” mode, which offers: single-frame shooting, continuous low-speed, continuous high-speed, single-frame “silent shutter” continuous shooting “quiet shutter”, self-timer, remote control, mirror lifting. |
 | The bottom panel traditionally shows us the handle profile (perhaps this is the most important thing), the battery compartment and the connector for the battery grip (under the rubber plug). |
After an external examination, the conclusion suggests itself that the D610 is a hybrid of a classic full-format DSLR (for example, Nikon D810) and a classic “cropped” one (for example, D7100). The result is a functionally developed camera with two control dials, a top LCD panel, and several programmable buttons.
But at the same time - with an “amateur” mode dial. And the camera shutter has become completely “unprofessional” - at the level of entry-level DSLRs. And the processor is relatively weak (but we must remember here that the D610 entered the market two years ago). Now we will not draw conclusions about how the brand of processor will affect the quality of pictures; it is better to find out in tests. Overall, considering the reasonable price, the D610's capabilities seem quite attractive. Although, let's now take a look at the menu to get a complete picture of the camera's functionality:
 |  |  |
 |  |  |
 |  |  |
 |  |  |
 |  | |
 |  |  |
 |  | |
 |  |  |
Now, after examining the menu, it is clear that the functionality of the D610 is noticeably reduced compared to, say, the D810. For example, it still has autofocus tracking settings, but there is no way to combine AF points into groups. In general, the D610's settings can be called advanced, but not professional. Which, in fact, was expected. The D610 is a camera for enthusiasts, advanced amateur photographers, but not professionals.
| Nikon D610 and competitors | ||||||
| Canon EOS 5D Mark II | Canon EOS 6D | Nikon D610 | Nikon D750 | Sony Alpha SLT-A99 | Sony Alpha 7R |
|
| Matrix | 21 MP Full Frame CMOS | 20 MP Full Frame CMOS | 24 MP Full Frame CMOS | 24 MP Full Frame CMOS | 24 MP Full Frame CMOS | 36 MP Full Frame CMOS |
| Autofocus | 49 points 6 additional | 11 points 1 cross | 39 points 9 cross | 51 points 15 cross | 19 points 11 cross | 25 points hybrid |
| Exposure metering | 35 RGB zones | 63 RGB zones | 2016 px. RGB | 191,000 pixels. RGB | 1200 RGB zones | 1200 RGB zones |
| Sensitivity | 100 - 6400 100 - 25 600 * | 100 - 25 600 50 - 102 600 * | 100 - 6400 50 - 25 600 * | 64 - 12 800 32 - 51 200 * | 100 - 25 600 | 100 - 25 600 |
| LCD screen | 3.0″ RGB 920 000 fixed | 3.0″ RGB 1 040 000 fixed | 3.2″ RGB 920 000 fixed | 3.2″ RGBW 1 229 000 folding | 3.2″ RGB 1 040 000 folding, rotating | 3.0″ RGB 920 000 folding, touch |
| Viewfinder | ≈98%, ≈0.71x | ≈97%, ≈0.71x | ≈100%, ≈0.7x | ≈100%, ≈0.7x | OLED 2,359,000, ≈100%, ≈0.7x | TFT 2,359,000, ≈100%, ≈0.7x |
| Gate | fur. 30–1/8000 X-sync 1/200 s | fur. 30–1/4000 X-sync 1/180 s | fur. 30–1/4000 X-sync 1/200 s | fur. 60–1/4000 X-sync 1/200 s | fur. 30–1/8000 X-sync 1/250 s | fur. 30–1/8000 X-sync 1/160 s |
| Built-in flash | No | No | there is, Ved. number 12 | there is, Ved. number 12 | No | No |
| Stabilizer | No | No | No | No | matrix | No |
| Continuous shooting | ≈3.9 fps | ≈4.5 fps | ≈6 fps | ≈6.5 fps | ≈6 fps | ≈4 fps |
| Wi-Fi/USB/GPS | option USB 2.0 No | built-in USB 2.0 built-in | option USB 2.0 option | built-in USB 2.0 option | No USB 2.0 No ** | built-in USB 2.0 No |
| Video | 1920×1080 30p | 1920×1080 30p | 1920×1080 30p | 1920×1080 60p | 3840×2160 60p | 1920×1080 60p |
| Battery life | 850 frames | 1090 frames | 900 frames | 1230 frames | 450 frames | 350 frames |
| Dimensions, weight | 152×114×75 810 g | 145×111×71 775 g | 145×111×82 850 g | 141×113×78 840 g | 147×111×78 733 g | 127x94x48 465 g |
| Approximate price | T-2638137 | T-8458236 | T-10533681 | T-11037120 | T-8455665 | T-10542306 |
*Extended ISO range.
** Built-in GPS module is not available in the Russian version of the camera.
The “Competitors” table contains models of approximately the same class as the model being tested. About the same price category. Of course, the higher the price, the greater the spread of prices in the group. The situation is that a person will figure out: “Buy a relatively inexpensive D610 for 83 thousand or a relatively advanced D750 for 110 thousand?” - quite likely.
In the table we see that Nikon full-frame DSLRs compare favorably with their competitors by having a built-in flash. And in general, despite its age, the D610 looks very decent; three years is not a long time for a full-frame DSLR. The same Canon 5D Mark II was released back in 2008. And although it is no longer included in the current Canon line, this camera continues to be sold, bought, and is generally considered a very worthy full-frame DSLR.
Image quality - resolution and noise
As usual, in the “noise - resolution” section we immediately display the final scores, and then show in comparison with the results of other cameras how high these scores are or, conversely, low. And, of course, the main object of comparison for the Nikon D610 will be the main competitor of this camera - the budget full-frame DSLR Canon EOS 6D (who would have thought, let’s say, in the year 2005, that such a phrase “full-frame budget DSLR” would ever be born) .
| Nikon D610, RAW | Nikon D610, JPG |
 |  |
If you read ours, it will immediately become clear to you that the quality of Nikon D610 images is high. And by the standards of our “Digital Photo” section, it is very high, since we mainly focus on the interests of amateur photographers, not professionals. Sure signs of high quality: the resolution curves are quite high on the graphs, and the noise lines are quite low. And, as a result, the distance between the resolution and noise lines is significant; even at ISO 12800 the lines do not meet. The distance between the lines can be considered an indirect indicator of quality. For clarity, we indicate on the graphs the distance in a bright scene at ISO 800 (Q L index, 800) and the distance in a dark scene at ISO 3200 (Q D index, 3200).
This is the general picture and general words. Now let's move on to private estimates:
|
|
||||||||||||||||||||||||||||||||||||||||||||||||
In terms of resolution, the 24-megapixel Nikon D610 is ahead of the 20-megapixel Canon 6D. Between ISO 100 and 6400, both cameras retain about 75 percent of their pixels visible, with the Nikon D610 holding at 18.67 megapixels in bright scenes and the Canon 6D at 15.50.
But at the same time, the Canon 6D is a little less noisy. Its noise score in a light scene is 1.55 points, and in a dark scene it is 2.49 points. While the Nikon D610 gives 1.6 points in a bright scene, and 3.40 in a dark scene (the noise rises to almost 3.5 points).
The final ratings for the two cameras are almost identical: 7.23 for the Nikon D610 and 7.4 for the Canon 6D. Given that our calculations and measurements are not perfect, we can consider this to be one level of quality. Although, we repeat, the Nikon D610 gains it due to its higher resolution, and the Canon 6D due to its lower noise.
Let's see if our estimates can be visually confirmed.
| Nikon D610 RAW, noise filter off. light scene R=20.14 - N=1.40 - RN=14.40 | Canon EOS 6D RAW, noise filter off. light scene R=16.50 - N=1.37 - RN=12.06 |
|
| ISO 100 |  |  |
| ISO 800 |  |  |
| ISO 1600 |  |  |
| ISO 3200 |  |  |
| ISO 6400 |  |  |
| ISO 12 800 |  |  |
If it weren’t for the characteristic coloring (Canon’s tones are warmer), one might be confused as to what kind of photo was taken Canon camera EOS 6D, and which one is Nikon D610. The noise level of two competing DSLRs is very close - about 1.4 points. At least in this series (RAW, light scene, noise filter turned off), no differences are visible in the noise picture. Let's see if they can show up in a darkened scene?
| Nikon D610 RAW, noise filter off. dark scene R=19.06 - N=2.89 - RN=6.60 | Canon EOS 6D RAW, noise filter off. dark scene R=15.96 - N=2.06 - RN=7.74 |
|
| ISO 100 |  |  |
| ISO 800 |  |  |
| ISO 1600 |  |  |
| ISO 3200 |  |  |
| ISO 6400 |  |  |
| ISO 12 800 |  |  |
In a darkened scene, the advantage of the Canon 6D is still felt. Our program rated the noise level in the range ISO 100 - 6400 at 2.06 points, and the noise level of the Nikon D610 at 2.89 points. This is a noticeable difference, noticeable even to the eye. And, most likely, Nikon loses due to its higher resolution (smaller pixel area).
Now let's see how the noise reduction of two cameras copes with noise, first in a bright scene.
| Nikon D610 JPG, noise filter on. light scene R=17.20 - N=1.81 - RN=9.53 | Canon EOS 6D JPG, noise filter incl. light scene R=14.50 - N=1.73 - RN=8.40 |
|
| ISO 100 |  |  |
| ISO 800 |  |  |
| ISO 1600 |  |  |
| ISO 3200 |  |  |
| ISO 6400 |  |  |
| ISO 12 800 |  |  |
According to estimates, we saw that here (in a light scene, JPG, noise filter on), the Nikon D610 loses to Canon slightly in terms of noise level - Nikon noise level is 1.81 versus 1.73 for Canon. If the discrepancy between the scores seemed smaller to you than the samples show, keep in mind that the score is calculated for the ISO range of 100 - 6400, and we see the greatest visual differences at ISO 12,800. Here, in a bright scene, due to the resolution, the Nikon D610 even scored more high rating. But the situation may change in a darkened scene, where the Nikon noise level will be much higher than in the light.
| Nikon D610 JPG, noise filter on. dark scene R=15.89 - N=3.90 - RN=4.07 | Canon EOS 6D JPG, noise filter incl. dark scene R=12.85 - N=2.92 - RN=4.40 |
|
| ISO 100 |  |  |
| ISO 800 |  |  |
| ISO 1600 |  |  |
| ISO 3200 |  |  |
| ISO 6400 |  |  |
| ISO 12 800 |  |  |
Yes, the situation has changed. The noise of the Nikon D6100 - already visible to the eye - is much higher than that of the Canon EOS 6D. For the Nikon D610 they reach almost 4 points; here the D610 “overtakes” its direct competitor by almost 1 point. This is reflected in both the really lower noise of the Canon EOS 6D and the poor quality of the Nikon D610 noise reduction.
The fact that the Nikon D610 is inferior in terms of noise has led to the fact that the “resolution - noise” rating of the heroine of our test is lower than that of the Canon 6D (although the resolution is higher). At the end of this test, we bring to your attention fragments of the test bench, photographed under different conditions:
| Nikon D610 noise test fragments of pictures of the test bench |
|||
| RAW filter off light scene | JPG filter on light scene | RAW filter off dark scene | JPG filter on dark scene |
 |  |  |  |
 |  |  |  |
 |  |  |  |
 |  |  |  |
 |  |  |  |
 |  |  |  |
| Clicking on each fragment will open a window where it will be presented in 6 options: in the top row - with sensitivity 100 - 800 - 1600 ISO units in the bottom row - with sensitivity 3200 - 6400 - 12,800 ISO |
|||
So, the main thing we found in this test is that the noise level of the Nikon D610 is much lower than that of any full-frame DSLR. The camera resolution is quite high - in the range of ISO 100 - 6400, the camera retains about 80% of visible pixels in a bright scene, and about 73% in a dark scene (this is a high percentage).
But in comparison with its closest competitor - the Canon EOS 6D - the achievements of the Nikon D610 no longer seem brilliant; Nikon loses in terms of noise. Most likely, if we continue the comparison - compare “budget” full-frame cameras with more advanced ones, it will turn out that they are significantly inferior to the advanced ones in terms of noise level. In about a month, the Canon EOS 5D Mark III will be in our laboratory - let's see how correct this forecast will be.
Optics - Nikon 24-85mm f/3.5-4.5G ED-IF AF-S Zoom-Nikkor
 |
| Bayonet | Nikon F |
| Format | Nikon FX (full frame) |
| detailed information | |
| Lens type | varifocal |
| Focal length | 24–85 mm (24–85 mm 35 mm equivalent) |
| Minimum focusing distance | 0.38 m from focal plane |
| Diaphragm | f/3.5 - f/4.5 - maximum f/22 - f/29 - minimum |
| Stabilizer | There is |
| Focus type | internal |
| Thread diameter | 72 mm |
| Dimensions, weight | ∅78×82 mm, 465 g |
| Peculiarities |
|
| Price | T-8368897 |
It is this lens that, together with the Nikon D610, forms a ready-made set - a “whale”. In terms of a full frame, the price of the lens cannot be called high. By Full Frame standards, the Nikon AF-S Nikkor 24–85 mm F/3.5–4.5 G ED VR is a standard workhorse. And almost certainly, she has strong and weak sides. Let's take a look at them.
FR = EGF = 24 mm
 |  |
At short focus we observe a noticeable “vertical barrel”. The vertical distortion is very large (−3.79), the horizontal distortion is noticeably less (−1.54). For landscapes and architectural photography this is not so bad, but it is better not to shoot portraits at the minimum “focus”; the distortion of the skull of the subject will be serious (or vice versa - comic). True, the Nikon D610 can correct distortion automatically (when you select the appropriate option in the menu), and even when developing RAW, this procedure does not take much time.
| Permission | Chromatic aberrations | ||
| Center of frame | Frame edge | Center of frame | Frame edge |
 |  |  |  |
| In all screenshots: top row: f/3.5 - f/5.6 - f/9.0, bottom row: f/11 - f/14 - f/22 | |||
But the resolution at “minimum focus” remains at “high” and “very high” even at the widest aperture. And even at the narrowest it drops to only 0.6 lines per pixel. The resolution at the edge of the frame is only slightly behind the resolution in the center.
But a pretty good picture here is spoiled by very noticeable chromatic aberrations. At the edge of the frame they sometimes go off scale (rising above 20%), and even in the center at wide apertures they remain at 5-7 percent.
FR = EGF = 50 mm
 |  |
At “medium focus” we expected a decrease in distortion. After all, this is a “portrait” focal length, where geometric distortions are undesirable. But it turned out that here the negative distortion (barrel) managed to turn into positive (cushion). Moreover, it is also very noticeable: 2.97 vertically and 1.38 horizontally.
We have already said that distortion is not a terrible evil (it is relatively easy to “treat”). But for a focal length of 50 mm it is too strong for the Nikon AF-S Nikkor 24–85 mm.
| Permission | Chromatic aberrations | ||
| Center of frame | Frame edge | Center of frame | Frame edge |
 |  |  |  |
| In all screenshots: top row: f/4.2 - f/6.3 - f/8.0, bottom row: f/13 - f/20 - f/29 | |||
The resolution remains high - it drops to 0.6 lines per pixel only with an aperture of f/20. And “chromaticity” remains noticeable only at wide apertures, and then, as the aperture closes, it gradually decreases to 2 percent. In this case, the intensity (brightness) of blue aberrations in the center of the frame becomes higher than at the edge (a unique case).
And here (at “medium focus”) we encounter another problem - at the widest aperture the picture noticeably loses contrast even in the center of the frame.
FR = EGF = 85 mm
 |  |
And finally, at “long focus” we also see “cushion” and high resolution. The “pillow” is again strongly elongated vertically (Dver = 3.09) and slightly horizontally (Dhor = 1.36). And the resolution drops below 0.6 lines per pixel only at an aperture of f/22 and narrower.
| Permission | Chromatic aberrations | ||
| Center of frame | Frame edge | Center of frame | Frame edge |
 |  |  |  |
| In all screenshots: top row: f/4.5 - f/7.1 - f/11.0, bottom row: f/14 - f/22 - f/29 | |||
Chromatic aberrations are noticeable here at wide apertures at the edge of the frame. At medium and narrow apertures they become unnoticeable, both at the edge of the frame and in the center, about 2–4 percent.
And, unfortunately, the loss of contrast at the widest aperture is also noticeable here.
Stabilizer
Everything here turned out to be simple and predictable. The manufacturer promised efficiency above 4 EV stages. And in our test we got about 4.12EV.

Now you can sort out the pros and cons of the “workhorse” Nikkor 24–85 mm F/3.5–4.5. Let's start with the pros:
- The lens has a very high resolution, which will not hinder the camera's capabilities.
- We know that the lens mount will not allow moisture into the camera.
- The efficiency of the stabilizer is high - exceeds 4 EV steps.
- The lens is relatively inexpensive (relative to the cost of full-frame DSLRs for which it is designed).
And now the cons:
- The lens does not suffer from ideal “geometry”. For those who shoot in JPG, you'll often need to turn on the Automatic Distortion Control option. Those who shoot in RAW will often have to correct distortion during development.
- Chromatic aberrations at short focus are high. At medium and long “focus” they are acceptable noticeable.
- At medium and long “focus” at the maximum open aperture, the contrast of the frame drops noticeably.
- And one more minus “arrived” from a later test - video filming. In tracking mode (autofocus adjustment), the optics squeak a little and spoil the soundtrack.
So, our “workhorse” indeed has pros and cons. In general, they are balanced just opposite 20 thousand rubles. Nikkor 24–85 mm F/3.5–4.5 is a good “whale” for an entry-level full-frame DSLR.
Features Nikon D610
Autofocus
Now is the time to remember the beginning of the article - how one of the forum visitors did not like the autofocus of the Nikon D610. At the beginning of the article, we did not have any arguments to confirm or refute the opinion that autofocus is “crappy.” Now it is. Despite the imperfections of the methodology, it provides data on which you can rely. And the results of this test (accuracy in points), as a rule, directly correlate with the number of usable (focused) images that accumulate during the preparation of the Gallery.
Let's figure out how bad or good the D610's phase autofocus is. It's about the same autofocus speed as the D5500 - matching the entry-level DSLR mark. And this is understandable - everything is determined by the capabilities of the Nikon Multi-CAM 4800 module, which works in both cameras.
In terms of phase detection autofocus accuracy, our tests showed the D610 to be more accurate compared to the D5500's results. This is most easily explained by the capabilities of the Nikon AF-S Nikkor 24–85 mm F/3.5–4.5 G ED VR lens. It can also be assumed that the phase module data undergoes additional processor processing before being converted into commands for the focusing drive. Here you can guess and guess for a long time, but you still have to state that the autofocus efficiency of the D610 is at the level of cameras such as Nikon D7100 and Pentax K-3. It's not the highest class, but it doesn't suck either.
Next, we move on to contrast AF. Its accuracy is quite high, even in low light -2EV autofocus scores 250 points out of a possible 300. And the speed is in the middle between the speed of Nikon D5500 and Nikon D7200. Again, it's not top class, but it's not terrible either. Nikon D610 is an entry-level DSLR equipped with a full-frame sensor. This is its main feature. And the rest of the characteristics - yes, they correspond to the initial level or slightly exceed them.
And finally, based on the “accuracy” and “speed” (time spent) data, we determine the effectiveness of autofocus. The phase AF of the Nikon D610 was on par with the AF of the Nikon D7100 and Pentax K-3. Contrast autofocus is almost at the same level as the Nikon D7200 and Pentax K-3 AF.

Let's voice the main conclusion: the autofocus of the Nikon D610, of course, does not correspond to a professional level. It is at the “advanced DSLR” mark, and does not reach the “highly advanced DSLR” mark (like the Nikon D7200). Those who think that this level sucks - for God's sake, stick to your opinion. But a lot of people all over the world simply shoot with advanced DSLRs and do not share your position. You have to understand that you have to pay for every detail, and if the Nikon D610 was equipped with an expensive autofocus, it would cease to be a budget full-frame DSLR.
Burst speed
The Nikon D610's specifications indicate a continuous shooting speed of up to 6 frames per second. Unfortunately, we did not see such speed; The maximum in our test was the high-speed mode when shooting RAW - 5.25 fps. We always stipulate the rules of the game that filming is carried out at the highest possible quality. So if the Nikon D610 reaches a speed of more than 5.25 fps in any mode, then this is a “weakened” quality or resolution. For example, 12-bit RAW or DX frame format.
Let us remind you that Nikon DSLRs shoot in series of hundreds of frames. You can install series of less than a hundred, this will have little effect. When shooting JPG, the camera snaps a hundred frames evenly and is ready to snap a hundred more literally in a second (just release and press the start button again). When shooting RAW and RAW+JPG, we observe a fast series (before the memory buffer is filled), and then a slow series (after the memory buffer is filled). In low-speed mode (Low), the speed of a slow burst is approximately 1 fps less than the speed of a fast burst.
In high-speed mode (High), JPG shooting of maximum quality occurs at a speed close to 5 fps. When shooting RAW and RAW+JPG we see more high speed, more than 5 fps. The buffer can hold 16 frames, and after it is full, the speed drops to about 2 fps.
And one more mode that the Nikon D610 can boast of is silent shooting. Here, of course, the emphasis is on minimum volume, not maximum speed. The camera shoots RAW and RAW+JPG a little faster than JPG, but a large number of frames are placed in the buffer - more than 30. Most likely, at such a shooting speed, the buffer manages to partially become empty before it is completely filled, and therefore it can hold so many frames in a quick series.
Overall, the Nikon D610 demonstrates not outstanding, but very good burst shooting performance. And the speed is quite high, and quite a lot of frames fit into the buffer.
We measured the speed of continuous shooting with a Nikon AF-S Nikkor 24–85 mm F/3.5–4.5 G ED VR lens and a SanDisk Extreme Pro SDHC UHS-I 16 GB memory card (write speed up to 95 MB/s). The shutter speed in this test is set to 1/500 of a second.
Video
If you can still twist your nose about how autofocus works in photo mode, twisting it in video mode is useless. Autofocus works very well. From the accumulated scenes, we specifically chose one that not every camera could cope with. Here, autofocus is actively interfered with by the glass of the display cases where the shooting objects are located. However, see for yourself:
Considering that the shooting was done in an ordinary room, quite bright, opposite a window, but without additional lighting, the picture turned out very good, almost wonderful. It’s interesting to watch the autofocus work as it gets “lost” from time to time, interfered with by the glass of the display case and reflections of external objects. But the “lost” autofocus can be helped - if you half-press the shutter button, the AF switches to continuous mode and quite quickly understands the picture, cutting off false “targets”. True, when the focus is adjusted, the phonogram deteriorates a little, and the lens AF creaks. But this is not a stone towards the camera, but towards the kit lens (we have already noted this drawback).
Shooting at high sensitivity (ISO 25,600)
For high sensitivity, we do not calculate the noise level. In principle, this is possible, but there is no particular point in it. So far, we have created a universal method for assessing the noise level for the ISO range 100 - 6400. For some cameras this range is working, for others it is “almost working”. And what lies beyond is, let’s say, photographic exotica.
| Nikon D610 | Canon EOS 6D | |
| ISO 25600 RAW light |  |  |
| ISO 25600 JPG light |  |  |
| ISO 25600 RAW dark |  |  |
| ISO 25600 JPG dark |  |  |
Nikon's Exotic D610 shows us that in bright scenes you can count on real shots. There are two important points here:
- A "light scene" is essentially a short exposure. That is, a situation where we want to catch a dynamic shot in low light conditions. If the frame is not dynamic, it is better to increase the shutter speed and reduce the ISO.
- If we find ourselves in such a situation, we will have to shoot in RAW, and then “conjure” for a while to draw out the frame in a photo editor. The shots that the Nikon D610 takes at ISO 25,600 are not hopeless; they can be brought to perfection. Not every crop DSLR will provide such quality at ISO 12,800.
Results
Nikon D610 is that rare case when it is difficult to single out individual pros and cons. The biggest plus is the full-frame sensor. But this is a really, really big plus. And when you start to catch the minuses, you come across a wall: “If you take out Nikon specifications D610 to a higher level, it will no longer be an inexpensive full-frame DSLR.” It turns out that the Nikon D610 is an ideal camera for its niche. Or almost perfect. So we will merge the results into one list:
- Nikon D610 is a very good entry-level full-frame DSLR. In terms of noise and noise reduction quality, it is inferior to its closest competitor, the Canon EOS 6D, but it does have a built-in flash (not a superfluous tool that can provide a little backlight and, accordingly, go to a lower ISO level).
- Nikon D610 - no new camera. But it belongs to a class where new products rarely appear. And its characteristics are such that it is difficult for them to become outdated. Except that today video is supposed to be shot in Full HD 60p resolution. But this is a separate conversation - I’m not sure that 60 progressive scan frames are really necessary even for those who professionally shoot video. Perhaps in some special way - filming sports competitions, in general, filming something very fast.
- Many characteristics of the Nikon D610 correspond to the level of a “slightly advanced DSLR” - these are the shutter and autofocus capabilities. But we have already emphasized that Nikon sought to make an inexpensive full-frame DSLR. And this task was brilliantly solved. Nikon D610 allows you to take excellent photos and videos; it has all the advantages of a non-professional full-frame camera. And professional full-frame is a completely different price category.
Who is Nikon D610 made for? For everyone who wants to try full frame and not be disappointed. There's nothing really disappointing about this camera. On the contrary, there is a lot that can charm.
Gallery
Another topic raised on the forum concerns the selection of photographs for the Gallery. I once again apologize to the inhabitants of the forum for the fact that, with very rare exceptions, I do not enter into discussions. And I explain it simply: there is not enough time. But I carefully look through the forum messages, and if I find something practical and useful, I try to find a use for it.
As far as I remember, for Last year two wishes were expressed: to include a night landscape in the selection (in particular, a view of the night sky) and just some photographs taken on the street. Another bewilderment was expressed: why are there so many children's portraits in the gallery?
I'll try to answer briefly. For about 15 years I have been hearing different opinions about which photographs are best suited for the Gallery. This was especially heatedly discussed when paper photo journals had not yet become extinct. Now, as far as I know, only Foto&Video remains on display - but this is a unique magazine, partly because Vladimir Neskoromny and his team are doing the impossible, something like a perpetual motion machine. At what cost - I'm even afraid to guess. Full respect!
So, I've heard a lot of opinions about which test photos are the best. The general conclusion from many debates is that these are photographs showing recognizable texture (foliage, flowers, human skin, hair, fur, wood, fabrics, etc.). How better camera, the more alive the textures seem to us, the more details we see. Details we don't like can always be removed during RAW development and processing. And the most difficult texture for the camera (for photorealism) is the human face. Well, hands are also the second mirror of the soul.
That's why I prefer to put ten large portraits in the Gallery than, say, ten landscapes. Because I’m sure: portraits (the texture of human skin) will say much more about the camera’s capabilities. But, of course, there should be other shots in the set that demonstrate color quality, dynamic range, detail, and so on. If you have anything to recommend, if you have ready-made recipes, please share, preferably with examples (photos) and comments ( What exactly allows you to identify a particular image or fragment of an image). Everyone practical advice I'll use it. Thank you in advance.
| Gallery | |||
 |  |  |  |
 |  |  |  |
 |  |  |  |
 |  |  |  |
 |  |  |  |
 |  |  |  |
 |  |  |  |
As for the images presented in the Gallery, they unfortunately show that the Nikon D610 sometimes turns human skin into an orange tint. This “bug” can be corrected during development, but it is still unclear why the powerful Nikon company did not eliminate it in the bud? Nikon's "orange defect" has been known for years.
The first frame in the bottom row was taken with the Vivid setting (one of the Picture Control presets), which is why the colors are so wild. Of course, they can be muted in the Picture Control settings, but this is fine tuning of the camera to suit your tastes. In general, the Gallery is a selection of raw frames; according to the rules of the game, they cannot be processed. Although each of them can be made three times better.
We also recommend
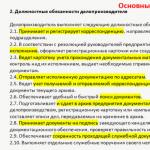 Job description of a clerk, job responsibilities of a clerk, sample job description of a clerk
 The Ministry of Finance refused the Ministry of Defense to increase the salaries of the military. How will the indexation of military salaries affect the budget?
 How to sell old clothes How to quickly sell your things
 Fleet Legend: Nuclear Submarine Lyra
 Adding an external printing form to the database
 Legislative framework of the Russian Federation