How to delete a report in 1c. Example of deleting a directory item Nomenclature
We examined in some detail the settings of reports implemented on the basis of the access control system. Now let's look at more subtle and detailed settings for report options. The window for “advanced” settings of the report option is called by the command “More” - “Other” - “Change report option”.
The window for changing the report version is divided into two parts:
1. Report structure.
2. Report settings.

The report option structure section is similar to the “Structure” tab of the standard report settings. The purpose and configuration of groupings is discussed in detail in Part 1 of the article.
The report variant structure table, in addition to the actual column with groupings, contains several additional columns:
The report option settings section gives the user ample opportunities to configure the report to suit their needs. It almost completely coincides with the standard report settings discussed in Part 1. Let’s look at all the tabs of the section and note the differences.
The settings section consists of the following tabs:
1. Parameters. Contains ACS parameters available to the user.
ACS parameter is a value used to obtain report data. This can be a condition value for selecting or checking data, as well as an auxiliary value.

The parameter table is presented in the “Parameter” - “Value” format. If necessary, you can change the parameter values. Clicking the “Custom Settings Element Properties” button opens the custom settings of the element.

In this window, you can select whether the element will be included in the user settings (that is, visible to the user when setting up a report), set the element's presentation and editing mode (quick access in the report header, normal in the report settings, and inaccessible).
Custom settings item properties also have groupable fields, margins, selections, and conditional appearance elements.
2. Custom fields. Contains fields that are generated by the user himself based on the data selected by the report.

The user can add two types of fields:
- New selection field...
- New expression field...
Selection fields allow you to calculate a value based on a given condition. The selection field editing window contains a field title and a table in which the selection, value and presentation of the field are specified. Selection is a condition, depending on which the desired value will be substituted.

For example, let's calculate an estimate of the number of sales. We will assume that if less than 10 units of a product are sold, we sold a little, and if more than 10 units, we sold a lot. To do this, we will set 2 values for the calculated field: the first will be with the selection “Number of goods Less than or equal to “10””, the second with the selection “Number of goods Greater than “10””.
Expression fields allow you to calculate a value using arbitrary algorithms. They can use the functions of the query language and the built-in 1C programming language. The expression field editing window contains two fields for expressions of detailed and summary records. Total records are groupings configured in the “Report Structure” area; they must use aggregate functions (“Sum”, “Minimum”, “Maximum”, “Quantity”).

For example, let's calculate the average discount percentage. The average discount percentage is calculated using the formula: [Sales amount without discount] - [Sales amount with discount] / [Sales amount without discount]. It is important to remember that the sales amount without a discount may be zero, so we use the SELECT operator to check. We get the following expressions:
· For detailed entries:
Choice
When [Sales amount without discount] = 0
Then 0
Otherwise [Sales amount without discount] - [Sales amount with discount] / [Sales amount without discount]
End
· For summary records:
Choice
When Amount([Sales amount without discount]) = 0
Then 0
Otherwise Sum([Sales amount without discount]) - Sum([Sales amount with discount]) / Sum([Sales amount without discount])
End
As mentioned earlier, in the expression of total records we use the aggregate function “Sum”.
3. Groupable fields. Contains fields by which the results of the report variant will be grouped. Grouped fields are configured separately for each grouping, but you can set general grouped fields for a report option if you select the “Report” root in the structure tree. You can add a field from the report result, a custom field, or select an auto field, then the system will select the fields automatically. This tab also allows you to change the order of grouped fields.

4. Fields. Contains the fields that will be output as a result of the report variant. Fields are configured separately for each grouping, but you can set common fields for a report option if you select the root “Report” in the structure tree. You can add a field from the report result, a custom field, or select an auto field, then the system will select the fields automatically. This tab also allows you to change the order of the fields.
Fields can be grouped to logically highlight any part of the report or to specify a special arrangement of columns. When adding a group, the “Location” column becomes active and allows you to select one of the location options:
- Auto - the system places fields automatically;
- Horizontal - fields are positioned horizontally;
- Vertical - fields are arranged vertically;
- In a separate column - fields are located in different columns;
- Together - the fields are located in one column.

5. Selection. Contains selections used in the report variant. Setting up selections was discussed in detail in part 1 of this article. Filters are configured separately for each grouping, but you can set general filters for a report option if you select the root “Report” in the structure tree.

6. Sorting. Contains the sort fields used in the report variant. Setting up sort fields was discussed in detail in Part 1 of this article. Sorting is configured separately for each grouping, but you can set general sorting fields for a report option if you select the root “Report” in the structure tree.

7. Conditional registration. Contains conditional design elements used in the report variant. Setting up conditional appearance was discussed in detail in Part 1 of this article. Conditional appearance is configured separately for each grouping, but you can set general elements of conditional appearance for a report option if you select the root “Report” in the structure tree.

8. Additional settings. Contains additional report design settings. Allows you to select the general appearance of the report, the location of fields, groupings, details, resources, totals, set chart settings, control the display of the title, parameters and selection, determine the position of resources and fix the header and grouping columns of the report version.

In conclusion, I would like to note that report settings can not only be saved as a report option, but also uploaded to a file (menu “More” - “Save settings”). To download, you must select “Load settings” and select the saved file. Thus, we can transfer report variant settings between different databases that have the same configuration.

Based on this, we can summarize that the user can not only independently customize the report to suit his needs, but also save his settings and use them in the future if necessary.
In the 1C program, almost no object can be physically deleted immediately. This feature can be configured in roles (the “delete” and “interactive deletion” rights). Typically, the developer does not allow such actions to be performed in order to avoid disastrous consequences in the future.
Marking for deletion means that the object is no longer relevant for the user. When a mark is placed on a document, its posting is automatically cancelled.
Example of deleting a directory item Nomenclature
In our example, we will delete an element, but the process of deleting a document or any other object is no different from the instructions given.
Let's set a checkbox for deletion directly from the list form of this directory. To do this, select the position we need and press the Del key on the keyboard (or use the context menu).
The program will ask us a question about the need (or removal) of the deletion mark. Let's answer “Yes”.

After this, a sign will appear next to the selected directory element. We remind you that if a configuration object has delete or interactive delete rights, then using the Shift+Del combination you can immediately delete it physically.
Now we can proceed to directly deleting our directory object. If you do not have access to this functionality, it means that you do not have the appropriate rights to it.
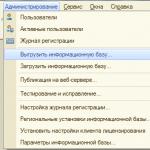
Select the “Delete marked objects” item in the “Administration” menu.
This functionality is also available in the “All functions” menu.

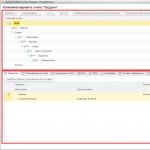
In the window that opens, the program will ask you to choose whether you want to delete all objects marked for deletion or only some. In our example, we will only delete the item “Edged board 50*250*300”.


For some time, the system will calculate whether other infobase objects reference our board. As a result, the program gave us a notification that deletion was impossible.


In order for our item to be deleted, we need to mark all objects in the table on the right for deletion. Another option is to replace our object with another everywhere.
You shouldn't have any problems marking related objects for deletion, so we'll choose a replacement.
Click on the "Replace..." button.

Let's select the item that will be replaced in all related objects. After this, you will again be presented with a window to delete again. This time everything went well, as the program notified us about.
Automatic deletion of marked objects according to schedule
In newer versions of the 1C program (starting from 8.3), the developers have added a very convenient ability to automatically delete marked objects on a schedule. Let's look at how to make this setting.

In the form that opens, go to the “Routine Operations” section and check the box “Automatically delete marked objects on a schedule.” After this, the “Set up schedule” hyperlink will become active for you. Follow it.

A standard form for setting up a schedule will open in front of you. If necessary, you can change the default values, but so that the start time of this routine operation does not coincide with the working hours of your organization’s employees.
Every accountant regularly faces the need to remove erroneously entered documents, directory data and accounting records from accounting. Deleting marked objects in 1C 8.3 is possible if their data is not used in another document. Next, we will talk about how to delete marked documents in 1C 8.3 in five steps.
Read in the article:
If you want to exclude, for example, an invoice from accounting, make sure that its data is not included in the reconciliation report. The same rule applies to any other documents and reference books. For example, if you want to exclude an item from the Nomenclature directory, then make sure that this item is not used somewhere else, for example, in an invoice. Removal in 1C 8.3 is carried out in five steps.
First, we note that deleting marked objects in 1C 8.3 takes place in two stages:
- You need to mark the document or transaction that you plan to delete
- You need to delete all marked objects
Step 1: Mark the item for deletion
Click on the document you want to exclude from accounting. It will be marked in yellow. Right-click and in the window that opens, select the “Mark for deletion” command. Next, move on to the second step.
Step 2: Open the Delete Marked Objects window
Go to the “Administration” section (1) and click on the “Delete marked objects” link (2).

Step 3: Select a mode
Deleting marked objects in 1C 8.3 can be carried out in two modes:
- automatic deletion of all marked objects;
- selective deletion of objects.
In automatic mode, the program will process all marked objects and delete those that are not associated with other documents. Selective deletion will allow you to delete objects of your choice from the list. The list will be generated by the program.
To automatically delete, select “Automatically delete all marked objects” (3) and click on the “Delete” button (4). All objects marked for deletion will be excluded, but on the condition that their data is not used by the program in other places:

To selectively delete, select “Selectively delete objects” (5) and click the “Next” button (6):

Step 4: Select items to delete
If you use the selective deletion mode, then after clicking the “Next” button (6), a list of all documents that you have marked for deletion will open, it looks like this:

Use the checkboxes (7) to mark everything you want to delete. After that, click the “Delete” button (8):

If some documents are not deleted, proceed to the next step.
Step 5. What to do if not all documents have been deleted
An object cannot be deleted if the data from it is used by the program somewhere else. In this case, the program will show a list of undeleted objects. For example, if you try to delete property (9) that is on the invoice (10), you will see the following window:

In the left half of the window you see a list of undeleted objects (9), on the right is a list of documents that contain their data (10). They are the ones that prevent an object from being excluded from the program, so they also need to be marked for deletion. In our case, to delete the item “Battery...” (9), you must mark the invoice “Receipt 3 dated June 25, 2018” for deletion. (10), and then repeat the procedure, starting from step 2.
After you have made changes to your accounting, check any reports that may have been affected by them. If, as a result, accounting or tax records have changed, you may need to provide the tax inspectorate with updated declarations or calculations. If an accounting adjustment has led to an increase in the amount of taxes payable to the budget, then first pay the difference in taxes and penalties, and then submit updated declarations.
The 1C 8.3 program does not allow you to delete directories and documents in the database immediately, without additional checks. This is done in order to avoid possible errors. For example, if you want to delete an item that is included in a document, you cannot do this.
Let's look at how to delete documents and directories marked for deletion in 1C 8.3. Removal in 1C 8.2 is slightly different, but has a similar algorithm.
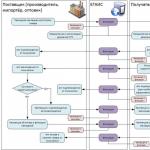
Deleting objects in 1C occurs in two stages:
- Mark for deletion— setting a sign that a document or directory is planned to be deleted. This element is no different from others; it can also be selected in other objects.
- Direct removal— a special procedure during which the system controls whether there are links to a given object in the database. After reference control, 1C makes a decision: whether the object marked for deletion can be deleted or not.
Let's look at these two steps. The instructions are absolutely universal and are suitable for all configurations on 1C 8.3 - Accounting, ZUP, Trade Management, ERP, Small Firm Management and so on.
Setting a mark for deletion in 1C is very simple. Simply select the document or reference book you are interested in from the list and press the “delete” button:
After which you need to confirm your intention. You can now see a special note in the log:

This means that the next time you delete objects through special processing, the system will offer to delete this item of the nomenclature.
How to delete objects marked for deletion in 1C 8.3
The second stage is directly deleting what is already marked in the 1C database. This is done using a special service processing “Deleting marked objects”. It is located on the “Administration” tab:
Get 267 video lessons on 1C for free:

When opening, 1C will give us two options to choose from - automatic deletion of all objects and selective deletion:

Selective can be useful to remove a specific object. For example, select “Automatic mode” and click “Delete”. The deletion of all objects marked for deletion in the system will begin. At the end of the work, the system will display conflict situations—objects that are marked for deletion but are included in accounting:

Here you need to make a choice. For example, we marked “Board 4000x200x20” for deletion, but it is included in the “Operation” and ““ documents. If we don’t need these documents either, we simply mark them for deletion and click on the “Repeat deletion” button. If documents are needed, it is worth thinking about whether this item should not be marked for deletion.
In our example, I decided that I didn’t need these documents in the database either, so I checked them. As a result, the system deleted both the interfering item and the unnecessary document:

That's all, now you know how to delete documents and directories from 1C 8.3.
Automatic deletion of directories and documents
We also recommend
 III All-Russian competition of children's art works “Colors of Autumn” Procedure for the Competition
 Lesson on "family needs"
 What is the name of the fairy tale the fox deceived the wolf
 Example of deleting a directory item Nomenclature
 Is it worth switching to the new edition?
 Federal Service for Regulation of the Alcohol Market Who is required to connect to egais